
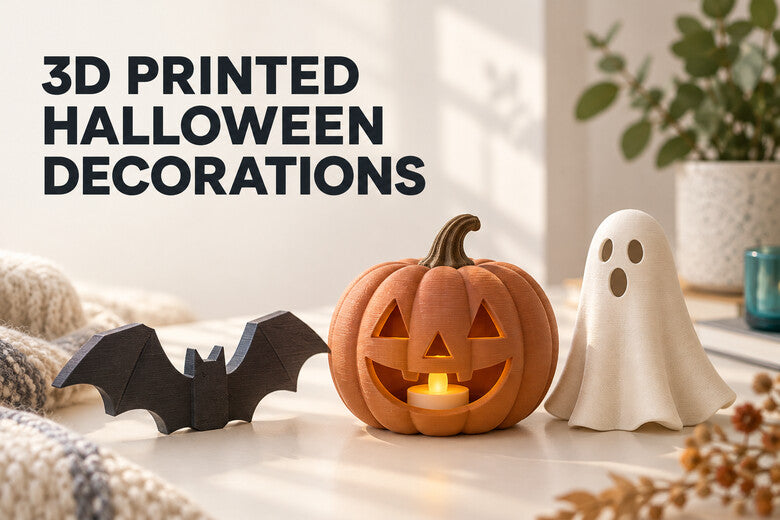
Halloween is a good excuse to make something useful with your 3D printer: a glowing pumpkin for a shelf, a row of bats for a window, or a sign made just for your door. These projects can be small, quick to customize, and easy to reuse next year.
Here are eight approachable ideas, followed by a simple workflow for choosing a model, planning colors, and checking the print. Most work with a single-color printer; a multicolor setup makes contrasting details easier to integrate into one piece.
Before you print: choose the right project
Start with where the decoration will go and how people will use it. A flat window ornament needs a hanging hole. A lantern needs access to its light. A door sign needs a secure mounting point. These small choices matter more than adding intricate details that disappear at normal viewing distance.
- Indoor or outdoor? PLA is convenient for indoor decorations. For prolonged outdoor exposure, check the specific filament maker's weather and UV guidance; PETG or ASA may be more suitable depending on the conditions and printer.
- One color or several? Two or three purposeful colors often give a stronger result than many tiny accents. Black, warm white, and muted orange are easy to read together.
- How will it be stored? Flat pieces stack neatly. Large hollow pieces may be easier to store if the base can be removed.
- Who will handle it? Smooth or round sharp corners, avoid fragile points, and keep small detachable pieces away from young children.
1. A pumpkin lantern with an LED light
A hollow jack-o'-lantern is a satisfying first project because the face does much of the visual work. Choose a model with a stable base and an opening large enough to insert and remove a battery-powered LED tealight. Print a small version first to confirm that the light fits and the eyes and mouth remain open after slicing.
Orange for the shell and a darker stem create a clear contrast. A separate stem or base can be printed in another color and assembled later; a multicolor system can also put colors on one print where the geometry allows. Use LED lighting only. Never place a real candle, flame, or hot bulb inside a plastic print, and follow the light manufacturer's battery guidance.

2. Flat bats and ghosts for a window
Flat ornaments are fast to print and use little material. Make several sizes of bats, ghosts, or moons, then hang them at different heights. A larger hanging hole and a slightly rounded edge can make the pieces easier to thread and less likely to chip during storage.
Lay flat shapes on the build plate to avoid unnecessary supports. If you want two colors on a single ghost or bat, use broad eyes, wings, or outlines rather than tiny marks. Check the preview to make sure each colored feature creates a printable path. Secure the hanging line appropriately and keep it clear of moving windows, heaters, and young children.

3. A personalized "Trick or Treat" door sign
A door sign can be reused year after year. Use a dark background and raised light letters so the words can be read from several steps away. Add one accent color around the edge or in a small pumpkin icon. Keep the text large and leave enough room around screw holes or a hanging slot.
Before printing, view the sign at its intended size and check the spelling. In the slicer, zoom in on the thinnest strokes of each letter. If a stroke disappears, enlarge the text or choose a bolder font. For an outdoor door, choose a material and mounting method suitable for the local weather.

4. A bowl for wrapped treats
A pumpkin, cauldron, or skull-shaped bowl can hold individually wrapped sweets on a party table. Give it a wide base so it does not tip when someone reaches inside. Check that the rim is comfortable to touch and that the bottom has enough solid layers to close cleanly.
FDM layer lines and a filament label do not make a finished print automatically suitable for direct food contact. Use it for wrapped treats only, or place a suitable removable food-safe liner inside. Avoid hot food and dishwashers unless the complete material and finish have been specifically assessed for that use.
5. A small haunted-house scene
Make a tabletop scene from a simple house facade, a fence, and a few trees or gravestones. Print the main shapes in separate pieces so you can rearrange them next year. A dark house with pale windows and a muted orange door gives the scene a focal point without requiring every surface to change color.
Put the widest, most stable side of each piece on the plate. For narrow trees or fences, check first-layer contact and add a brim only where needed. Avoid overly thin free-standing details that may snap when the scene is packed away.
6. Costume badges and clip-on accessories
A name badge, witch-hat emblem, or small bat pin can finish a costume without printing a large wearable prop. Print a flat shape with rounded edges and use an appropriate fastening method. A contrasting symbol is easier to spot in dim party lighting.
Test the attachment before wearing it. A sharp clip, loose pin, or brittle piece can be uncomfortable. Do not design a printed part as protective equipment, and avoid attachments that could interfere with visibility or movement.
7. Party place cards and reusable labels
Print a set of little pumpkins or ghosts with each guest's name, or make labels for wrapped treat bags. Use a common base shape and change only the name. This keeps the table visually consistent and makes it easy to print replacements.
Raised text should be wide enough for your nozzle and easy to read at the table. If you expect to reuse the decorations, make a neutral holder with a removable name insert instead of printing a completely new piece every year.
8. A simple color-changing display set
Take one small pumpkin, ghost, or bat design and print a series with different palettes: traditional black and orange, softer cream and terracotta, or colors chosen to match your room. Keep the model and print settings the same so you can compare what color alone changes.
This is also a good test for multicolor printing. Start with a two-color sample, then add a third color only if it helps define a face, outline, or letter. The aim is a coherent set that looks good from normal viewing distance.
From downloaded model to finished decoration
- Check the model and its license. Make sure the file is complete and that its creator permits your intended use, especially if you plan to sell prints.
- Scale and orient it. Confirm real-world dimensions, first-layer contact, hanging holes, and access openings. Recheck wall thickness after resizing.
- Pick a tested material profile. Match your printer, nozzle, and filament. For outdoor use, consult the exact filament's guidance.
- Plan color areas. Separate model parts or paint broad regions in the slicer. Place colors where they will be visible in the final display.
- Inspect the sliced preview. Look for missing letters, closed eye holes, unsupported ledges, excessive color switches, and any purge or priming structures your machine requires.
- Print a small sample. Test the lantern opening, sign lettering, or ornament hanging hole before running a whole set.
- Finish and store it. Remove supports carefully, smooth sharp edges, test the mounting, and pack thin pieces flat after the season.
Where the Sovol M1D fits
For a one-color bat, almost any suitable FDM printer can do the job. The Sovol M1D, currently listed for pre-order, becomes relevant when a design uses several colors on one piece: pale lettering on a dark sign, a pumpkin face with contrasting details, or a whole set of personalized decorations.
Its DualX™ system combines one fixed toolhead with six automatically changed toolheads, for up to seven colors or materials in a job. Separate melt paths can reduce the flushing required by a shared-nozzle color change. "Near-zero purge waste" describes that reduction; it does not mean that a job can never use priming, wiping, or test material. A tasteful two- or three-color design is often enough to make the capability useful.
Check the current product page for configurations and availability, and verify that any materials used together suit the same bed and surrounding conditions.
Common mistakes to avoid
- Using a real candle in a printed lantern: use a battery LED instead.
- Making letters too small: inspect the actual sliced paths, not only the smooth model preview.
- Forgetting mounting and access: plan holes, clips, and removable parts before printing.
- Assuming every filament is outdoor-ready: check the specific formulation and exposure conditions.
- Adding colors without a purpose: more switches may add time and material without improving the design.
- Putting unwrapped food directly in a printed bowl: use wrapped treats or a suitable liner.
Frequently asked questions
What is the easiest Halloween decoration to 3D print?
A flat bat or ghost ornament is a good starting point. It uses little material, can sit flat on the build plate, and is easy to scale. Check its hanging hole before printing a batch.
Can I make a glowing pumpkin with PLA?
Yes, for a suitable indoor decoration using a low-power battery LED. Keep flames and hot lamps away from the plastic, and make sure the light can be removed and switched off.
Do I need a multicolor printer?
No. You can print parts in separate colors and assemble them, or paint a finished piece. A multicolor system is convenient when contrasting details should be integrated into one print.
Which material should I use outdoors?
It depends on sun, rain, temperature, and the specific filament. Check the manufacturer's data for the exact material; PETG or ASA may be preferable to ordinary PLA for some outdoor uses, with appropriate printer settings and ventilation for the chosen filament.
How do I avoid wasting filament on decorations?
Start small, orient flat parts efficiently, inspect support and color-switch counts, and test critical details before a full batch. Save your successful profile for reprints next season.
Conclusion
Start with the place where your decoration will be used. A pumpkin needs safe LED access; a hanging bat needs a reliable hole; a sign needs readable letters and a secure mount. Those practical details turn a quick seasonal print into something you will want to reuse.
Once the basic design works, add color where it helps: a brighter pumpkin face, clearer sign text, or a coordinated set for the whole room. A small sample and careful slicer preview will save more time than printing a complex display at the first attempt.
