




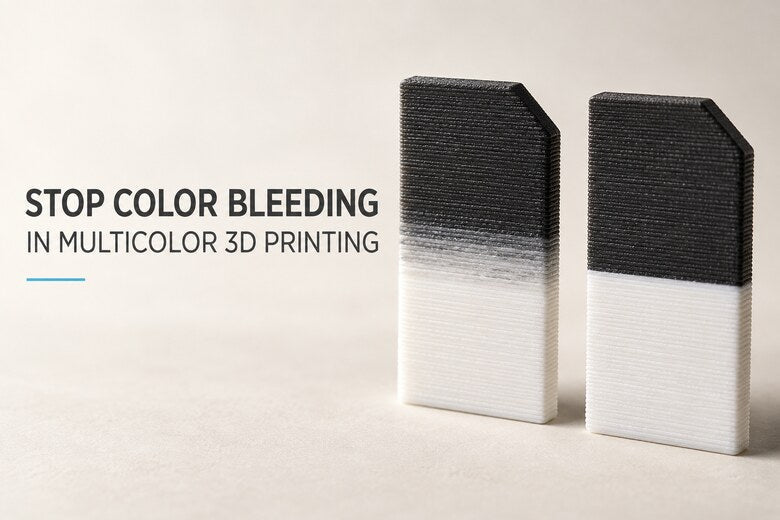
A white logo turns gray after a switch from black filament. A red dot leaves a pink halo, even though the colors looked separate in the slicer. This is color bleeding or color contamination in multicolor 3D printing: the new color carries traces of the previous one, or a stray deposit makes a clean boundary look dirty.
Before increasing every purge setting, find out where the unwanted color appears. A fading gray band inside the new color calls for a different fix from a black speck stuck to its surface. This guide walks through a small test that helps you clean up the transition without wasting filament on every swap.
What color bleeding looks like
After a filament change in a shared-nozzle system, some old plastic remains in the melt zone. As the new filament pushes it out, the extruded color changes gradually. Dark-to-light switches can make even a small remnant obvious. The amount needed for a clean switch varies by filament, pigment, hotend and the direction of the change.
But not every dark mark comes from plastic mixed inside the nozzle. A tiny blob on one edge may be material on the outside of the nozzle. A dark pattern visible beneath a very thin white wall may be show-through, even when the white extrusion itself is clean.

Find the source before changing settings
- A gradual tint in the first new-color lines: on a shared nozzle, check the purge or flushing amount for that exact old-to-new color pair.
- Isolated dark dots or a smear at the boundary: inspect external nozzle residue, wiping and oozing during the move back to the model.
- A repeating dark pattern through a pale wall: check whether purge-to-infill is enabled and whether the visible wall is thick enough to hide dark material behind it.
- Fine hairlike strands between separate areas: this is stringing. Check filament condition, temperature and travel behavior as well as the color transition.
- Every line of the “new” color is wrong: verify spool assignment and color painting in the sliced layer preview. A larger purge will not fix an incorrect tool assignment.
If the print uses separate hotends, such as a tool changer or IDEX setup, the old color does not remain in a shared melt zone. Start with nozzle-tip residue, parked-tool ooze, wiping and the first priming lines instead. A separate hotend can still leave an external mark.
Why dark-to-light changes deserve their own test
The slicer may let you set a separate flushing volume for each direction. That matters because black-to-white is not necessarily as forgiving as white-to-black. It also means the same white spool can behave differently after red, blue or black filament.
Keep the printer's tested profile as your starting point. If the black → white transition is gray, adjust only that direction and test again. Do not assume the reverse direction needs the same value, or that one number will suit every pigment and material.

Test purge volume without printing the whole model
- Choose the problem pair. Use the same two spools, printer, nozzle and profile as the real project. A black-to-white switch is a useful stress test when that is the failing transition.
- Make a small, repeatable sample. A short two-color coupon with a clearly visible white section is easier to inspect than an entire figure. Keep its walls and color-change direction relevant to the finished model.
- Slice and inspect. Verify the assigned colors, switch order, purge or wipe structure, and whether the slicer diverts transition material into infill or another object.
- Print the baseline. Label it with the profile or purge setting. Look at the first few lines of the new color and the tower or other purge destination.
- Change one direction at a time. If the new white remains gray, increase the black-to-white flush amount in a modest step available in your slicer. Repeat the same sample until the visible transition is clean.
- Stop at the first reliable clean result. Run one more sample or a small crop of the real model. Excess purge adds material, time and tower height without improving an already clean color.
The slicer may express the setting as a volume, a multiplier or a material-specific transition matrix. Follow the labels in your software and check its preview after each edit; there is no universal milliliter value for all printers.

Use purge-to-infill with care
Some slicers can send transition material into a model's infill or a separate sacrificial object. This can reduce material deposited in a tower, but the transition color still exists. If a dark purge goes into a thin white part, the dark infill may show through the wall or appear at gaps in the surface.
For a pale display surface, inspect the preview for purge-to-infill and test a thicker opaque wall if the design allows it. A hidden test object may be useful when its appearance does not matter. Do not blindly remove the purge tower: it may also prime the nozzle and stabilize flow before printing visible details.
Clean up surface marks and oozing
If the new-color extrusion is clean on the tower but the model has a dark dot, purge volume is probably not the first setting to change. Check whether the previous color is stuck to the outside of the nozzle, whether the parked hotend oozes, and whether the printer's wipe or prime sequence is working as intended.
With the machine safely stopped and cool enough for the maintenance procedure, inspect the nozzle exterior and follow its cleaning instructions. For a separate-hotend machine, check the parked tool, its temperature behavior and any wiping or priming routine. Observe the first few transitions on a short test print before starting a long job.
Check the filament and the design
Moisture, inappropriate temperature and unstable extrusion can cause strings or blobs that carry color across a boundary. Dry filament only according to its maker's instructions, then start from a proven material profile. If a nozzle is partially clogged or the feed path slips, fix that first; increasing purge cannot compensate for inconsistent flow.
Design choices matter too. A tiny white eye surrounded by black requires a very crisp transition and may trigger many switches. A larger light-colored area, a thicker light outer wall, or a different tool assignment can be more forgiving. Review the sliced layer order rather than judging only the colored model view.
For a broader comparison of shared-nozzle systems, tool changers and IDEX, see our multicolor 3D printing systems guide. Separate hotends reduce internal mixing, but visible surfaces still benefit from a good wipe and prime routine.
A quick troubleshooting sequence
- Find the first layer and the exact color switch where the mark begins.
- Compare the model with the purge tower or test coupon: is the new extrusion tinted there too?
- If yes, test the old-to-new flushing direction on a small coupon.
- If no, inspect nozzle exterior, parked-tool ooze, wiping and priming.
- If the color appears beneath a clean pale wall, inspect purge-to-infill and wall thickness.
- Repeat the same test after changing just one cause; only then scale up to the full model.
Common mistakes
- Using one flush value for every pair: pigments and switch directions can behave differently.
- Increasing every purge setting at once: this obscures the real cause and adds avoidable waste.
- Sending dark transition material into thin white walls: apparent “bleed” may be show-through.
- Assuming separate hotends cannot mark a model: residue on the outside of a nozzle can still transfer.
- Removing the tower without checking priming: the first new-color line may be pale, missing or uneven.
- Skipping the sliced preview: an incorrectly assigned color can resemble contamination.
FAQ
Why does black bleed into white more visibly than white into black?
A small amount of dark pigment is easy to see in a pale extrusion. The reverse switch can look clean sooner even if some old material remains. Test each direction rather than applying the same setting automatically.
Will a larger purge tower always fix color bleeding?
No. It helps when the shared nozzle still contains the previous color and the actual purge amount is too small. It will not fix a dirty nozzle exterior, dark infill visible through a thin wall, or incorrect color assignment.
Can a tool changer have color contamination?
Independent hotends avoid mixing two colors inside one shared melt zone. They can still ooze while parked, leave residue on the outside of a nozzle, or produce an uneven first line if not primed properly.
Does increasing the number of walls help?
It may hide dark infill behind a light surface, but it does not remove old pigment from a shared nozzle. Check whether you are seeing actual mixed extrusion or show-through first.
Should I set flushing volume to zero to save filament?
Only if a tested machine-and-project workflow supports it. A shared nozzle normally needs to clear previous material, while a separate-hotend setup may still require wiping or a small prime. Verify visible quality with a short test.
Conclusion
Clean multicolor prints start with the right diagnosis. A fading tint after a shared-nozzle swap suggests insufficient purge for that particular direction. A surface speck points toward external residue or ooze. A dark shape behind white plastic may simply be visible through a thin wall.
Print a small repeatable sample, inspect the sliced path and adjust only the setting tied to the observed defect. You can then keep sharp color boundaries without paying for unnecessary purge on every transition.
