


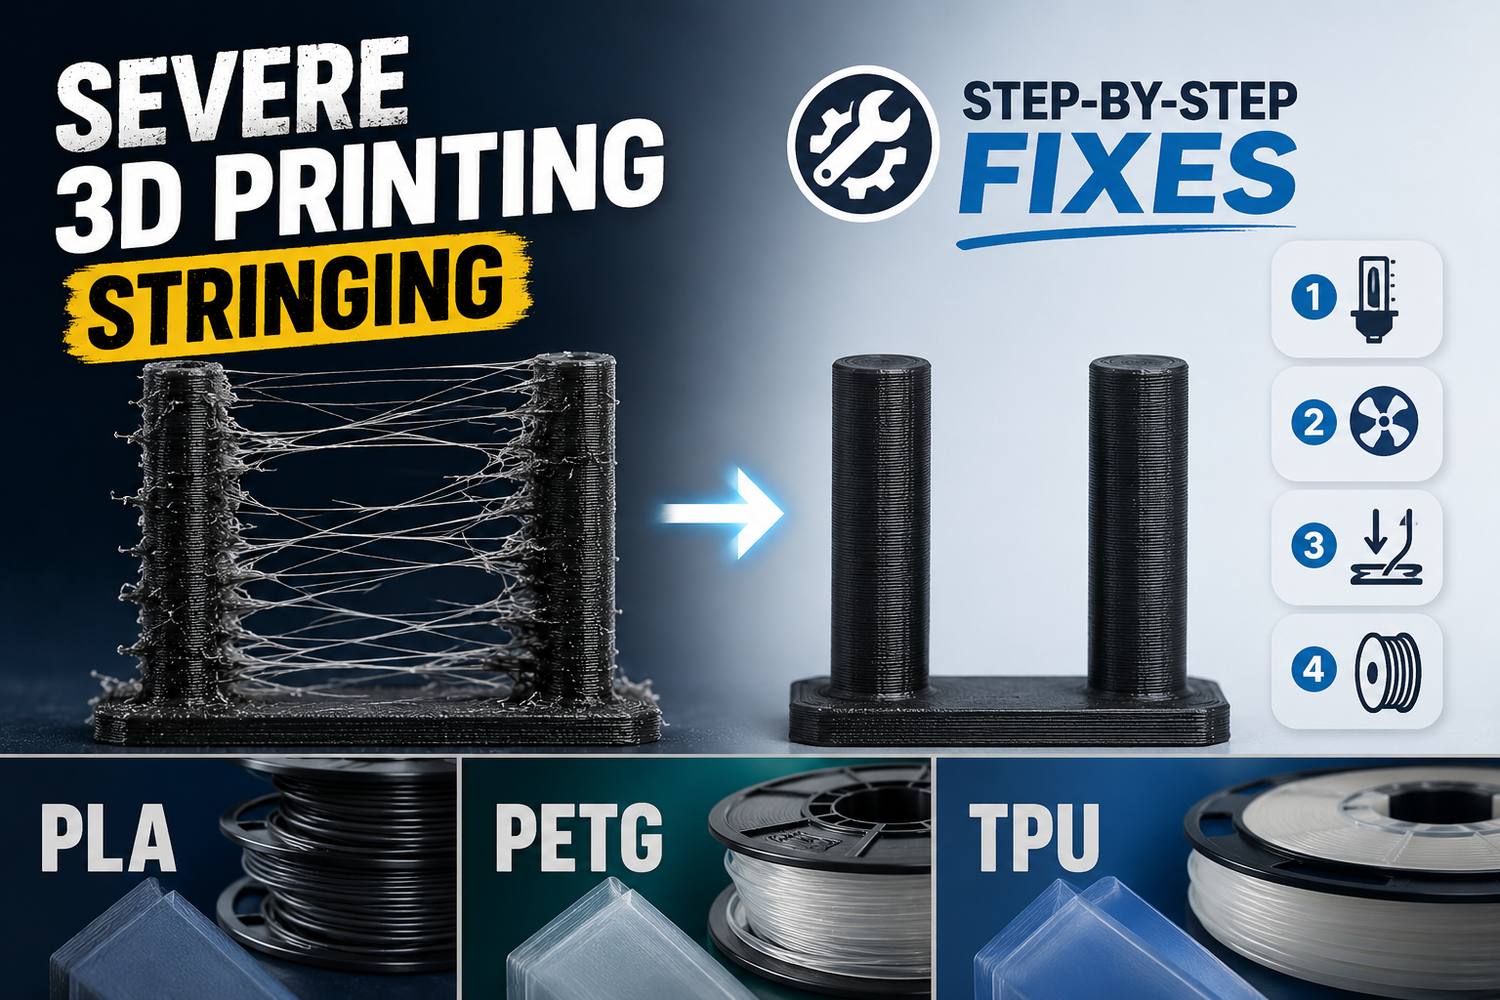
If you’re getting the kind of stringing that looks like spiderwebs across every gap (or worse, thick strings with blobs), you don’t need another list of random settings to try. You need a workflow that tells you what to change next.
This guide is for severe 3D printing stringing at the “I already tried the basics” stage. It’s slicer-agnostic, and it’s built around controlled tests, not guessing.
If you want a quicker 3D printing stringing fix for day-to-day prints, run Steps 2–5 in order and stop as soon as you see a clear improvement.
Key takeaways
- Severe stringing almost always comes down to four buckets: temperature, retraction, moisture (including dry filament stringing issues), or travel/pathing.
- Change one variable at a time, in a fixed order. You’ll get to the root cause faster and avoid new problems.
- PETG and TPU are more likely to string even when everything is “fine,” so your goal is often “clean enough” plus easy post-cleanup.
- If drying the filament makes a big difference with no other changes, you just found your biggest lever.
Before you tune: classify what you’re seeing
Stringing isn’t one failure mode. The fastest wins come from classifying the symptom first.
Wispy hairs (spiderwebs)
You’ll usually see fine hairs across open gaps or inside cavities.
Most likely causes:
- a little too hot
- small amount of ooze during long travel moves
- mild moisture (especially PETG/TPU)
Thick strings with blobs
You’ll see thicker “threads” and sometimes a blob where the nozzle left or re-entered.
Most likely causes:
- too hot by a lot
- retraction disabled or way off
- pressure not being relieved at the end of lines
Pro Tip: If the blob is created right as a travel move starts, coasting-style pressure relief can help. If it’s created right before the nozzle lands, wipe-style behavior can help. This “blob location” heuristic comes up often in real-world troubleshooting discussions (for example, Prusa forum users describe it as a way to choose between wipe vs. coast behavior).
Step-by-step diagnostic workflow for severe 3D printing stringing
Run this workflow in order. Don’t jump around.
Step 1: lock a baseline and a test model
Input: one filament, one slicer profile, one small stringing test model.
Action:
- Pick one spool. Don’t switch materials mid-diagnosis.
- Use a known-good profile (your printer preset is fine).
- Print a simple stringing test (two towers or a retraction tower). Use the same model for every step.
Expected result: you have a repeatable “before/after” benchmark.
Done when: you can reproduce the same kind of stringing twice in a row.
Warning: If you change three settings at once, you’ll “fix” stringing and accidentally create a jam, weak layer bonding, or ugly corners. Then you’re troubleshooting a new problem you created.
Step 2: do a temperature sweep first
Multiple sources point out that stringing often comes from printing too hot, and recommend reducing nozzle temperature in small increments (see Prusa Research’s “Stringing and oozing” guide and Simplify3D’s “Stringing or Oozing” troubleshooting page).
Input: your current nozzle temperature.
Action:
- Reduce nozzle temperature by 5°C.
- Reprint the same test.
- Repeat until either:
- stringing improves clearly, or
- you start seeing under-extrusion or weak layer bonding.
Expected result: you find the lowest temperature that still prints cleanly.
Done when: stringing drops materially without introducing obvious under-extrusion.
If you want to go faster, print a temperature tower. Just be consistent about judging results.
Step 3: tune retraction like a controlled experiment
Retraction is the most direct “stop oozing during travel” lever, but it’s also easy to overdo. Both Prusa and Simplify3D highlight retraction as a primary control for stringing/oozing, with the caution that too much retraction can cause problems (skipped steps or clogs). In practice, most stubborn cases come down to retraction settings for stringing plus temperature and travel behavior.
Step 3a: retraction distance
Input: your current retraction distance.
Action:
- Increase retraction distance in small steps.
- A practical rule: +0.2–0.5 mm per test on direct drive, +0.5–1.0 mm per test on Bowden.
- Reprint the same test each time.
Expected result: fewer strings between towers.
Done when: strings reduce, but you don’t see new issues like:
- under-extrusion right after travel
- clicking/grinding
- jams (especially on TPU)
Step 3b: retraction speed
Input: your current retraction speed.
Action:
- If distance helped but didn’t solve it, adjust speed next.
- Move in small steps (5–10 mm/s per test is usually plenty).
Expected result: cleaner travel transitions.
Done when: you get improvement without filament grinding or inconsistent extrusion.
Step 3c: minimum travel + retract-on-layer-change
If your printer is doing tons of tiny retracts, you can make stringing worse and wear the filament.
Action:
- Increase “minimum travel before retraction” slightly if you’re retracting on tiny moves.
- Enable “retract on layer change” if it’s off.
Prusa’s documentation explicitly calls out minimum travel and “avoid crossing” behaviors as stringing-related controls in PrusaSlicer.
Step 4: run the moisture A/B test (don’t guess)
Moisture is a common reason stringing persists even when retraction and temperature are reasonable. Prusa Research’s drying filament guide is a solid baseline for storage and drying habits.
Input: the same spool you’ve been using.
Action:
- Dry the spool.
- Without changing any slicer settings, reprint the same test.
Expected result: if moisture is a major contributor, stringing drops sharply (and surfaces often look cleaner).
Done when: you can say, with confidence, “drying changed it” or “drying didn’t change it much.”
If you need a practical storage routine, this internal guide is a decent starting point:
Step 5: fix travel moves (pathing and speed)
Once temperature, retraction, and moisture are not the primary problem, the remaining strings often come from travel paths crossing open air too often, or traveling too slowly.
Simplify3D’s troubleshooting guide explicitly points to travel movement and “avoid crossing outline” as a way to minimize ooze dragged across gaps. PrusaSlicer similarly offers “avoid crossing perimeters.”
Input: your current travel speed and travel behavior settings.
Action:
- Increase travel speed (within what your machine can handle without losing steps).
- Enable travel-path features:
- “avoid crossing perimeters/outline”
- “combing” style options (keep travel inside the model when possible)
Expected result: fewer strings across open spaces, especially on models with many islands.
Done when: strings are mostly reduced to small hairs that are easy to remove.
Step 6: check extrusion consistency and hotend hardware
If stringing is still severe after the steps above, stop blaming slicer settings and check the hardware.
Action:
- Clean the nozzle exterior and remove burnt buildup.
- If you suspect partial clogs, do a cold pull.
- Check for hotend leaks (molten plastic seeping above the nozzle threads can create random strings).
- Confirm the PTFE/Bowden tube is seated correctly (if applicable).
For a practical overview of nozzle wear and maintenance, this internal guide is relevant:
Done when: extrusion is smooth and repeatable, and stringing is responsive to tuning again.
Material-specific shortcuts (PLA, PETG, TPU)
These aren’t magic profiles. They’re “what to try first” based on how each material tends to behave.
PLA
If PLA is stringing badly, it’s often simply too hot.
Try first:
- run Step 2 (temperature sweep) aggressively within the filament’s recommended range
- then Step 3 (retraction distance)
If you still see wispy hairs, Step 5 (avoid crossing perimeters + faster travel) often cleans up the rest.
PETG
PETG is famous for stringing. The goal is controlled ooze, not perfection.
Try first:
- dry the spool (Step 4)
- find the lowest stable temperature (Step 2)
- tune retraction, but don’t chase huge values
If you haven’t gone through the basics recently, this internal guide is a useful refresher:
TPU
TPU stringing is often a combination of ooze plus the filament being easy to deform in the extruder.
Try first:
- keep retraction modest (too much can create feed problems)
- slow down retraction speed if you see grinding or inconsistent extrusion
- dry the filament if you hear popping or the surface looks rough
If you’re struggling with TPU generally, Sovol has a broader material difficulty article (not TPU-only, but still relevant):
Slicer setting translation (so you can find the right knobs)
Different slicers use different labels. The underlying behaviors are the same.
|
What you want |
Common setting names |
Why it helps |
|---|---|---|
|
Pull pressure back before travel |
Retraction distance/length |
Less molten plastic at the nozzle tip |
|
Retract faster or slower |
Retraction speed |
Balances ooze control vs grinding/jams |
|
Avoid retracting on tiny moves |
Minimum travel before retraction |
Fewer pointless retract cycles |
|
Clean nozzle before travel |
Wipe while retracting / Wipe |
Reduces blobs and drag |
|
Reduce strings across gaps |
Avoid crossing perimeters/outline |
Shorter travel over open air |
|
Hide travel inside the model |
Combing (Cura-like) |
Keeps any ooze inside walls/infill |
For PrusaSlicer-specific guidance, Prusa Research’s official “Stringing and oozing” article is the most direct reference for these options.
For a slicer-agnostic troubleshooting flow that also highlights travel behavior, Simplify3D’s “Stringing or Oozing” page is also worth reading.
FAQ
What’s the fastest way to reduce severe stringing?
Start with temperature and retraction, in that order. Reduce nozzle temperature in small steps, then tune retraction distance and speed. Both Prusa Research and Simplify3D describe this core sequence in their stringing/oozing troubleshooting guidance.
I dried the filament and it still strings. Now what?
That’s normal. Drying removes one variable. Go back to travel pathing and retraction validation:
- increase travel speed
- enable avoid-crossing behavior
- check that retraction isn’t so high that it causes inconsistent extrusion
Why does PETG string more than PLA?
PETG tends to stay “sticky” and ooze more during travel moves. Even with good settings, you may see fine hairs. Your best wins are usually drying, the lowest stable temp, and travel-path control.
Why did raising retraction make things worse?
Too much retraction can pull hot, soft filament into a hotter zone (or simply overwork the feed path), leading to inconsistent extrusion or jams. Increase gradually, and stop when you see new problems.
Should I use coasting or wipe?
Use them as second-order tools after temperature and retraction are in the right neighborhood. The simplest diagnostic is where blobs form: at the start of moves (pressure relief helps) vs right before landing (wipe helps). Note that some slicers don’t implement every feature the same way.
Next steps
If you want a tighter baseline before you do the workflow again, review your slicer profile fundamentals and tighten up your filament storage.
If you need a low-cost drying method before buying anything: