


Seeing 3d printing zits or 3d printing blobs on a finished part can make you feel upset. Blobs and zits usually show up at the start or end of a layer. These small bumps can make your print look worse, especially if they are on moving parts. Zits mostly change how the print looks but sometimes cause problems with how it works.
Key Takeaways
- Check and adjust your flow rate to prevent over-extrusion. This helps reduce blobs and zits on your prints.
- Keep your filament dry. Moisture can cause bubbles and uneven layers, leading to more zits and blobs.
- Regularly clean your nozzle and print surface. A clean setup ensures even extrusion and better print quality.
Main Causes of 3d Printing Zits
Over-Extrusion and Flow Rate
If too much filament comes out, you get blobs and zits. Over-extrusion happens when the flow rate is set too high. The printer pushes out more plastic than it should. Extra material builds up on the print’s surface. This makes bumps because there is nowhere for the extra plastic to go. You can stop zits by checking and changing the flow rate. Calibrating the extruder often also helps keep blobs away.
Retraction Settings Problems
Retraction pulls the filament back so it does not ooze. If retraction settings are wrong, you will see blobs and zits. Not enough retraction lets plastic leak out. Too much retraction can make gaps in your print. You need to set retraction just right to avoid blobs. Good retraction settings make the print look better and have fewer problems.
High Nozzle Temperature
If the nozzle is too hot, the filament gets too runny. This makes the plastic flow out of control. Blobs and zits can form on your print. The material can drip or ooze and make bumps. Lowering the nozzle temperature helps control the flow. Always check what temperature your filament needs.
Moisture in Filament
Filament with water in it can cause blobs and zits. Water turns into steam when you print. This makes bubbles and uneven layers. The layers may not stick well. Dry filament gives you better prints and fewer zits.
Print Surface and Nozzle Condition
A dirty or broken print surface can make blobs and zits worse. The nozzle can get dirty or worn out too. This causes the plastic to come out unevenly. Cleaning and taking care of your printer helps stop blobs. Check the nozzle and print bed before you start printing.
Fixing and Preventing Blobs and Zits
Taking blobs and zits off your prints makes them look nicer. You can use a sharp knife or sandpaper to smooth bumps. Work slowly and check your progress often. If you see big blobs, trim them carefully. For small zits, gentle sanding works best. Clean the print after sanding to remove dust and make it look neat.
Adjusting Retraction and Coasting
Retraction settings help control blobs and zits. Retraction pulls filament back to stop ooze. Coasting stops extrusion before a layer ends. Both help prevent blobs and zits. Experts suggest these steps:
- Change retraction length and speed. Longer retraction works for flexible filaments. Shorter retraction fits rigid filaments.
- Adjust movement speed. Fast printers need high speeds to stop stringing and blobs.
- Use fresh filament to avoid moisture and blobs.
- Set minimum movement after retraction to about 1mm.
- Lower Z-lift to reduce stringing and blobs.
- Make sure retraction and feed speeds are not too high. High speeds can cause extrusion problems and clogs.
Many slicers have coasting options. Coasting helps stop blobs and zits by ending material flow before the print job finishes. Cura, PrusaSlicer, and Simplify3D all have coasting features. Changing these settings can make prints better and reduce blobs.
Lowering Nozzle Temperature
Lowering nozzle temperature can help stop blobs and zits. If the nozzle is too hot, filament gets too runny. This causes uncontrolled flow and blobs. Lower temperatures make extrusion more controlled and help prevent blobs and zits. Always check the recommended temperature for your filament.
Finding the right nozzle temperature is important. You can use a temperature tower to test different settings. Here are the steps:
- Pick print speed and layer height.
- Divide the print object into sections.
- Find the lower and upper print temperature for your filament.
- Set temperature change per section, usually in 5°C steps.
- Create GCODE for the test.
- Move the file to your printer and start the calibration print.
- Remove the finished print and check for blobs and zits.
Temperature towers show how blobs and zits change with different nozzle temperatures. Thingiverse has many temperature tower models.
Drying Filament Before Printing
Wet filament can cause blobs and zits. Drying filament before printing helps stop blobs and zits and makes prints better. There are several drying methods:
|
Method |
Technique |
Advantages |
Disadvantages |
|---|---|---|---|
|
Oven Drying |
Put filament in a preheated oven |
Quick and cheap |
Needs watching; can release compounds |
|
Dehydrators |
Use a dehydrator |
Affordable and easy to get |
Slow drying process |
|
Filament Containers |
Store filament in a box |
Keeps filament away from air |
No drying option; limited space |
|
Drying Cabinets |
Use a drying cabinet |
Always dry and efficient |
Expensive |
Drying times and temperatures depend on the material:
|
Material |
Duration |
Method |
|
|---|---|---|---|
|
PLA |
40-45°C |
4-6 hours |
Filament dryer, dehydrator |
|
PETG |
60-65°C |
4-8 hours |
Filament dryer |
|
ABS |
60-70°C |
4-6 hours |
Oven, dryer |
|
Nylon |
70-80°C |
8-12 hours |
Professional dryer |
|
TPU |
50-55°C |
4-6 hours |
Low temperature dryer |
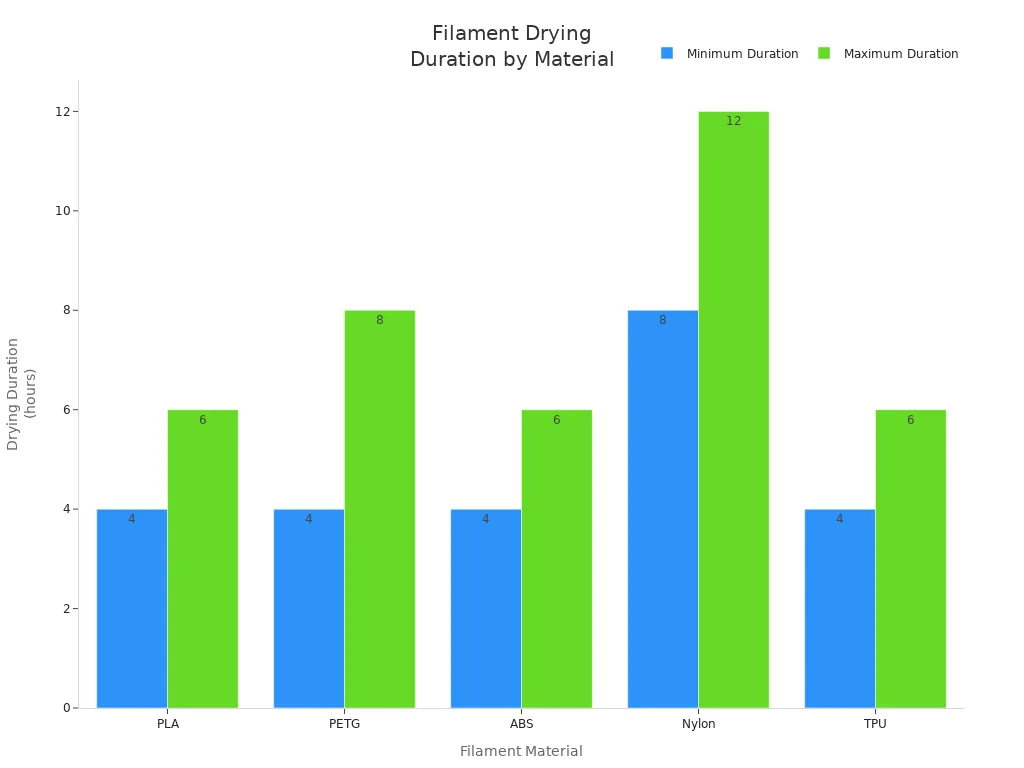
Drying filament removes moisture and helps stop blobs and zits. Always keep filament in a dry place to avoid surface bumps.
Tuning Slicer Settings for 3d Printing Blobs
Slicer settings affect blobs and zits. Start with a rough retract value and test different settings. Measure the PTFE tube to find the right retract value. For example, a 10cm tube often needs a 1mm retract. Fine-tune the retract value by printing retract tests and adjusting in small steps, like 0.25mm. Different materials need different settings. Test PLA, PETG, and TPU to find the best values.
Wrong speed settings can cause blobs and zits. Adjust retraction distance and frequency to avoid blobs. Many slicers have ooze control behavior options. These settings help stop blobs and zits and make prints better.
|
Slicer Software |
Functionality |
Description |
|---|---|---|
|
Cura |
Coasting |
Stops material flow before the end of a print job to prevent blobs and zits. |
|
PrusaSlicer |
Coasting |
Helps minimize extra extrusion and blobs. |
|
Simplify3D |
Coasting |
Reduces blobs and zits by controlling extrusion. |
Cleaning Nozzle and Print Surface
A clean nozzle and print surface help stop blobs and zits. Dirt and clogs cause uneven extrusion and blobs. Professionals suggest these cleaning methods:
- Use the right pressure and nozzle for cleaning.
- Higher pressure removes deep dirt from concrete surfaces.
- Lower pressure protects sensitive surfaces like wood or stone.
- Special cleaning agents protect wood fibers.
- Water temperature between 50°C and 60°C helps cleaning.
Regular cleaning stops blobs and zits from forming. Always check the nozzle and print bed before printing. Clean the nozzle to stop clogs and extrusion problems.
Seam Positioning and Wipe Options
Seam positioning and wipe options can help reduce blobs and zits. New seam options in UltiMaker Cura give more control over seam placement. This helps make smoother surfaces and fewer blobs. Turn on wiping to remove extra filament. Offset layer start points to make prints look better. Increase fan speed for faster cooling. Lower print speed for better filament setting. Clean the nozzle often to stop blobs and zits.
Troubleshooting Persistent Issues
If blobs and zits keep showing up, try these troubleshooting tips:
- Check filament quality and replace if needed.
- Adjust retraction settings and test different values.
- Lower nozzle temperature to control extrusion.
- Dry filament before printing.
- Clean nozzle and print surface often.
- Use coasting and ooze control behavior in slicer settings.
- Offset seam positions for smoother surfaces.
Blobs and zits can hurt print quality and cause surface bumps. Careful tuning and maintenance help stop blobs and zits. Try different settings and methods to get high quality prints and avoid 3d printing blobs and 3d printing zits.
Regular maintenance and calibration help your printer last longer and work better. Try different settings and learn from each print.
- Use mistakes to find new solutions.
- Work with others to solve problems.
- Ask for help, then try on your own.
FAQ
What causes blobs and zits on 3D prints?
Blobs and zits often appear from over-extrusion, wrong retraction, or wet filament. These issues make blobs and zits form on the print surface during printing.
How can I remove blobs and zits after printing?
You can remove blobs and zits with a sharp knife or sandpaper. Work slowly to avoid damaging the print. Blobs and zits become less visible after careful sanding.
Will changing slicer settings stop blobs and zits?
Yes. Adjusting slicer settings helps control blobs and zits. Lowering temperature, tuning retraction, and using coasting features reduce blobs and zits on finished prints.
Tip: Always check for blobs and zits before starting a new print. Regular maintenance prevents blobs and zits from ruining your work.