


Finding the best slicing parameters in Cura helps improve print quality and reliability. Key settings include layer height, print speed, wall thickness, infill, temperature, retraction, supports, and adhesion. The table below shows typical starter values for beginners. Adjustments may be needed for different printers or materials.
|
Parameter |
Meaning |
Typical Value for Beginners |
|---|---|---|
|
Layer Height |
Thickness of each layer |
0.2 mm |
|
Infill |
Density of the interior |
20% |
|
Print Speed |
Print head movement speed |
50 mm/s |
|
Support Structures |
For overhangs |
Activate from 45° overhang |
|
Bed Temperature |
Print bed temperature |
60°C for PLA |
|
Extruder Temperature |
Nozzle temperature |
200-210°C for PLA |
-
PLA is the most common material, used in over half of hobby prints.
Key Takeaways
- Start with a layer height of 0.2 mm and an infill density of 15-25% for most prints. This combination balances quality and speed.
- Adjust print speed based on material: 50-70 mm/s for PLA, 40-60 mm/s for ABS and PETG, and 20-35 mm/s for TPU. This ensures optimal results.
- Use a heated bed and proper adhesion methods like brims or rafts to prevent warping and improve print stability.
Best Slicing Parameters Overview
Key Parameters and Default Values
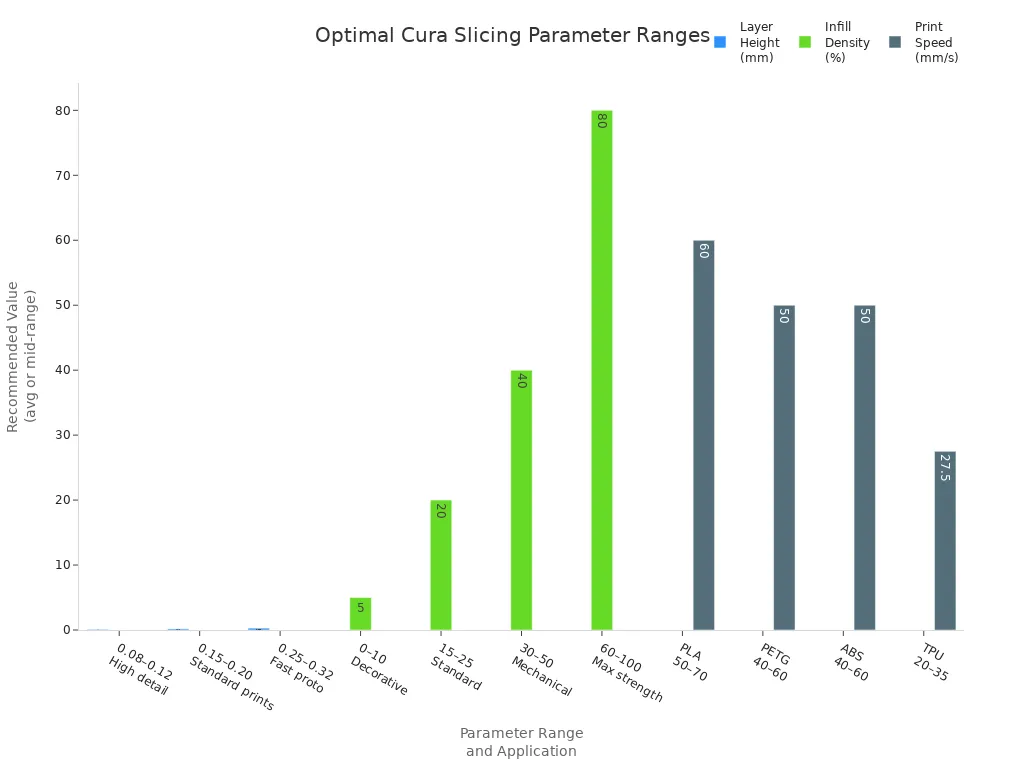
Choosing the best slicing parameters in Cura helps users achieve consistent results. The most important settings include layer height, infill density, print speed, wall thickness, temperature, supports, and build plate adhesion. Each parameter affects the final print in different ways. The table below shows optimal ranges for these settings based on recent benchmarks and studies.
|
Parameter |
Optimal Range |
Application |
|---|---|---|
|
Layer Height |
0.08 – 0.12 mm |
High detail, smooth surfaces, miniatures |
|
Layer Height |
0.15 – 0.20 mm |
Standard prints, balanced quality and speed |
|
Layer Height |
0.25 – 0.32 mm |
Fast prototypes, mechanical parts |
|
Infill Density |
0-10% |
Decorative objects, foam models |
|
Infill Density |
15-25% |
Everyday items, general use |
|
Infill Density |
30-50% |
Functional objects, loaded parts |
|
Infill Density |
60-100% |
Maximum strength, tools, heavy-duty parts |
|
Print Speed (PLA) |
50-70 mm/s |
Standard speed for PLA |
|
Print Speed (PETG) |
40-60 mm/s |
Standard speed for PETG |
|
Print Speed (ABS) |
40-60 mm/s |
Standard speed for ABS |
|
Print Speed (TPU) |
20-35 mm/s |
Standard speed for TPU (flexible) |
Why These Settings Matter
Slicing parameters play a key role in the pre-processing phase of 3D printing. Cura lets users set these values to match their print goals. The right choices help balance print quality, speed, and strength. For example, a lower layer height produces smoother surfaces and better detail. Higher layer height speeds up printing but reduces detail. Infill settings control the strength and weight of the object. Low infill density works for decorative items, while high density is needed for functional parts.
Print speed affects how quickly the printer moves. Fast speeds save time but may lower quality. Slower speeds improve accuracy and reduce errors. Cura support settings help print overhangs and complex shapes. Supports prevent sagging and ensure proper geometry. Good build plate adhesion keeps the print stable and reduces warping.
Researchers found that setting the right parameters during slicing leads to better results. The process starts with designing the model and choosing the material. Cura slices the model into layers and applies the selected settings. With careful adjustment, users can optimize the balance between print quality, print time, and mechanical properties. This approach helps achieve reliable prints and efficient production.
Note: Adjusting parameters for each project is important. The best slicing parameters depend on the printer, material, and desired outcome.
Essential Cura Settings Breakdown
Layer Height
Layer height is one of the most important settings in cura. It controls the thickness of each printed layer. Lower layer heights, such as 0.1 mm, create smoother surfaces and capture fine details. Higher layer heights, like 0.2 mm, print faster but may show visible lines. The table below shows how layer height affects print time:
|
Print Time (h) |
|
|---|---|
|
200 |
0:50 |
|
100 |
2:00 |
|
60 |
3:30 |
- Lower layer heights improve print quality.
- Reducing layer height increases print time.
Print Speed
Print speed determines how fast the printer moves. Cura allows users to set this value based on material and model complexity. Higher print speed reduces print time but can lower accuracy. For PLA, a speed of 50-70 mm/s works well. Complex models or flexible filaments need slower speeds.
Wall Thickness
Wall thickness affects the strength and durability of the print. Thicker walls provide more support and help prevent leaks in hollow objects. A common starting value is 1.2 mm, which equals three lines with a 0.4 mm nozzle.
Infill Density
Infill density controls how much material fills the inside of the object. For decorative prints, 15-20% is enough. Functional parts need 50% or more for strength. Adjusting infill settings helps balance strength, weight, and print time.
Temperature
Temperature settings depend on the filament. PLA prints best at 200–230°C with a heated bed at 60–80°C. ABS and PETG require higher temperatures and a heated bed for proper adhesion.
Retraction
Retraction pulls filament back during travel moves to prevent stringing. Bowden systems often use 4-7 mm retraction distance at 40-60 mm/s. Direct-drive systems need less, around 0.5-2 mm. Proper retraction settings reduce unwanted strings.
Supports
Supports help print overhangs and bridges. Cura can generate supports automatically for angles over 45°. Removing supports after printing leaves a cleaner finish.
Build Plate Adhesion
Good adhesion keeps the print attached to the bed. Cura offers options like brim, raft, or skirt. A heated bed and clean surface improve adhesion and reduce warping.
Tip: Adjusting these best slicing parameters in cura helps achieve reliable results for any project.
Adjusting for Materials
PLA Settings
PLA is the most popular filament for beginners. It prints at lower temperatures and does not require a heated enclosure. The table below shows recommended settings for PLA and other common materials:
|
Material |
Nozzle Temp |
Retraction |
Fan Speed |
Print Speed |
Notes |
|---|---|---|---|---|---|
|
PLA |
190-220°C |
5-6 mm (Bowden), 2-3 mm (Direct) |
100% after first layers |
50-70 mm/s |
Linear/Pressure Advance: 0.05-0.10 |
PLA works well with standard infill settings and does not warp easily. Use a fan for cooling after the first few layers to improve surface quality.
ABS Settings
ABS needs higher temperatures and careful control. It prints best at 240-260°C with a heated bed at 90-110°C. Unlike PLA, ABS benefits from low fan speed (0-15%) and a closed enclosure to prevent warping. Practical tests show that ABS requires more precise adjustments than PLA. ABS is less forgiving and needs fine-tuning for good results. Use the best slicing parameters in cura to reduce warping and improve adhesion.
PETG Settings
PETG combines strength and flexibility but can be tricky. Common issues include stringing and strong bed adhesion. The table below lists PETG problems and solutions:
|
Problem |
Solution |
|---|---|
|
Extreme adhesion |
Use glue stick or hairspray, lower bed temp to 70°C for PEI plates |
|
Stringing |
Lower nozzle temp to 235-240°C, set retraction to 6-7 mm, fan 30-50% |
|
Difficult bridging |
Set fan to 100% for bridges, slow speed to 20 mm/s, avoid long bridges |
|
Blobbing and oozing |
Enable coasting, set Z-Seam to 'Sharpest Corner', reduce flow to 95-98% |
Adjust infill settings for PETG to balance strength and print time.
TPU Settings
TPU is flexible and soft, making it ideal for elastic parts. Printing with TPU requires special care:
- Use slow print speeds (15-30 mm/s) to prevent stretching.
- Direct drive extruders work best for TPU.
- Set nozzle temperature between 210-230°C and bed temperature at 40-60°C.
- Increase wall thickness to 3-4 lines for better strength.
- Heated bed improves adhesion and reduces warping.
Note: Each material needs unique adjustments in cura for reliable prints.
Fine-Tuning for Quality
Detail Optimization
Improving detail in 3D prints requires careful adjustment of slicing parameters. Cura offers advanced features that help boost print quality, especially for small models. Adaptive Layering changes the layer height based on the geometry of the object. This method uses thinner layers for detailed areas and thicker layers for simpler sections. The Arachne Algorithm adapts line width, filling narrow spaces without gaps or excess material. These features help create smoother surfaces and sharper details.
|
Parameter |
Description |
|---|---|
|
Adaptive Layering |
Varies layer height for better detail and faster printing |
|
Arachne Algorithm |
Adjusts line width to fill narrow areas and improve surface quality |
Strength Enhancement
Strength depends on the shell thickness and infill settings. Increasing wall thickness improves stability and resistance to stress. For most prints, a wall thickness of at least 0.8 mm, or double the nozzle diameter, is recommended. For parts under heavy loads, increase thickness to 1.2 mm or more. Thicker shells and higher infill density make prints stronger and more durable.
- Wall thickness of 0.8 mm or more boosts strength.
- Use three to four times the nozzle diameter for parts needing extra durability.
- Adjust infill settings for functional parts.
Speed vs. Quality
Print speed affects both efficiency and accuracy. Faster speeds reduce print time but may lower detail and cause errors. Slower speeds improve precision and surface finish. For best results, balance speed with the complexity of the model and the desired outcome. Test different speeds to find the right setting for your project.
Note: Fine-tuning these parameters helps achieve the best balance between speed, strength, and print quality.
Troubleshooting Common Issues
Layer Shifts
Layer shifts happen when the print moves out of alignment during the process. This problem often results from loose belts, mechanical obstructions, or sudden bumps to the printer. Check that all belts are tight and pulleys are secure. Remove any objects near the printer that could cause interference. Slow down the print speed if shifts continue.
Stringing
Stringing appears as thin, hair-like strands between parts of a print. This issue often results from improper retraction or high temperatures. To reduce stringing:
- Set retraction distance to 4-7 mm and speed to 40-60 mm/s for Bowden systems.
- Use 0.5-2 mm retraction distance and 25-45 mm/s speed for direct-drive systems.
- Lower the nozzle temperature by 5-10°C below the usual setting.
- For PETG, use 230-235°C instead of higher temperatures.
- Increase travel speed and use dry filament to prevent moisture-related stringing.
High printing temperatures can make filament too fluid, which leads to stringing. Adjusting retraction settings and using the right filament type can help.
Warping
Warping causes the corners of a print to lift from the bed. This problem is common with large prints and materials like ABS. To prevent warping:
- Use a heated print bed.
- Add a brim or raft to improve adhesion.
- Make sure the build plate is clean and level.
Support structures can also help stabilize prints with large overhangs.
Under-Extrusion
Under-extrusion means the printer does not push out enough filament. This can cause weak prints and gaps. To fix under-extrusion:
- Calibrate the extruder steps per millimeter.
- Check and set the correct filament diameter in Cura.
- Adjust the flow settings for consistent extrusion.
Quick Reference Table
Parameter Summary
A quick reference table helps users find important Cura slicing parameters fast. This table lists each parameter, its recommended starting value, and a short explanation. Users can check the table before starting a print. The table format makes information easy to scan and understand. Many experts suggest using tables for quick access to settings.
|
Parameter |
Recommended Value |
Description |
|---|---|---|
|
Layer Height |
0.2 mm (standard) |
Controls layer thickness and surface detail |
|
Print Speed |
50-70 mm/s (PLA) |
Sets how fast the printer moves |
|
Wall Thickness |
1.2 mm |
Increases strength and durability |
|
Infill Density |
15-25% (general use) |
Fills the interior for strength or weight |
|
Nozzle Temperature |
200-210°C (PLA) |
Melts filament for extrusion |
|
Bed Temperature |
60°C (PLA) |
Improves adhesion and reduces warping |
|
Retraction Distance |
5-6 mm (Bowden), 2-3 mm (Direct) |
Prevents stringing during travel moves |
|
Supports |
Enabled for overhangs >45° |
Helps print complex shapes |
|
Adhesion Type |
Brim or Raft |
Keeps print attached to the bed |
- The table shows standard values for PLA. Other materials need different settings.
- Users can change parameters to match their printer and print goals.
- Tables like this improve workflow and reduce mistakes.
A clear table gives users a fast way to review settings. This method matches expert advice for quick access and easy understanding.
Starting with recommended Cura parameters helps users achieve consistent and high-quality prints. Adjusting layer height, print speed, and temperature improves results. Experimenting with settings allows users to match their printer and material. Understanding slicing parameters increases print success. Ongoing learning and testing support growth in 3D printing.
- Smaller layer height creates finer surfaces but increases print time.
- High print speed causes inaccuracies; slow speed prolongs printing.
- Print temperature affects adhesion and material layering.
Keep exploring new settings to improve your skills and print quality. 🛠️
FAQ
What is the best layer height for beginners?
Most beginners start with a layer height of 0.2 mm. This value balances print quality and speed for most projects.
How can I prevent warping during printing?
- Use a heated bed set to the recommended temperature.
- Add a brim or raft for better adhesion.
- Keep the build plate clean and level.
Why does my print have stringing?
Stringing often happens when retraction settings are too low or nozzle temperature is too high. Adjust these values in Cura to reduce unwanted strands.