


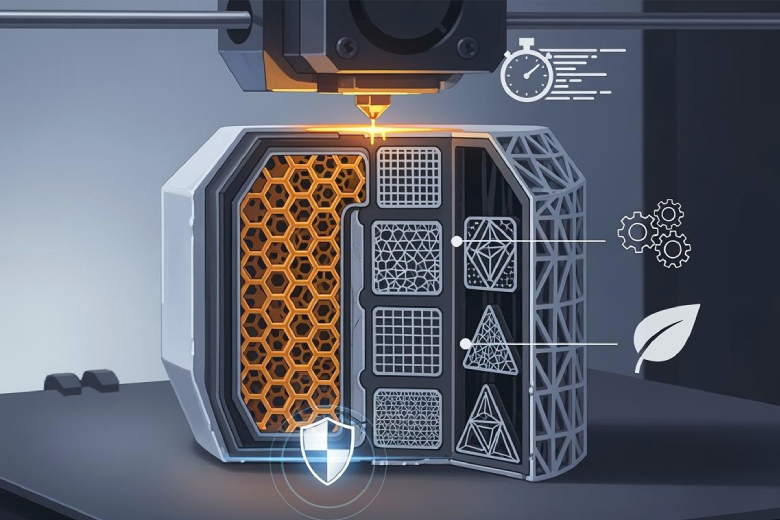
Gyroid 3D printing infill patterns usually provide the most strength. Lightning and Grid patterns are fast and use less material. Infill patterns are very important in 3D printing. They affect the appearance of the print, the amount of material used, and the overall strength of the final product.
- The 3D printing infill pattern you choose influences how much material you need and how long the printing process takes.
- Some patterns make prints lighter and stronger, while others help you save time and material.
- Selecting the right 3D printing infill pattern minimizes waste and enhances the quality of your prints.
This article will assist you in choosing the best infill for your project.
Key Takeaways
Picking the right infill pattern changes how strong your 3D prints are. It also changes how fast they print and how much material you use. Gyroid and cubic patterns make prints very strong. Lightning and grid patterns print fast and use less filament. You can change infill density and wall count to make prints stronger. This does not waste material. Use lightning infill for models that are just for looks. This saves filament and prints faster. Try different patterns and settings. This helps you find what works best for your project.
3D Printing Infill Patterns Overview
What Are Infill Patterns
Infill patterns are shapes inside a 3d printed object. They help the object stay strong and stable. The printer puts material between the outside walls using these patterns. Some common infill patterns are grid, honeycomb, and gyroid. Lightning infill is a newer pattern that uses special shapes. It only adds material under the top layers. This saves time and filament. Some printers can change the density from bottom to top. They start with more material at the bottom and use less at the top. This way, material is only where it needs to be strong.
Note: Picking an infill pattern changes how strong, heavy, and tough your print will be.
Why Infill Patterns Matter
Infill patterns are important for how well 3d printed parts work. The right pattern makes parts stronger, lighter, and faster to print. Infill patterns help the inside of the part fit its job. If a part needs to hold weight, it should use a strong pattern like gyroid or honeycomb. The shape and stress on the part also help decide which pattern to use. Some new ideas use different patterns in different spots for extra strength. For example, the middle might use 15% gyroid infill. Areas near screw holes could use 50% for more support.
|
Trend/Innovation |
Description |
|---|---|
|
Lightning Infill |
Lightning shapes under top layers save material and time. |
|
Infill density changes, like 20% at the bottom, 0% at the top. |
|
|
Gyroid Infill |
Has equal strength in all directions and gives good support. |
|
Zone-specific Infill |
Uses different infill types in certain spots for more strength. |
Choosing the right infill pattern helps the part do its job. It keeps the balance between strength, speed, and efficiency. Infill is a big part of making 3d prints work well.
Infill Patterns and Strength
How Infill Affects Strength
Infill plays a major role in the strength of 3d printed parts. The way the infill pattern fills the inside of a print changes how much weight the part can hold and how long it will last. When you choose a higher infill density, the print becomes stronger and more durable. Lower infill density can make the part lighter, but it may not have enough strength for heavy loads. If the core of the print is too soft, it can bend or lose its shape under pressure. This can cause the part to fail or not fit as expected.
The most common infill densities for 3d printing range from 10% to 40%. Prints with higher infill density have more strength and support, but they use more material and take longer to finish. Lower infill density saves time and filament, but it can reduce the strength and surface quality of the part. It is important to match the infill density to the job the part needs to do. For example, a part that holds weight or faces stress should use a higher infill density.
Wall count also affects strength. The outer walls of a print take most of the stress. Adding more walls often increases strength more than raising the infill density. Well-fused walls help the part resist breaking or bending. The infill pattern, wall count, and infill density all work together to give the part the right balance of strength, weight, and speed.
Tip: For parts that need extra strength, increase both the wall count and the infill density. This gives the best results for tough jobs.
|
Factor |
Effect on Strength |
|---|---|
|
Wall Count |
More walls give better strength, especially for outer stress. |
|
Infill Density |
Higher density increases strength, but also uses more material and time. |
|
Infill Pattern |
The pattern changes how the part handles stress and how strong it will be. |
The direction of the load also matters. In 3d printing, parts are often stronger in some directions than others. The way the layers bond in the z-direction is very important. When a part is pulled or pushed along the z-axis, the infill percentage has less effect on tensile strength. The choice of infill pattern should match the way the part will be used.
Best Patterns for Strength
Some infill patterns are better for strength than others. The gyroid infill pattern is often the best infill pattern for strength. It gives equal strength in all directions. This makes it a good choice for parts that face stress from many angles. Gyroid also supports the outer walls well and helps the part resist twisting or bending.
Cubic infill is another strong option. Tests show that cubic infill has the highest compressive strength. It stays together under heavy loads. Grid and triangle patterns can fail early when stressed, while linear infill can stretch more before breaking. Honeycomb and adaptive patterns also offer good strength and support, but may not match gyroid or cubic for the toughest jobs.
The best infill pattern depends on the type of force the part will face. For example:
- Gyroid: Best for strength in all directions, good for complex loads.
- Cubic: Best for compressive strength, good for parts under pressure.
- Honeycomb: Good for lightweight strength, often used in engineering.
- Grid: Fast and easy, but not as strong as gyroid or cubic.
- Adaptive: Changes density where needed, saving material while keeping strength.
Note: The load direction is key. If a part faces stress mostly in one direction, choose a pattern that supports that type of load.
When choosing 3d printing infill patterns, always think about the job the part will do. Use higher infill density and more walls for parts that need maximum strength. Pick gyroid or cubic infill patterns for the best results. Remember, the right infill pattern, density, and wall count work together to give your print the strength and support it needs.
Infill Patterns for Speed and Efficiency
Fastest Infill Patterns
Speed is a key factor in 3d printing. The right infill pattern can make prints finish much faster. Lightning infill is the fastest infill pattern for most projects. This pattern uses thin, branching lines that only support the top layers. It skips filling the whole part. This saves time and filament. Lightning works best for models that do not need much strength inside.
Grid infill is another fast option. The grid pattern uses straight lines that cross each other. The printer can move quickly when making this pattern. Grid is a good choice for general use. It balances speed and support. Gyroid infill is not as fast as lightning or grid, but it prints faster than honeycomb or cubic patterns. Gyroid also gives better strength for its print time.
The fastest print time can be achieved by optimizing infill patterns and other printing parameters. It is recommended to increase the infill speed and adjust the layer height and nozzle diameter to minimize print time. The combination of various parameters such as infill percentage, layer height, and nozzle diameter plays a crucial role in reducing print time.
Print speed depends on more than just the infill pattern. Lower infill density also makes prints finish faster. A 10% infill density will print much quicker than 40%. Larger nozzle sizes and thicker layers help too. For the best print efficiency, use a fast infill pattern, low density, and the right printer settings.
Quick List: Fastest Infill Patterns
- Lightning: Fastest, uses the least material, best for non-structural parts.
- Grid: Fast, easy to print, good for most projects.
- Gyroid: Faster than honeycomb, strong for its speed.
Patterns for Material Efficiency
Efficiency means using less filament and less time while still getting a good print. The best infill pattern for efficiency depends on the part's needs. Lightning infill is the most efficient for saving material. It only puts filament where it is needed for the top layers. This pattern is perfect for decorative prints or models that do not need much strength.
Grid infill is efficient for most prints. It uses less filament than honeycomb or cubic patterns. Grid also prints quickly. Gyroid infill is efficient when you need both strength and material savings. Gyroid uses a wavy pattern that supports the walls well. It gives good strength with less filament than honeycomb. Gyroid is also easy for the printer to make, which helps with print efficiency.
Honeycomb and cubic patterns use more filament. They take longer to print. These patterns are best for parts that need extra strength. For most projects, grid or gyroid infill patterns give the best balance of speed, strength, and efficiency.
|
Infill Pattern |
Speed |
Material Use |
Efficiency |
Best Use Case |
|---|---|---|---|---|
|
Lightning |
Very Fast |
Very Low |
High |
Decorative, low strength |
|
Grid |
Fast |
Low |
High |
General use, moderate loads |
|
Gyroid |
Moderate |
Moderate |
High |
Strong, efficient parts |
|
Honeycomb |
Slow |
High |
Moderate |
Lightweight, strong parts |
|
Cubic |
Slow |
High |
Moderate |
High compressive strength |
Infill density is important for efficiency. Most prints do not need more than 40% infill density. Going above 80% infill density gives little extra strength. The print time and material use go up fast after this point. This is called "diminishing returns." For most projects, a lower infill density with a strong pattern like gyroid gives the best results.
Gyroid infill is popular for its balance of strength, speed, and efficiency. It supports the outer walls well. It also uses less filament than honeycomb. Many users pick gyroid for functional parts that need to be strong but not heavy. Grid and lightning patterns are best for fast, efficient prints that do not need much strength.
Choosing the right infill pattern and density helps you save time and filament. It also improves print efficiency. Always match the pattern and density to the job the part needs to do. For most 3d printing infill patterns, gyroid, grid, and lightning offer the best mix of speed, efficiency, and strength.
Comparing Popular Infill Patterns
Grid
Grid is a very common infill pattern in 3d printing. It uses straight lines that cross each other at right angles. This makes a mesh inside the print. Grid gives medium strength and prints quickly. It uses a medium amount of filament. Grid works well for most projects and quick prints. It is simple to set up and prints fast. Many people use grid for test prints and everyday things.
|
Pattern |
Strength (Relative) |
Speed (Relative) |
Filament Efficiency |
Best For |
|---|---|---|---|---|
|
Grid |
Medium |
High |
Medium |
General use, quick prints |
Gyroid
Gyroid is easy to spot because of its wavy shape. This pattern gives strength in every direction. It uses less material than many other patterns. Gyroid spreads out stress and absorbs energy well. This makes it good for strong and efficient parts. It supports the outside shell and works with many infill densities. Gyroid is known for saving filament while keeping prints strong.
Cubic
Cubic infill is made of cubes stacked and turned at an angle. This pattern gives great strength in all three directions. It is a good choice for mechanical parts. Cubic prints faster than some other hard patterns. It helps lower print time. Cubic is best for parts that need to handle pressure from every side.
|
Evidence Description |
Details |
|---|---|
|
Strength in 3D |
The cubic infill pattern provides excellent strength in three dimensions. |
|
Printing Speed |
It is often faster to print than other complex patterns. |
|
Structure |
Stacked cubes tilted at 45 degrees around X and Y axes. |
Honeycomb
Honeycomb looks like the shapes found in nature. This pattern is very strong when squeezed or pulled. Honeycomb uses little filament but still gives high strength. It is great for parts that need to be light and stable. Honeycomb is often used in engineering and aerospace projects.
|
Characteristic |
Description |
|---|---|
|
Inspired by natural structure |
Pattern is inspired by honeycombs. |
|
Strength under forces |
Very strong in compressive and tensile forces. |
|
Material efficiency |
High efficiency with minimal material usage. |
|
Ideal for lightweight components |
Perfect for lightweight, stable parts. |
Other Patterns
Some patterns are made for special uses. Lightning infill is for prints that only need a closed outside. It saves both filament and time. Density gradients use more infill at the bottom and less at the top. This helps use material where it is needed most. Adaptive patterns can change how much infill is in different spots. This gives extra support where it is needed.
Tip: When you try new infill patterns, match the pattern and density to your print’s job. Using selective and adaptive infill helps balance strength, speed, and efficiency for harder projects.
Choosing the Right Infill Pattern
Print Purpose: Functional vs Decorative
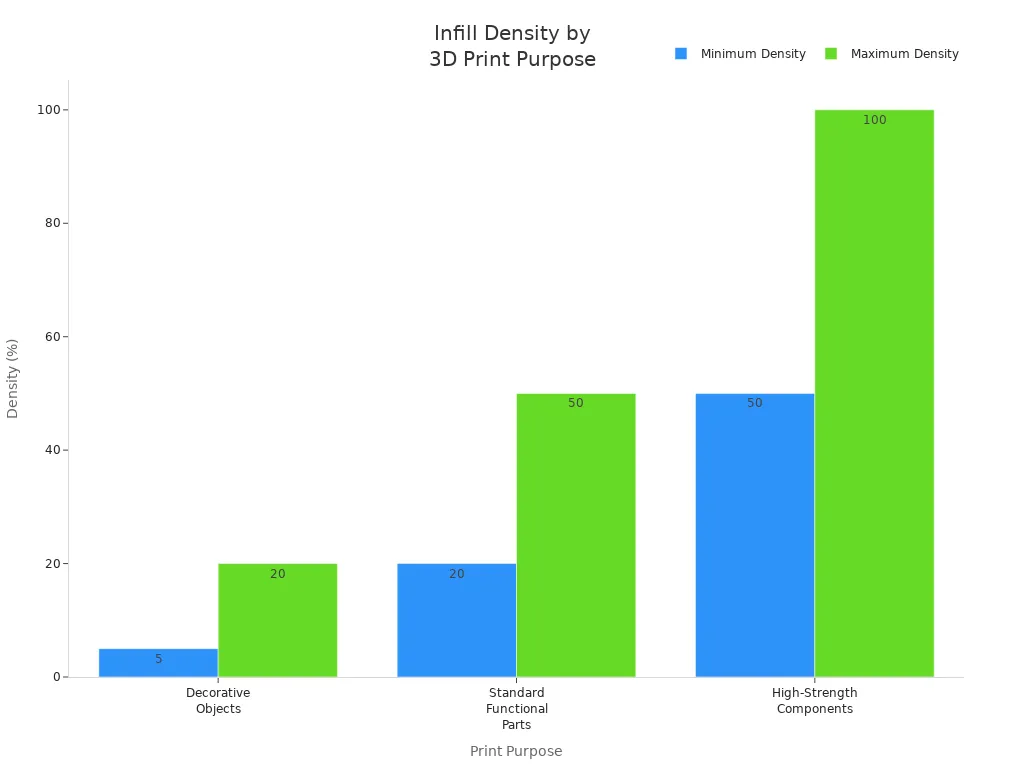
You need to know why you are printing the part. If you print something just to look nice, it does not need much support inside. Simple patterns like grid or lines are good for these prints. Using low infill density, between 5% and 20%, keeps the print light and saves material. If your part needs to be strong, you should use a tougher infill pattern. Grid, rectilinear, or triangles give both support and fast printing. For parts that must be very strong, use cubic, gyroid, or honeycomb patterns. These work best with high infill density, from 50% to 100%. The table below helps you pick the right infill pattern and density for your print’s job:
|
Purpose |
Infill Pattern Options |
Density Range |
|---|---|---|
|
Decorative Objects |
Simple patterns (e.g., Grid, Lines) |
5-20% |
|
Standard Functional Parts |
Grid, Rectilinear, Triangles |
20-50% |
|
High-Strength Components |
Cubic, Gyroid, Honeycomb |
50-100% |
Material Type and Print Settings
The kind of material you use changes which infill pattern works best. PLA is easy to print and fits most patterns. PETG needs hotter temperatures and a heated bed to stick well. Each material has its own best settings for infill density and pattern. For example, PETG uses a nozzle temperature around 230°C and a bed temperature between 60°C and 80°C. PLA prints well at about 200°C. Changing infill density helps balance strength and print time. Lower density is fine for display models. Higher density is better for parts that need to be strong. Always match the infill pattern and density to the material and the part’s job.
Infill Density and Wall Count
Infill density and wall count work together to make prints strong and efficient. Adding more walls often makes the part stronger than just raising infill density. Most stress happens on the outside walls. For parts that need to be very strong, use infill density between 50% and 100%. Strength does not go up much after 70-80% density. Adding more walls can help without using lots of extra material. For most prints, 15-25% density and two or three walls is enough. If you need the part to hold heavy loads, use a strong infill pattern, higher density, and more walls.
Tip: Think about how the part will be used, what material you have, and how much weight it needs to hold. This helps you pick the best infill pattern, density, and wall count. You will get the right mix of strength, speed, and efficiency.
Infill Patterns Quick Comparison Table
Picking the right infill pattern is very important. It helps you get the right mix of strength, speed, and efficiency in 3D printing. Every pattern has special features. These features make each pattern good for certain jobs. The tri-hexagonal pattern is known for being very strong. Its lines cross and make a tough inside. This is great for parts that need to hold heavy things. The cubic pattern makes cubes inside the print. This gives the print more balance and helps the outside stay strong. Cubic is used for mechanical parts that need steady strength.
Infill density affects how stable the print is and how much material you use. Lower density uses less filament but makes the print weaker. Higher density gives the most stability and can hold more weight. This works best with strong patterns like tri-hexagonal or cubic.
Note: Picking the right pattern and density helps your print do its job. It also stops you from wasting material and time.
Here is a table that shows the most popular infill patterns. It lists their best density ranges and where they are usually used:
|
Infill Pattern |
Density Range (%) |
Strength |
Speed |
Material Efficiency |
Application Area |
|---|---|---|---|---|---|
|
Grid |
10-40 |
Medium |
High |
Medium |
General use, quick prints |
|
Gyroid |
15-50 |
High |
Moderate |
High |
Functional parts, balanced strength |
|
Cubic |
20-60 |
High |
Moderate |
Moderate |
Mechanical parts, compressive loads |
|
Honeycomb |
20-50 |
High |
Low |
High |
Lightweight, stable parts |
|
Tri-Hexagonal |
30-70 |
Very High |
Moderate |
Moderate |
High-strength, load-bearing components |
|
Lightning |
5-20 |
Low |
Very High |
Very High |
Decorative objects, minimal strength required |
- Tri-hexagonal is the strongest for hard jobs.
- Cubic gives balanced support for mechanical parts.
- Grid and gyroid are fast and efficient.
- Honeycomb is best for light but strong parts.
- Lightning saves material and time for decorations.
The best pattern depends on what the part needs to do. Change the infill density and pattern to get better print quality and use less material.
Practical Tips for Infill
Picking the right infill pattern makes your 3D prints better. It can help your prints be stronger and look nicer. Many people who print a lot have some helpful advice. You should use these tips for your next print.
- Lightning infill is good for models with a closed shell. It saves material and time by only supporting the top layers.
- Changing density gradients uses material where it is needed most. Start with 20% infill at the bottom and go down to 0% at the top. This gives support without wasting filament.
- Gyroid infill is special because it is strong in every direction. It also supports the outside shell well.
- Zone-specific infill types make certain areas stronger. For example, use 15% gyroid in the middle and 50% grid near screw holes. This helps parts stay strong where they need it most.
- Calculating infill for ceilings is important. Make sure the pattern supports the upper layers so they do not sag.
Tip: Always pick the infill pattern based on what the part will do. Stronger patterns are best for parts that need to work. Faster patterns are good for decorations.
To get better prints, you should change some settings. Try these steps:
- Slow down the print speed. Printing slower helps the extruder feed material right. This stops weak infill from happening.
- Make the extrusion width bigger. Setting a wider extrusion than the nozzle size makes the infill more stable.
- Try different patterns. Each pattern gives different stability. Test grid, triangle, or honeycomb to see which works best for your project.
Choosing the right pattern and settings makes prints turn out better. Always check what your print needs. Change infill density, wall count, and pattern as needed. These tips help you get strong, efficient, and high-quality prints.
Choosing the right infill pattern impacts strength, speed, and material efficiency. Gyroid and cubic patterns offer high strength. Lightning and grid patterns print quickly and save filament. Always match the pattern to your project’s needs.
- Test different infill settings for best results.
- Adjust density and wall count for stronger parts.
Balancing strength, speed, and efficiency leads to better 3D prints. Experiment with patterns and settings to find what works best for your application.
FAQ
What is the best infill pattern for strong 3D prints?
Gyroid infill gives balanced strength. It handles stress from every direction. Cubic and honeycomb patterns are strong for mechanical parts.
How does infill density affect print quality?
Higher infill density makes prints stronger and more stable. Lower density uses less material and prints faster. Most prints use 15% to 40% density for a good balance.
Which infill pattern saves the most material?
Lightning infill uses the least filament. It only supports the top layers. Grid infill also saves material and prints fast.
Tip: Use lightning infill for decorative models. This helps you waste less filament.
Can I mix infill patterns in one print?
Some slicer software lets you use different infill patterns in one print. You can put stronger patterns near stress points and lighter patterns in other spots. This makes prints stronger and more efficient.
|
Pattern |
Best Use |
|---|---|
|
Gyroid |
Functional parts |
|
Lightning |
Decorative prints |
|
Grid |
General use |