


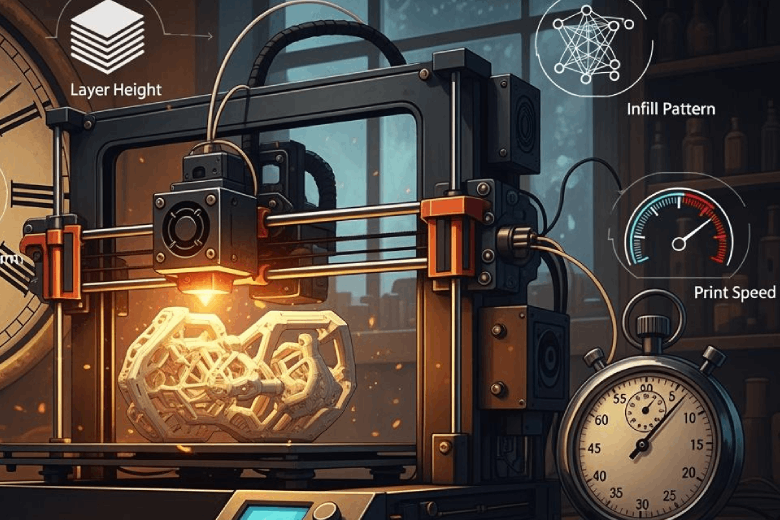
Several factors shape print time 3d printer, including model complexity, object size, layer height, print speed, nozzle diameter, infill pattern, infill density, perimeters, part orientation, printer technology, material type, and slicer settings.
- Print speed affects cooling and layer merging.
- Layer height changes the number of layers and surface detail.
- Nozzle diameter adjusts material flow and precision.
- Infill density influences internal strength and total print time.
Understanding these factors allows users to manage efficiency and maintain print quality.
Key Takeaways
- Model complexity and size significantly impact print time. Simplifying designs can lead to faster prints.
- Layer height affects both print speed and quality. A height of 0.2 mm balances speed and detail for most projects.
- Nozzle diameter influences material flow. Larger nozzles speed up printing, while smaller nozzles enhance detail.
- Infill density and pattern affect strength and print time. A density of 30% to 50% is ideal for balancing speed and durability.
- Proper part orientation minimizes supports and reduces print time. Horizontal placement often leads to faster results.
Complexity of the 3D Model and Size of the Object
Model Complexity and Print Time
Model complexity plays a major role in determining print time 3d printer. Designs with intricate details, sharp corners, or thin features require more print passes. This increases the number of movements the print head must make. Overhanging parts often need extra support structures, which add layers and extend the printing process. Highly detailed objects also demand careful layer placement, slowing down the overall speed.
Tip: Reducing unnecessary overhangs and simplifying internal structures can help decrease 3d printing time.
The following table shows how different prediction models consider complexity when estimating build time:
|
Model Type |
Prediction Accuracy |
Complexity Consideration |
|---|---|---|
|
ANN |
High |
Yes |
|
MLR |
Moderate |
Yes |
|
FDM |
Variable |
Yes |
Designs with increased geometric shape complexity lead to longer print times. Variations in complexity affect support requirements and bounding box volume. The ANN model provides more accurate predictions of build time compared to MLR.
- Complex models increase the number of layers and print head movements.
- Overhanging sections above 45 degrees require supports, which add time and material.
- Steep overhangs can cause sagging and layer failures, making the process slower.
Object Size Impact on 3D Printing Time
The size of the object directly affects how long a print takes. Larger objects need more layers and material, which increases the total time. The relationship between object size and print time is clear. For example, printing time depends on both the Z-axial height and the basal area. The equation f(x) = (−2.5e−5x² + 0.1539x + 55.1)h² shows how basal area and height influence time. For cuboids with a basal area of 100 cm², print time increases linearly with height, following f(x) = 32.25x + 2.4.
When considering object size and complexity together, print time rises quickly. A large, simple object prints faster than a small, highly complex one. Both factors interact to determine the total time needed.
Note: Orienting parts to minimize overhangs can reduce support needs, improve surface quality, and decrease post-processing time.
Layer Height, Nozzle Diameter, and Infill
Layer Height and Print Quality
Layer height and thickness play a major role in both print speed and print quality. Lower layer heights create more layers, which increases print time but results in smoother surfaces and finer details. Taller layers reduce print time because the printer needs fewer passes, but this comes at the cost of lower resolution and visible layer lines. The relationship between layer height and print time is clear: halving the layer height nearly doubles the print time.
- Thinner layers increase print time but improve surface finish.
- Thicker layers decrease print time but reduce detail.
The following table shows common layer heights and their best uses:
|
Layer Height (mm) |
Use Case |
|---|---|
|
0.1 - 0.15 |
Fine detail, smooth surfaces |
|
0.2 |
Balanced quality and speed |
|
0.3 - 0.4 |
Fast prints, rougher surfaces |
Nozzle Size and Print Speed
Nozzle diameter directly affects 3d printing speed. A larger nozzle extrudes more material with each pass, which speeds up the process. This is useful for rapid prototyping or when detail is less important. Smaller nozzles provide higher resolution and better detail but slow down the print because the printer must make more passes.
- Larger nozzles increase print speed and are ideal for big, simple models.
- Smaller nozzles improve detail but reduce print speed.
- A 0.4 mm nozzle often balances speed, strength, and detail.
Choosing the right nozzle diameter depends on the project’s needs. For quick drafts, a larger nozzle saves time. For detailed models, a smaller nozzle is best.
Infill Pattern and Density Effects
Infill settings have a strong impact on both print speed and part strength. Lower infill densities reduce print time and material use but offer less strength. Higher densities increase strength but also increase print time. The pattern also matters. Grid patterns balance strength and efficiency, honeycomb patterns add durability, and gyroid patterns provide strength in all directions.
|
Infill Density Range |
Impact on Strength |
Impact on Print Time |
|---|---|---|
|
0-15% |
Minimal strength, for decorative parts |
Significantly reduced print time |
|
15-50% |
Moderate strength, ideal for prototypes |
Balanced print time |
|
50-100% |
Maximum strength, for functional parts |
Increased print time |
For most prints, an infill density between 30% and 50% balances print speed and strength. Load-bearing parts may need 40% to 60% infill. Adjusting infill settings helps optimize 3d printing speed without sacrificing durability.
Print Settings and Slicer Adjustments
Print Speed and Decreasing Print Time
Print speed stands as one of the most influential factors in 3d printing speed. Adjusting print speed in slicing software settings can dramatically change the duration of a print job. Higher print speed settings allow the printer to lay down material faster, which leads to shorter print time 3d printer. However, increasing print speed may introduce defects such as ringing, poor layer adhesion, and under-extrusion. Slower print speed often results in better dimensional accuracy and stronger parts, but excessive slowness can cause overheating and wasted time.
Users should consider the following when adjusting print speed:
- Printing speed affects both surface finish and structural integrity.
- Travel speed determines how quickly the print head moves between points without extruding material.
- Initial layer speed influences bed adhesion and the foundation of the print.
- Print temperature must match the chosen print speed to ensure proper extrusion and bonding.
A balance between print speed and quality is essential. For most projects, moderate print speed settings yield reliable results. The table below summarizes slicer settings that impact 3d printing speed and quality:
|
Slicer Setting |
Impact on Print Time |
Quality Consideration |
|---|---|---|
|
Increase Printing Speed |
Reduces print time significantly |
Depends on design size |
|
Adjust Acceleration |
Faster top speed reduces operation time |
Must maintain smooth jerk value |
|
Change Infill Patterns |
Affects speed and strength |
Varies with pattern choice |
|
Reduce Infill Density |
Directly proportional to print time |
Lower density may affect strength |
|
Decrease Wall Thickness |
Reduces print time |
Must balance with structural integrity |
|
Use Dynamic Layer Height |
Adjusts layer height for efficiency |
Can improve surface finish |
|
Print Multiple Objects |
Utilizes bed space for efficiency |
May require careful arrangement |
Perimeters, Shells, and Acceleration
Perimeters and shells play a critical role in both 3d printing speed and part durability. Increasing the number of perimeters strengthens the model, but also increases print time. Thicker shells enhance sealing and surface durability, which benefits functional parts. However, excessive shells or perimeters slow down the process.
- The number of shells or roofs and floors affects flexural strength more than infill does.
- Thicker shells improve strength, sealing, and surface durability.
- Increasing perimeters leads to a stronger print, but at the cost of longer print time.
Acceleration and jerk settings in printer settings and configuration determine how quickly the print head reaches its target speed. Higher acceleration reduces operation time by allowing the printer to move faster between points. Proper acceleration settings minimize vibrations, which improves surface quality. Jerk control smooths out direction changes, reducing surface imperfections and improving print accuracy.
- Acceleration settings help the printer reach optimal printing speed quickly.
- Jerk control prevents sudden movements that cause artifacts.
- Travel speed adjustments can further decrease print time without sacrificing quality.
Part Orientation and Placement
Part orientation and placement on the print bed have a significant impact on 3d printing speed and efficiency. Horizontal orientation minimizes estimated print time for most printers. Vertical orientation may reduce costs for specific models, but often increases print time. Proper orientation can reduce the number of layers required, which speeds up the print process.
- Effective orientation eliminates unnecessary support structures, reducing material waste and simplifying post-processing.
- Minimizing unsupported surfaces decreases the need for supports, which enhances efficiency.
- Orienting parts to avoid overhangs of less than 45° helps eliminate supports and increases print speed.
Best practices for part placement include:
- Increase layer height to reduce the total number of layers and decrease print time.
- Design parts specifically for 3D printing to avoid unnecessary complexity.
- Minimize surface area to reduce the number of walls, which speeds up printing.
- Limit support material by optimizing orientation and design.
The table below highlights slicer adjustments that influence print time and efficiency:
|
Adjustment Type |
Impact on Print Time |
Notes |
|---|---|---|
|
Infill Speed |
Decreases time |
Speeding up infill saves time as it is not visible in the final print. |
|
Layer Height |
Increases time |
Decreasing layer height generally increases print time. |
|
Model Orientation |
Varies |
Horizontal orientation minimizes print time; vertical minimizes cost. |
Careful adjustment of print settings, print speed, travel speed, initial layer speed, and print temperature, combined with thoughtful part orientation, leads to decreasing print time and improved 3d printing speed. Regular 3d printer calibration ensures that printer settings and configuration remain optimal for each project.
Printer Technology and Material Choice
Technology Differences in Print Time 3D Printer
Printer technology plays a major role in determining how quickly a 3D printer completes a job. Different types of 3d printing technology offer unique advantages and limitations. Fused Deposition Modeling (FDM) printers use heated filament and tend to print faster than resin-based printers, but may sacrifice surface quality. Stereolithography (SLA) and Digital Light Processing (DLP) printers use liquid resin and UV light, producing smoother surfaces but often require longer curing times. Hardware capabilities, such as processor speed and memory, also influence print speed. Printers with advanced hardware process complex files more efficiently.
The following table highlights key factors that affect print speed across various printer technologies:
|
Factor |
Description |
|---|---|
|
Printer Type |
FDM printers usually print faster than SLA or DLP models. |
|
Print Quality Settings |
Draft mode prints quickly; high-quality mode takes longer. |
|
File Complexity |
Simple models print faster; detailed designs slow down the process. |
|
Hardware Specs |
Faster processors and more memory increase efficiency. |
|
Maintenance |
Regular upkeep prevents jams and keeps print times consistent. |
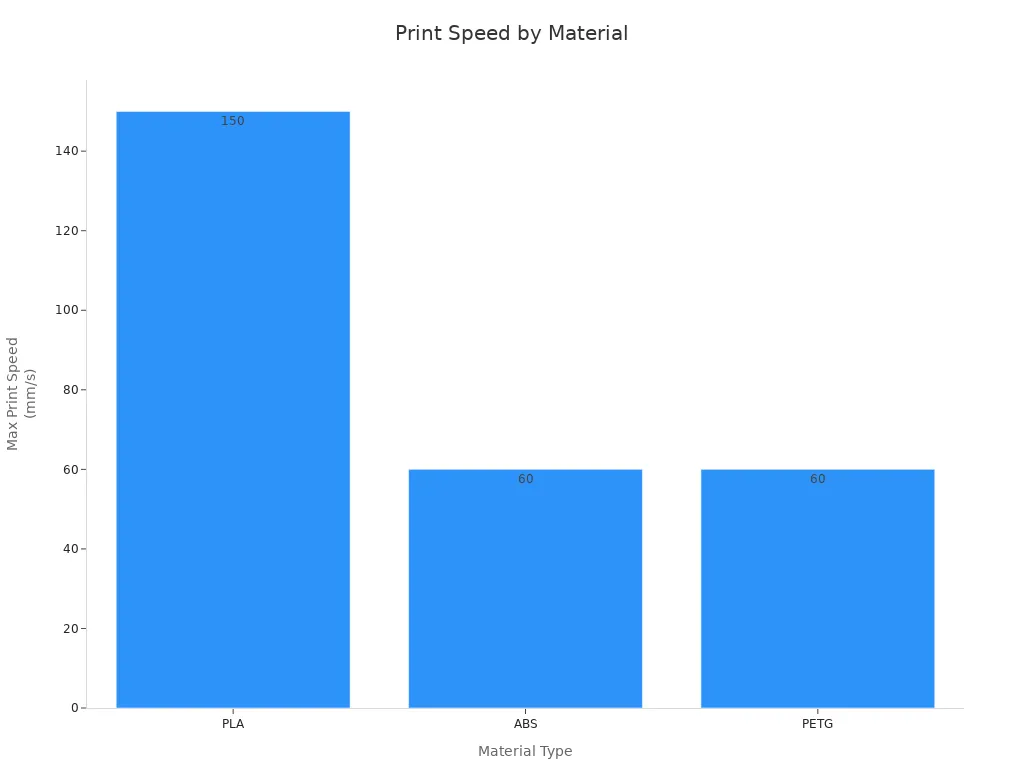
Material Type and 3D Printing Time
Material choice affects both speed and quality in 3D printing. PLA prints at higher speeds and works well for concept models and educational projects. ABS and PETG require slower speeds to prevent warping and ensure strong layer bonding. Resin materials, used in SLA and DLP printers, deliver high precision but often take longer due to curing steps.
The chart below compares recommended print speeds for popular materials:
The table summarizes material properties and recommended uses:
|
Material |
Properties |
Recommended Use |
|---|---|---|
|
Resin (SLA/DLP/LCD) |
High precision, smooth surfaces, brittle, UV-sensitive |
Figurines, jewelry molds, dental models |
|
Nylon (PA) |
High strength, flexibility, moisture-sensitive |
Gears, hinges, clips, drone frames |
|
PLA |
Easy to print, rigid, brittle |
Concept models, educational projects |
|
PETG |
Balanced strength and toughness, good weather resistance |
Outdoor housings, functional parts |
|
ABS |
Strong, heat-resistant, prone to warping |
Automotive parts, durable housings |
Material choice impacts 3d printing time and final part quality. PLA allows for faster prints, while ABS and PETG require careful temperature control and slower speeds. Resin-based prints take longer but deliver exceptional detail. Selecting the right material for the project ensures efficient use of 3d printing technology.
Post-Processing and Workflow Efficiency
Time After Printing
Post-processing begins as soon as the printer finishes its job. This stage includes support removal and surface finishing. Support removal usually comes first, especially for prints with complex overhangs. Surface finishing follows, which may involve sanding, washing, or chemical treatments. The time required for these steps can vary. For every one to six hours spent printing, users often spend about one hour on post-processing. Sometimes, post-processing adds between 17% and 100% to the total project time. The ratio of print time to post-processing time ranges from 1:1 to 1:6. These steps ensure the final part looks clean and functions as intended.
Common post-processing steps:
- Support removal
- Sanding or smoothing surfaces
- Washing or curing (for resin prints)
- Painting or coating
Balancing Print and Post-Processing
Workflow efficiency depends on balancing print time with post-processing. Design refinements help by dividing large models into smaller sections. Smaller parts print faster and are easier to finish. Hardware and firmware upgrades improve motion planning and reliability. Organized filament management prevents tangling and keeps printing smooth. Automation software allows users to control printers remotely and schedule jobs. Adjusting infill and perimeter settings balances speed and strength, reducing the need for extra finishing. Regular maintenance keeps the printer running well and avoids failures.
|
Workflow Optimization |
Benefit |
|---|---|
|
Design refinements |
Easier printing and assembly |
|
Hardware upgrades |
Faster, more reliable printing |
|
Filament management |
Smooth, uninterrupted workflow |
|
Automation |
Efficient job scheduling |
|
Infill/perimeter tuning |
Balanced speed and strength |
|
Maintenance practices |
Consistent performance |
Balancing print and post-processing steps leads to faster, more reliable results. Users who optimize their workflow spend less time waiting and achieve better outcomes with every print.
Many factors influence print time 3d printer, including model complexity, layer height, nozzle size, infill, and material choice. These elements interact to shape both speed and quality. Experts recommend adjusting layer height, printing speed, temperature, infill density, support structures, cooling, and retraction settings for best results. Users can optimize infill, use adaptive layers, prepare the printer bed, and slow down speed if needed. Experimenting with settings and regular maintenance helps achieve efficient and high-quality prints.
FAQ
What is the fastest way to reduce print time for a 3D printer?
Users can increase layer height and print speed in the slicer settings. They should also choose lower infill density and use larger nozzle diameters. These adjustments help finish prints faster while maintaining acceptable quality.
Does model orientation affect print time?
Model orientation changes the number of layers and support structures needed. Placing the object horizontally often reduces print time. Proper orientation also improves surface quality and minimizes post-processing steps.
How does material choice impact print time?
Different materials require unique temperature and speed settings. PLA prints quickly and suits most projects. ABS and PETG need slower speeds to prevent warping. Resin-based prints take longer because of curing steps.
Why do supports increase print time for a 3D printer?
Supports add extra layers and movements. The printer must build these structures before printing the main object. Removing supports after printing also adds time to the workflow.
Can slicer software estimate print time 3d printer accurately?
Slicer software provides a good estimate based on model complexity, settings, and printer type. Actual print time may vary due to hardware performance, material, and environmental factors.