


Electroplate 3D prints provide plastic objects with a genuine metal finish by first making the surface conductive and then applying a thin layer of metal. The process involves four main steps: applying conductive paint, preparing an electroplating bath, executing the electroplating process, and polishing the final result. This method enhances both the appearance and durability of items, making it a favored choice for jewelry and car badges. Many individuals find electroplate 3D prints to be accessible, with numerous online resources and a beginner’s guide available for those eager to learn.
Key Takeaways
- Electroplating enhances 3D prints by adding a durable metal finish, improving both appearance and strength.
- Preparation is key: Clean and sand your print to ensure a smooth surface for better metal adhesion.
- Use conductive paint to make non-conductive plastics ready for electroplating; apply it evenly for uniform results.
- Monitor voltage and current during the electroplating process to achieve a consistent metal layer.
- Safety first: Always wear protective gear and work in a well-ventilated area when handling chemicals.
Electroplating 3D Prints: Overview
What Is Electroplating
Electroplating uses a scientific process to deposit a thin layer of metal onto a surface. This process transfers metal ions from an anode to a cathode through an electrolyte bath. For non-conductive 3d printed objects, the surface must first become slightly conductive. Makers often use silver paint or other conductive coatings to prepare the print. This step allows the electroplating process to work on materials like plastic, which do not conduct electricity on their own. The result is a real metal finish that improves both the look and the strength of the object.
Why Electroplate 3D Prints
Many choose to electroplate 3d prints for several reasons:
- Increased durability: A metal coating makes the object stronger than plastic alone.
- Improved conductivity: Electroplating can turn 3d printed parts into functional electronic components.
- Enhanced adhesion: Electroless plating helps the metal layer stick better.
- Better consistency: Electroplating gives more uniform results than painting.
- Cost-effectiveness: The process is faster and less expensive than applying many layers of paint.
Electroplating also improves the Young's modulus and impact strength of FDM-PLA parts. For example, a 55 µm thick metal layer can increase the Young's modulus by over 100%. Thicker coatings may reduce flexibility, but even thin layers provide a significant boost in strength.
Common Applications
Electroplating 3d prints finds use in many industries. The table below shows some popular applications:
|
Industry |
Applications |
|---|---|
|
Automotive |
Restoration of classic car parts, concept components |
|
Fashion & Art |
Jewelry, footwear, large sculptures |
|
Medical Devices |
Electroplated tools and components |
Makers often use copper for the first layer because it provides excellent coverage and adhesion. Other metals like nickel, chrome, and gold offer different benefits, such as corrosion resistance, wear resistance, and high conductivity. Electroforming, a related process, allows for even thicker metal layers and more complex shapes.
Materials & Tools for Electroplating
Electroplating 3d prints requires careful selection of materials and tools at each stage. The process begins with making the print conductive, continues with setting up the electroplating bath, and finishes with post-processing for a smooth metal finish.
Making Prints Conductive
Most 3d printing materials, such as Polylactic Acid (PLA), Acrylonitrile Butadiene Styrene (ABS), Acrylonitrile Styrene Acrylate (ASA), nylon, polypropylene, polycarbonate, and polyetherimide, work well for electroplating. Some filaments contain additives like graphite or graphene to improve conductivity. Makers often use graphite paint or conductive ink to create a conductive surface. Polishing the graphite coating with a rotary rock tumbler increases conductivity and leads to better copper plating results.
Tip: Conductive PLA filaments provide a substrate that supports uniform copper electroforming and fast deposition rates.
Common materials for this stage:
- 3d printed part (PLA, ABS, or other compatible plastics)
- Conductive ink or graphite paint
- Rotary rock tumbler or polishing tool
Electroplating Bath Setup
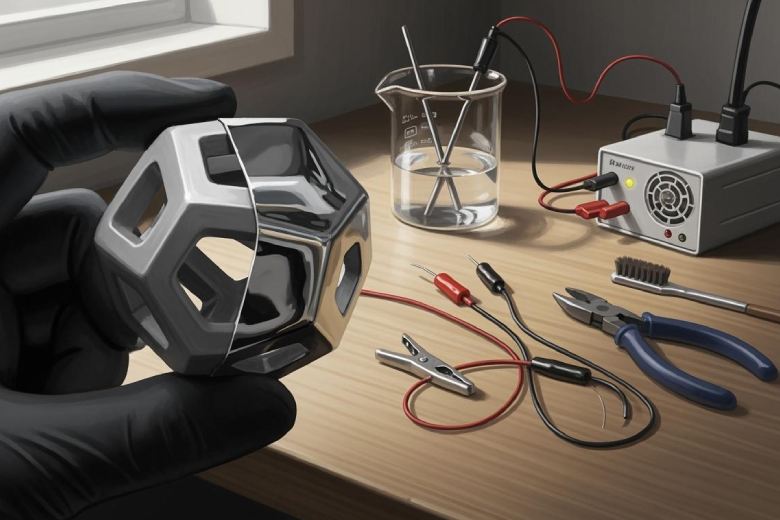
Setting up the electroplating bath involves several essential components. Safety gear protects users from chemicals during the electroforming process. A copper electrode supplies the metal ions needed for copper electroforming. The bath contains electrolytes specific to the chosen metal. A laboratory power supply controls the current for consistent plating.
|
Item |
Purpose |
|---|---|
|
Lab coat, glasses, gloves |
Safety during chemical handling |
|
Copper electrode |
Source for copper ions |
|
Electrolyte solution |
Transfers metal ions |
|
Power supply |
Controls current for electroplating |
|
Wires and clamps |
Connects electrodes and print |
|
Vat or container |
Holds the electroplating bath |
|
Airbrush |
Applies conductive coating |
Post-Processing Tools
After the electroforming process, post-processing tools help achieve a high-quality metal finish. Sandpaper, polishing paste, and cloth remove imperfections and bring out the shine in the copper layer. Non-woven fabric and an improvised rotating device can further smooth the surface.
Recommended tools for finishing:
- 1000-2000 grit sandpaper
- Polishing paste and cloth
- Non-woven fabric
- Rotary device for even polishing
Copper plating creates a durable and attractive shell. Nickel, chrome, and other metals may be added for extra protection or decorative effects. Surface preparation and careful polishing ensure the final metal finish looks professional.
Electroplating 3D Prints: Step-by-Step
Prepare the Print
Preparation forms the foundation for successful results when people electroplate 3d prints. Makers start by cleaning the 3d printed objects to remove dust, oils, or any leftover support material. Sanding the surface with fine-grit sandpaper smooths out layer lines and imperfections. This step helps the metal adhere evenly and prevents defects like pitting or blisters. For best results, users should round off sharp edges. Sharp corners can attract too much current during electroplating, which may cause excessive coating and brittleness. After sanding, a quick rinse with water removes any remaining particles.
Tip: A smooth, clean surface leads to more uniform metallic results and reduces the risk of common mistakes during the electroforming process.
Apply Conductive Paint
The next step involves making the print conductive. Most 3d printed parts use plastic, which does not conduct electricity. Makers solve this by applying a thin, even layer of conductive paint or graphite. The paint covers every part of the surface, including small details and crevices. This step prepares the print for the real metal finish.
Best practices for applying conductive paint include:
- Clean and sand the print to remove flaws.
- Apply a thin, even layer of conductive paint.
- Allow the paint to dry completely before moving to the next step.
- Inspect the surface for missed spots and touch up as needed.
A rotary tool or airbrush can help achieve a smooth coating. Uneven paint can lead to patchy copper plating, so careful application is important. Makers should wear gloves and work in a well-ventilated area to avoid inhaling fumes.
Copper Electroforming Basics
Copper electroforming creates the first metal layer on the print. This process uses a copper electrode, an electrolyte solution, and a power supply. The print attaches to the negative terminal, while the copper electrode connects to the positive terminal. The electrolyte bath contains copper ions that deposit onto the print when current flows.
Key parameters for copper electroforming include:
|
Parameter |
Value |
|---|---|
|
Voltage |
1 to 10 volts |
|
Current |
Around 1A (stabilized) |
|
Time |
1 hour (initial wash) |
|
|
4 hours (for coating) |
Makers often start with a low voltage, such as 1 or 2 volts. The current may begin at 0.5A and increase as the copper layer builds up. Maintaining a stable current near 1A produces the best results. If the initial current is too low, increasing it after the first layer improves coverage. Monitoring the process helps avoid problems like cold shuts or cleavage points.
Note: Always wear gloves, goggles, and a lab coat when handling chemicals. Work in a well-ventilated space to reduce exposure to fumes.
Run the Electroplating Process
Electroplating 3d prints involves several careful steps:
- Prepare the plating bath with the chosen metal solution, such as copper or nickel.
- Attach the print to the negative terminal of the power supply.
- Place the copper electrode in the bath and connect it to the positive terminal.
- Submerge the print in the solution and turn on the power.
- Monitor voltage and current to keep them within recommended ranges.
- Allow the process to run for the required time, usually several hours for a strong metal layer.
Common mistakes during electroplating include poor surface preparation, which can cause pitting, and unclean manufacturing, which leads to poor adhesion. Makers should avoid sharp edges and ensure the print is fully covered with conductive paint. If bubbles form on the surface, gently agitate the bath to release them.
Safety Alert: Never touch the solution or electrodes while the power is on. Always disconnect the power before adjusting the setup.
Polish for Metal Finish
Polishing brings out the shine and smoothness in the final metal layer. The process starts with rinsing the print to remove any leftover chemicals. Makers then use abrasive materials, such as 1000-2000 grit sandpaper, to remove surface imperfections. Applying a fine polishing compound, like diamond paste or aluminum oxide, enhances the gloss.
"Isotropic superfinishing uses a combination of mechanical and chemical finishing to achieve a mirror-like finish on metal parts. The process first uses a chemical solution to produce a self-assembled monolayer—essentially a softened metal layer on the surface of a part. That layer is then removed with a relatively gentle vibratory finishing cycle, resulting in parts that are extremely smooth, with very little roughness, waviness, or sharp micro-notches."
Buffing with a soft cloth or polishing wheel creates a mirror-like shine. Makers should inspect the part for any dull spots and repeat the polishing steps if needed. This final stage transforms 3d printed jewelry, car badges, and other items into professional-quality pieces with a real metal finish.
Tip: Consistent polishing and inspection ensure the best metallic results and long-lasting durability.
Safety & Troubleshooting in Electroforming
Safety Precautions
Electroplating and electroforming use chemicals that can harm people if handled carelessly. Makers should always wear safety gear when working with copper solutions or other metal baths. The following items help protect against common hazards:
- Appropriate eyewear shields eyes from splashes of acidic solutions.
- Non-conductive gloves prevent skin irritation and reduce electrical risks.
- Lab coats and closed-toe shoes keep chemicals away from skin and clothing.
Many home setups lack proper ventilation. Garages and basements trap toxic fumes, which can cause respiratory emergencies. Unprotected skin exposure leads to chemical burns, especially when handling chromium or copper solutions. Pouring waste water down drains is illegal and damages local ecosystems.
|
Aspect |
Professional Plating |
DIY Attempt |
|---|---|---|
|
Chemicals Used |
Regulated hexavalent chromium with neutralization protocols |
Unregulated kits; often contain toxic substitutes like trivalent chromium (still hazardous) |
|
Safety Requirements |
Industrial ventilation, PPE, wastewater treatment, and OSHA compliance |
Rarely achievable at home; leads to unsafe fume exposure |
|
Result Quality |
Durable, corrosion-resistant mirror finish |
Uneven coating, poor adhesion, rapid peeling |
Common Issues
Electroplating 3D prints can present several challenges. Poor adhesion often happens when the plastic surface is not activated or cleaned well. Uneven coating results from rough surfaces or incorrect current distribution. Makers should sandblast or chemically etch the print to improve surface roughness and use conductive coatings for better adhesion. Adjusting anode placement and current density helps achieve a uniform copper layer.
- Poor adhesion: Caused by greasy surfaces or uncured paint. Strip and degrease the part, then repaint and allow full curing.
- Uneven coating: Results from sharp edges or lack of solution movement. Use multiple anodes and stir the bath gently.
- Patchy plating: Occurs when conductive paint coverage is incomplete or wiring is incorrect. Repaint and check connections.
- Unexpected defects: Overgrowth in sharp regions, mask detachment, and shape deviations appear in less than 12% of samples.
|
Issue |
Potential Causes |
Recommended Solutions |
|---|---|---|
|
No Plating / Patchy Plating |
Re-paint and ensure full coverage. |
|
|
|
Incorrect wiring (+/- reversed). |
Double-check your connections. |
|
|
Current is too low. |
Slowly increase amperage. |
|
Poor Adhesion (Metal Flakes Off) |
Greasy or dirty surface before painting. |
Strip the part and restart, ensuring thorough degreasing. |
|
|
Primer/paint not fully cured. |
Allow for full curing time as per manufacturer instructions. |
|
Uneven Plating Thickness |
Part's geometry (sharp edges plate faster). |
Use multiple anodes for more even current distribution. |
|
|
Lack of solution movement. |
Introduce gentle solution movement with a stirrer or pump. |
Tips for Best Results
Electroforming and electroplating make 3D prints stronger and give them a shiny, mirror-like metal surface. The metal layer protects against scratches, rust, and heat. Beginners can achieve consistent results by following expert advice:
- Inspect anode and cathode connections for proper electrical flow.
- Clean and check filtration systems to keep the plating bath free of contaminants.
- Test and calibrate pumps, heaters, and rectifiers regularly.
- Monitor and replace reagents to maintain correct electrolyte ratios.
- Check tanks and equipment for wear or leaks.
- Use sensors and automated tools for real-time monitoring.
Makers who follow these steps can create durable copper coatings and achieve professional-quality finishes. Electroplated plastic parts can handle nearly twice the weight of 3D printed aluminum.
Electroplating 3D prints transforms plastic objects into strong, attractive pieces with a real metal finish. The process follows four main steps:
- Prepare the plating setup with the right bath and power source.
- Immerse the print and connect it to the circuit.
- Run the plating process, adjusting current for even coating.
- Polish the surface for a smooth, shiny result.
Safety remains essential. Makers should never leave tanks unattended or set voltage too low. Many beginners struggle with masking or polishing, which can affect results. For deeper learning, they can explore resources like the Electroplating Tutorial.
FAQ
How long does it take to electroplate a 3D print?
The process usually takes between 4 and 8 hours. Larger or more detailed prints may require extra time for thicker metal layers.
Can someone electroplate any type of plastic?
Most common 3D printing plastics like PLA and ABS work well. Some specialty plastics may need extra surface preparation for good adhesion.
Is electroplating safe to do at home?
Electroplating uses chemicals that can be hazardous. Makers should always wear safety gear, work in a ventilated area, and follow local disposal rules.
What metals can be used for electroplating 3D prints?
Copper is the most common choice for the first layer. Nickel, chrome, silver, and gold can also be used for different finishes and properties.
Why does the metal sometimes peel off after plating?
Poor surface cleaning or incomplete curing of conductive paint often causes peeling. Makers should ensure the print is clean and the paint is fully dry before starting electroplating.