


Vous pouvez apprendre l'impression 3D en quelques étapes simples. Si vous vous demandez comment débuter avec une imprimante 3D, rassurez-vous, vous n'êtes pas seul. Faire des erreurs est normal. La plupart des gens réussissent rapidement.
69 % des nouveaux utilisateurs remplissent un formulaire d'impression.
La pratique permet de gagner en confiance.
Principes de base de l'impression 3D
Comment ça marche
Vous vous demandez peut-être comment fonctionne une imprimante 3D. Tout d'abord, il vous faut un modèle numérique. Vous envoyez ce modèle à votre imprimante 3D. Celle-ci construit l'objet couche par couche. La plupart des débutants utilisent la technologie de dépôt de fil fondu (FDM). L'imprimante fait fondre un filament de plastique et le dépose en fines lignes. Certaines imprimantes utilisent des lasers ou la lumière pour façonner le métal ou la résine.
Voici un aperçu rapide des différentes méthodes d'impression 3D :
| Description | |
|---|---|
| Modélisation par dépôt de fil fondu (FDM) | Il pousse le plastique fondu pour former des couches. |
| Stéréolithographie (SLA) | Utilise la lumière UV pour durcir la résine liquide. |
| Frittage laser sélectif (SLS) | Un laser chauffe de la poudre pour créer des formes solides. |
| Fusion laser sélective (SLM) | Un laser fait fondre de la poudre métallique pour la souder. |
| Frittage laser direct de métal (DMLS) | Un laser assemble des poudres métalliques. |
L'impression 3D ajoute de la matière au lieu d'en enlever. Cela permet de créer des formes difficiles à réaliser avec d'autres outils.
À quoi s'attendre
Lorsque vous commencez à utiliser une imprimante 3D, vous pouvez concevoir et fabriquer des objets vous-même. Vous pouvez imprimer des modèles de test pour expérimenter rapidement vos idées. Vous pouvez créer des objets pour votre maison ou vos loisirs. Certaines personnes utilisent l'impression 3D pour fabriquer des pièces ou de petits produits.
Conseil : Pas besoin d’être un expert pour commencer. Beaucoup de gens impriment d’abord des objets simples, comme des porte-clés ou des supports pour téléphone.
L'impression 3D prend du temps, surtout pour les grands objets. L'imprimante travaille lentement et construit chaque couche avec précision. Votre première impression peut prendre quelques heures. Observer son imprimante 3D en action est passionnant. C'est formidable de voir son idée prendre forme.
Choisir une imprimante 3D
Types pour débutants
Choisir sa première imprimante 3D peut sembler complexe, mais vous pouvez vous simplifier la tâche en suivant quelques étapes :
- Réfléchissez à la raison pour laquelle vous souhaitez une imprimante 3D. Vous souhaitez l'utiliser pour vos loisirs, vos études ou peut-être une petite entreprise ?
- Déterminez ce que vous souhaitez imprimer. Si vous prévoyez de fabriquer des jouets, des gadgets ou des pièces détachées, une imprimante 3D FDM est un excellent choix. Si vous souhaitez imprimer des miniatures ou des bijoux, une imprimante résine (SLA) sera plus adaptée.
- Vérifiez les dimensions des objets que vous souhaitez imprimer. Certaines imprimantes ne peuvent réaliser que de petits objets, tandis que d'autres prennent en charge des projets plus importants.
- Établissez votre budget. N'oubliez pas que vous dépenserez de l'argent pour les matériaux et l'entretien, et pas seulement pour l'imprimante.
Voici deux marques populaires d'imprimantes 3D d'entrée de gamme :
| Marque | Part de marché (%) | Croissance annuelle (%) |
|---|---|---|
| 47 | 64 | |
| Laboratoire de bambou | 26 | 336 |
Vous trouverez de nombreux guides et vidéos utiles pour ces marques, ce qui facilite l'apprentissage de l'impression 3D.
Matériels
Il est essentiel de choisir le bon matériau pour vos projets d'impression 3D. La plupart des débutants utilisent du filament PLA : facile à imprimer, sûr et disponible en de nombreuses couleurs. Pour des pièces plus résistantes, privilégiez le PETG ou l'ABS. Les imprimantes à résine utilisent quant à elles de la résine liquide, qui permet d'obtenir des impressions lisses et détaillées.
- PLA : Convient à la plupart des projets et facile à utiliser.
- PETG : Plus résistant et un peu plus flexible.
- ABS : Résistant mais nécessite une bonne ventilation.
- Résine : Idéale pour les maquettes minuscules et détaillées.
Choisir la bonne imprimante 3D et le bon matériau vous permettra d'obtenir les meilleurs résultats et de profiter pleinement de votre expérience d'impression 3D.
Configuration de l'imprimante 3D
Préparer son imprimante 3D est très important. Il faut s'assurer qu'elle est sûre et robuste avant d'imprimer. Il y a trois étapes principales : l'assemblage, nivellement du lit, et l'étalonnage.
Assemblée
Ouvrir le carton de votre nouvelle imprimante 3D est un moment excitant. Avant de commencer, rassemblez tous vos outils et matériaux. Vous devriez avoir à portée de main de la colle, du papier de verre, des cutters, des pinces et des équipements de sécurité. En voici quelques-uns. conseils de sécurité:
- Portez des gants et des lunettes de protection lorsque vous poncez ou utilisez de la colle.
- Nettoyer la poussière et la graisse avec de l'alcool et un chiffon non pelucheux.
- Examinez les pièces pour repérer d'éventuels problèmes. Éliminez les aspérités avec un couteau bien aiguisé.
- Gardez un extincteur et une alarme incendie dans votre espace de travail.
- Activez la protection contre l'emballement thermique dans le logiciel de votre imprimante.
- Utilisez des pièces de bonne qualité pour réduire les risques d'incendies électriques.
- Vérifiez régulièrement votre imprimante 3D pour détecter tout dommage.
Placez votre imprimante 3D sur une table plane et stable. Cela évite les vibrations et garantit des impressions réussies. Si vous avez une pied à coulisse numérique, Utilisez-le pour mesurer les pièces et vérifier leur ajustement. Des pinces à épiler, des pinces classiques et des outils de retrait d'impression facilitent les petites tâches. Un séchoir à filament et un bon système de rangement permettent de conserver votre filament en bon état.
Conseil : Un caisson pour imprimante 3D maintient une température stable et empêche la poussière de se déposer sur vos impressions.
Nivellement du lit
Le nivellement du plateau est essentiel pour obtenir des impressions 3D de qualité. Si le plateau n'est pas nivelé, la première couche risque de ne pas adhérer et votre impression pourrait échouer. La buse doit se trouver à une distance constante du plateau.
Voici pourquoi le nivellement du lit de culture est important :
| Zone d'impact | Description |
|---|---|
| Finition de surface | Un lit de niveau vous offre des surfaces lisses et uniformes. |
| Précision dimensionnelle | L'étalonnage permet d'obtenir des impressions de la taille souhaitée. |
| Adhésion des couches | Un bon nivellement permet aux couches d'adhérer plus facilement entre elles. |
| Prévenir les défaillances | |
Utilisez une feuille de papier ou une jauge d'épaisseur pour vérifier l'écart entre la buse et le plateau. Certaines imprimantes sont équipées d'un système de nivellement automatique, mais une vérification manuelle reste conseillée. Prenez votre temps pour cette étape : elle est essentielle au bon fonctionnement de vos impressions 3D.
Étalonnage
L'étalonnage permet à votre imprimante 3D de réaliser des impressions solides et précises. Suivez les tutoriels d'étalonnage et imprimez des objets de test avant de vous lancer dans des projets importants. Deux impressions de test courantes sont : cubes d'étalonnage et les tours thermiques.
| Objet de test | Objectif et avantages |
|---|---|
| Cube d'étalonnage | Contrôle la précision dimensionnelle sur tous les côtés. Permet de détecter les erreurs et les défauts d'alignement. |
| Tour thermique | Détermine la température optimale pour votre filament. Indique les problèmes tels que le filage et le gauchissement. |
Utilisez un pied à coulisse pour mesurer votre cube de calibration. Si ses dimensions sont incorrectes, modifiez les paramètres de votre imprimante. La tour thermique vous aide à choisir la température optimale pour votre filament. Cela permet une meilleure adhérence des couches et des surfaces plus esthétiques.
Les erreurs de calibration courantes incluent des problèmes d'adhérence de la première couche, des dimensions incorrectes et des pièces mal fixées. Si la première couche n'adhère pas, l'impression risque d'échouer. Si la taille est incorrecte, vérifiez la température et l'extrusion. Des rails ou des courroies desserrés peuvent également nuire à la précision des impressions.
Remarque : Imprimez toujours un cube de calibration et une tour thermique avant de commencer un nouveau projet ou de changer de filament.
Vous êtes maintenant prêt pour votre première impression 3D. Une préparation soignée vous permettra d'obtenir une impression réussie.
Préparation à l'impression
Trouver des modèles
Vous avez peut-être hâte de vous lancer dans votre premier projet d'impression 3D. La bonne nouvelle, c'est que vous n'avez pas besoin de tout concevoir de A à Z. De nombreux sites web proposent des modèles 3D gratuits compatibles avec votre imprimante. Voici deux excellents sites pour trouver des modèles 3D faciles à utiliser, même pour les débutants :
- Thingiverse: Vous pouvez parcourir des milliers de modèles 3D gratuits. Le site propose également des guides et des conseils pour les nouveaux utilisateurs.
- Shapeways: Ce site propose des tutoriels sur les logiciels de modélisation 3D. Vous pouvez apprendre à modifier ou à créer vos propres modèles d'impression 3D.
Vous pouvez télécharger un modèle, puis vous préparer à utiliser votre imprimante 3D.
Logiciel de découpe
Avant de vous lancer dans l'impression 3D, vous aurez besoin d'un logiciel de découpe. Cet outil transforme vos modèles 3D en instructions pour votre imprimante 3D. Plusieurs options simples sont disponibles pour les débutants. En voici un aperçu :
| Logiciel | Caractéristiques principales | Idéal pour |
|---|---|---|
| Logiciel libre, compatible avec de nombreuses imprimantes 3D, profils d'impression faciles à utiliser | Débutants et passionnés | |
| PrusaSlicer | Modes simple et avancé, adaptés aux imprimantes 3D Prusa | utilisateurs d'imprimantes Prusa |
| Studio Bambu | Interface épurée, conçue pour les imprimantes 3D Bambu Lab | utilisateurs d'imprimantes Bambu Lab |
Choisissez le logiciel compatible avec votre imprimante 3D. Vous pouvez suivre les guides d'installation pour commencer.
Paramètres d'impression
Vous contrôlez le fonctionnement de votre imprimante 3D en modifiant les paramètres d'impression dans votre logiciel de découpe. Deux paramètres importants sont la hauteur de couche et la vitesse d'impression. Ils influencent l'aspect et la texture de votre objet imprimé en 3D.
| Aspect | Couches plus fines (e.g. , 0,1 mm) | Couches plus épaisses (e.g. , 0,3 mm) |
|---|---|---|
| Qualité d'impression | Résolution plus élevée, détails plus fins | lignes de calque plus visibles |
| Vitesse d'impression | Plus lent en raison du nombre plus élevé de couches | Plus rapide grâce à un nombre réduit de couches |
| Qualité esthétique | Finition plus lisse, moins d'effet d'escalier | Finition plus rugueuse, plus de marches |
| Force | Souvent plus résistant grâce à une meilleure adhérence | Liaison plus faible possible |
| Cas d'utilisation idéal | Finition polie et très détaillée | Lignes droites, surfaces planes |
Conseil : Surveillez toujours la première couche lors de l’impression 3D. Une première couche réussie permet à vos modèles d’adhérer au plateau et d’obtenir une finition impeccable.
Vous pouvez essayer différents réglages pour voir ce qui convient le mieux à votre imprimante 3D et à vos projets d'impression 3D.
Impression 3D Pro taxe
Début d'une impression
Vous êtes prêt à donner vie à votre idée grâce à votre imprimante 3D. Avant de lancer l'impression, suivez ces étapes pour assurer la réussite de votre projet :
- Choisissez le bon filament. Choisissez un matériau adapté à vos besoins. Le PLA convient parfaitement à la plupart des débutants, mais vous préférerez peut-être un matériau plus résistant ou plus flexible.
- Vérifiez votre imprimante 3D. Assurez-vous que le plateau est bien nivelé et que la buse est propre. Cela favorise l'adhérence de la première couche et garantit une impression lisse.
- Préparer le plateau d'impression. Essuyez la surface pour éliminer la poussière et la graisse. Un plateau propre favorise l'adhérence de l'impression.
- Découpez votre modèle. Utilisez un logiciel de découpe pour convertir votre modèle en instructions pour votre imprimante 3D. Ajustez les paramètres pour obtenir les meilleurs résultats.
- Lancer l'impression. Observez attentivement la première couche. Si elle n'adhère pas, faites une pause et corrigez-la. La première couche est déterminante pour l'impression finale.
Conseil : Gardez votre espace de travail à une hauteur suffisante. température stable. Des changements brusques peuvent provoquer des déformations ou des fissures, notamment avec l'impression 3D en résine. Des températures stables permettent d'obtenir des impressions de meilleure qualité et plus durables.
Surveillance
Une fois votre impression 3D lancée, vous devez la surveiller.
- Observez l'impression en temps réel. Vous pourrez ainsi repérer rapidement les problèmes tels que les déformations ou les espaces.
- Utiliser outils de surveillance à distance. Certaines imprimantes vous permettent de suivre l'avancement de l'impression depuis votre téléphone ou votre ordinateur.
- Configurez des alertes. Recevez des notifications en cas de problème.
- Préparez les outils nécessaires pour les réparations rapides. Pinces à épiler, spatules et pinces vous aideront à gérer les bourrages ou les filaments détachés.
| Méthode de surveillance | Description |
|---|---|
| Des caméras contrôlent chaque couche pour détecter les défauts tels que les déformations ou les espaces vides. | |
| Détection automatisée des défauts | L'IA repère les changements de forme ou de texture et vous alerte immédiatement. |
| Surveillance à distance | Suivez votre imprimante 3D où que vous soyez, pour ne plus avoir à rester à côté. |
| Analyse des performances | Utilisez les données pour améliorer les paramètres et planifier la maintenance afin d'obtenir une meilleure impression 3D. |
Vous n'avez pas besoin de surveiller chaque minute, mais vérifier régulièrement vous aide à repérer les problèmes avant qu'ils ne ruinent votre projet d'impression 3D.
Dépannage
Adhérence au lit
Vous remarquerez peut-être que vos impressions se décollent ou que les bords se recourbent. C'est un signe de mauvaise adhérence. Une bonne adhérence permet à votre objet d'impression 3D de rester bien en place sur le plateau du début à la fin. Vous pouvez améliorer l'adhérence grâce à quelques astuces simples :
- Utilisez des bâtons de colle, de la laque ou des produits spéciaux pour meilleure adhérence.
- Choisissez le support d'impression approprié. Le verre, le PEI ou les feuilles magnétiques favorisent l'adhérence.
- Réglez le décalage Z. Cela positionne la buse à la hauteur idéale pour l'adhérence.
- Nettoyez régulièrement le plateau d'impression. La poussière et la graisse nuisent à l'adhérence.
- Modifiez la température du plateau en fonction de votre filament. Cela améliore l'adhérence.
L'adhérence est essentielle pour tout utilisateur d'imprimante 3D. Pour une adhérence optimale, vérifiez toujours votre plateau avant d'imprimer. Les problèmes d'adhérence peuvent compromettre votre projet, alors ne négligez pas ces étapes.
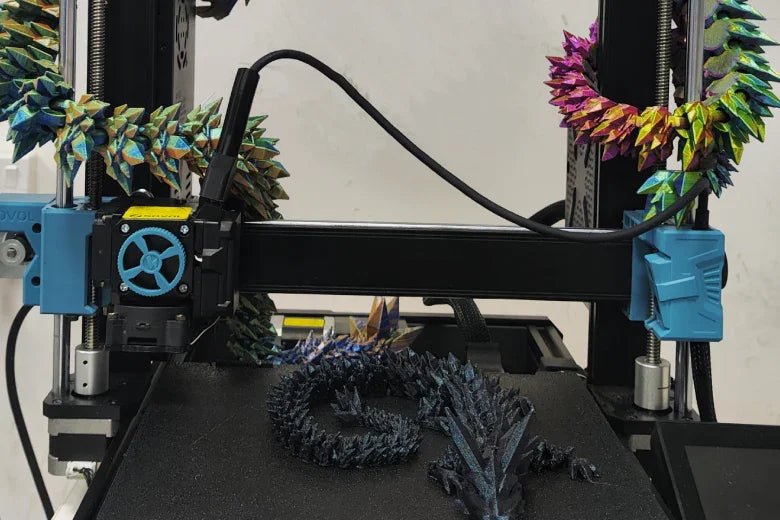
Problèmes d'extrusion
Il arrive que votre imprimante 3D cesse d'extruder le filament ou laisse des espaces vides. Ces problèmes d'extrusion peuvent nuire à l'adhérence et à la qualité d'impression. Il est donc important de nettoyer régulièrement la buse et la partie chaude. Voici un tableau pour vous rappeler quand le faire :
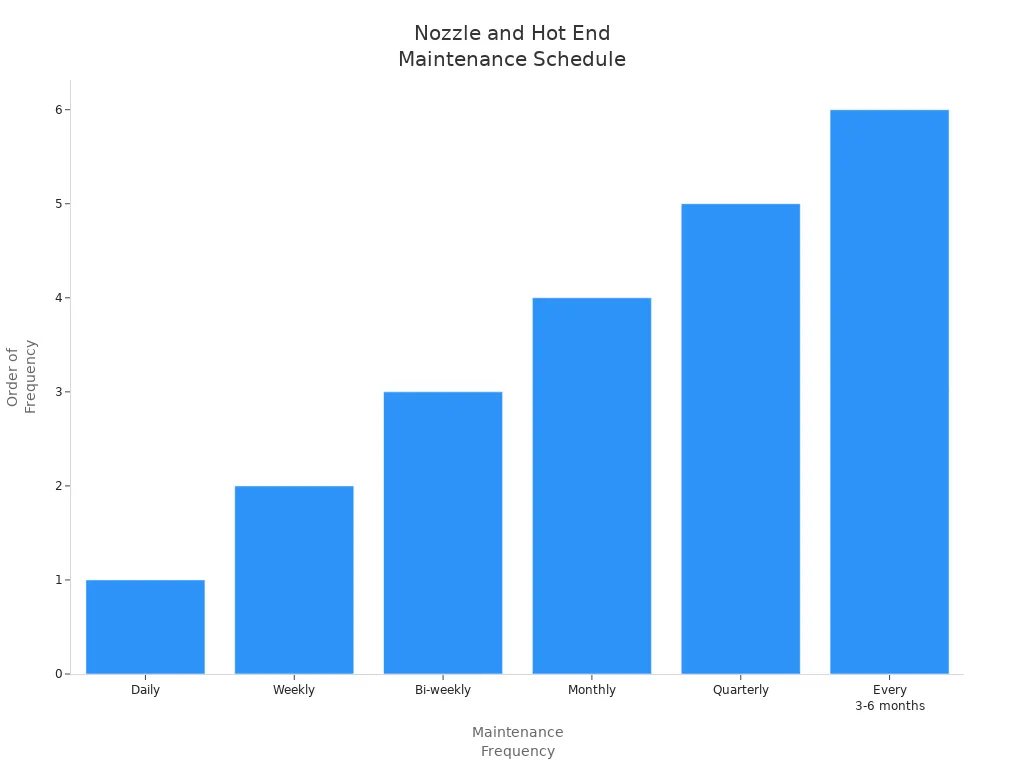
Vérifiez quotidiennement l'état de la buse. Nettoyez le plateau d'impression chaque semaine. Procédez à un rinçage à froid toutes les deux semaines. Trempez la buse une fois par mois si nécessaire. Démontez la tête d'impression tous les deux ou trois mois. Remplacez la buse si elle est usée. Ces étapes garantissent une extrusion fluide et une meilleure adhérence.
Voici un tableau avec problèmes et solutions courants:
| Problème | Description et solution |
|---|---|
| Sous extrusion | Le filament est trop froid pour adhérer. Vérifiez s'il y a des obstructions et augmentez la température de la buse. |
| L'extrusion s'arrête en cours d'impression | Manque de filament, extrudeuse bouchée ou moteur surchauffé. Réparez ces problèmes pour une meilleure adhérence. |
| Extrusion irrégulière | Problèmes de filament ou réglages incorrects. Ajustez pour une adhérence stable. |
Couche Pro défauts
Des décalages de couches ou des surfaces rugueuses peuvent survenir si votre imprimante 3D vibre ou si des pièces se desserrent. Ces problèmes affectent l'adhérence entre les couches. Vous pouvez résoudre les problèmes de couches en vérifiant les pièces mécaniques :
- Resserrer les courroies de distribution. Cela permet de maintenir les différentes couches alignées et favorise l'adhérence.
- Fixez solidement le plateau d'impression et le cadre. Des vis desserrées provoquent des oscillations et une mauvaise adhérence.
- Placez votre imprimante 3D sur une table stable et plane. Cela réduit les vibrations et améliore l'adhérence.
Pour des impressions 3D de qualité, inspectez régulièrement les pièces mobiles. Une bonne adhérence entre les couches garantit des impressions solides et nettes.
Maintenance des imprimantes 3D
Nettoyage
Un nettoyage régulier de votre imprimante 3D vous permettra d'obtenir de meilleures impressions et de réduire les problèmes. La poussière et les résidus de filament peuvent s'accumuler rapidement. Il est donc important de la nettoyer régulièrement. Nettoyer la buse et le plateau d'impression Fréquemment. Chauffez la buse à la température du dernier filament utilisé afin de ramollir les résidus. Nettoyez l'extérieur avec une brosse en laiton. Si la buse est bouchée, essayez de la déboucher avec une fine aiguille. Pour le plateau d'impression, munissez-vous d'alcool isopropylique et d'un chiffon doux. Essuyez la poussière et les traces de gras avant chaque impression.
Conseil : Un plateau d'impression propre permet à vos projets d'impression 3D d'adhérer plus facilement et d'obtenir une finition plus lisse.
Un nettoyage régulier ne se limite pas à l'esthétique. Il assure le bon fonctionnement de votre imprimante 3D et prévient les bourrages. Vous économisez ainsi du temps et de l'argent en évitant les impressions ratées et le gaspillage de matériaux.
| Zone d'impact | Description |
|---|---|
| Qualité d'impression | Le nettoyage permet d'obtenir des impressions plus lisses et plus précises. |
| Prévention des pannes matérielles | Empêche les obstructions et les blocages qui peuvent endommager votre imprimante. |
| Économies à long terme | Moins de déchets et moins de réparations vous permettent d'économiser de l'argent sur le long terme. |
Contrôles réguliers
Pour une expérience d'impression 3D optimale, il est essentiel de vérifier régulièrement votre machine. Contrôlez l'état des câbles : vérifiez qu'ils ne présentent aucune usure ni aucun jeu. Assurez-vous que les courroies sont bien tendues, sans être trop serrées. Si vous constatez des pièces tordues ou endommagées, réparez-les immédiatement. Nettoyez les rails et les roulements pour un fonctionnement fluide.
Voici un Liste de vérification rapide pour maintenir votre imprimante 3D en parfait état:
- Vérifiez que les câbles et les connecteurs ne sont pas endommagés.
- Vérifiez la tension de la courroie et ajustez-la si nécessaire.
- Nettoyez le plateau d'impression avant chaque impression.
- Lubrifiez les pièces mobiles pour réduire la friction.
- Mettez à jour le firmware dès que de nouvelles versions sont disponibles.
| Composant | Que vérifier ou faire |
|---|---|
| Câbles | Vérifiez que les connexions ne sont pas effilochées ou desserrées. |
| Parties déformées | Surveillez les déformations, en particulier près de l'extrudeuse. |
| Tension de la courroie | Assurez-vous que les ceintures ne soient ni trop lâches ni trop serrées. |
| Mises à jour du firmware | Installez les mises à jour et sauvegardez vos paramètres. |
| Plaque de construction | Nettoyer avant chaque impression pour une adhérence optimale. |
En suivant ces étapes, votre imprimante 3D durera plus longtemps et vos projets d'impression 3D seront de meilleure qualité.
Vous pouvez obtenir une excellente première impression en suivant ces étapes :
- Réglez la hauteur de votre buse pour une pulvérisation solide première couche.
- Nettoyez votre plateau d'impression avec de l'alcool isopropylique.
- Réglez la température du plateau en fonction de votre matériau.
Continuez d'expérimenter avec l'impression 3D. Essayez de nouveaux projets, utilisez des outils de CAO et explorez les kits pédagogiques.
FAQ
Que faire si mon impression se décolle constamment du plateau ?
Essayez de nettoyer le plateau, de le niveler à nouveau ou d'utiliser de la colle en bâton. Un plateau propre et nivelé favorise une meilleure adhérence de l'impression.
Pourquoi le filament ne sort-il pas de mon imprimante 3D ?
Vérifiez si la buse est bouchée ou si le filament est emmêlé. Chauffez la buse et poussez délicatement le filament pour éliminer tout blocage.
Puis-je laisser mon imprimante 3D fonctionner toute la nuit ?
Vous ne devez pas laisser votre imprimante 3D sans surveillance.