


Multi-color 3D printing creates objects with more than one color by combining different filaments or materials during the printing process. Beginners often start with a multi color 3d printer that features specialized hardware for handling multiple colors. Many choose machines like the Toolchanger system or the Original Prusa XL for complex designs. Some entry-level options, such as the Creality Hi Combo, offer high-speed performance and multicolor abilities for families or schools. The main methods for multi-color 3d printing use either manual or automated filament changes, each with unique benefits and challenges.
Common beginner equipment includes:
- Toolchanger system for switching materials
- Original Prusa XL for advanced multi-material prints
- Creality Hi Combo for affordable, industrial-grade multicolor printing
Key Takeaways
- Multi-color 3D printing combines different filaments to create vibrant objects. Beginners can start with single extruder printers for easy color changes.
- Different printer types, like dual nozzle and IDEX, offer unique benefits. Choose based on your needs for speed, complexity, and print quality.
- Manual filament changes are cost-effective for beginners. Automated systems save time but may require a higher investment.
- Proper model preparation and slicer settings enhance color transitions. Splitting models and adjusting printer settings can improve print quality.
- Regular maintenance and calibration are essential. Clean nozzles and monitor equipment to ensure consistent multi-color printing.
Main Types of Multi Color 3D Printers
Multi color 3d printer technology has evolved rapidly, offering several types that enable users to create vibrant objects with more than one color. Each type uses a unique approach to combine filaments or materials during printing.
|
Printer Type |
Description |
|---|---|
|
Single Extruder |
Uses one nozzle; switches filament manually or with a device for color changes. |
|
Dual Nozzle |
Features two nozzles; prints with two colors or materials at once. |
|
IDEX |
Independent Dual Extruder; each extruder moves separately for clean color transitions. |
|
Tool Changer System |
Swaps entire tool heads automatically; supports multiple colors and materials. |
Single Extruder Printers
A single extruder multi color 3d printer uses one nozzle to print objects. Users change the filament during the print to switch colors. This method works well for simple designs and educational models. Print quality often remains high because calibration is straightforward and the process is less complex. However, switching colors manually can slow down printing and limit the number of colors in a single object.
Tip: Single extruder printers suit beginners who want to experiment with color without investing in advanced hardware.
Dual Nozzle Printers
Dual nozzle multi color 3d printers use two separate nozzles to print with two colors or materials at the same time. This setup allows for faster printing and more complex color patterns. Some users notice issues like drooling and stringing, which can affect print quality. These printers fit well in classrooms and prototyping labs where speed and color variety matter.
IDEX Printers
IDEX multi color 3d printers feature two independent extruders. Each extruder moves separately, preventing material contamination and ensuring clean color transitions. Users can print with two colors or materials in one job, creating objects with different properties and vibrant color patterns. The separation of extruders reduces the risk of stringing and oozing, resulting in accurate prints.
- IDEX printers provide superior quality for multi-material and multi color 3d printer projects.
- The independent movement of extruders minimizes unwanted drips and cross-contamination.
- Users can combine different materials or colors for advanced designs.
Tool Changer Systems
Tool changer multi color 3d printers swap entire tool heads automatically during printing. This system supports several colors and materials, enhancing multicolor 3d printing capabilities. The Snapmaker U1, for example, features a four-head tool changer with dedicated filament paths. This design prevents oozing and filament waste by isolating inactive tools. The Snapmaker U1 is available at an early bird price of $679, with a retail price of $999, making it competitive among advanced multi color 3d printer options.
Note: Tool changer systems offer true multi-material and multi color printing, ideal for professional and industrial applications.
Multicolor 3D Printing Methods
Multicolor 3D printing offers several approaches for creating vibrant, full-color 3D-printed objects. Each method uses different equipment and techniques to achieve printing in multiple colors. The choice depends on the desired color complexity, budget, and the type of 3D printer available.
Manual Filament Changes
Manual filament changes represent the most accessible method for multicolor 3D printing. The user pauses the printer at specific layers or points, removes the current filament, and loads a new color. This process repeats for each color transition in the model.
Manual filament changes suit beginners who want to experiment with color without investing in advanced hardware.
How It Works:
- The user monitors the print and pauses at designated points.
- The filament is extracted and replaced with a new color.
- The printer resumes, continuing with the new filament.
Requirements:
- A single extruder 3D printer.
- Multiple filament spools in different colors.
- Slicer software to set pause points.
When Most Practical:
- Simple models with few color changes.
- Educational settings or hobby projects.
Pros and Cons:
|
Pros |
Cons |
|---|---|
|
Low cost and universally accessible |
Labor-intensive and time-consuming |
|
No need for special hardware |
Risk of filament extraction issues and nozzle blockages |
|
Easy to learn |
Common Challenges:
- Filament extraction issues can cause small filament balls at the tip, leading to extruder obstructions.
- Clearing blockages requires stopping the print and dismantling the extruder, which wastes time and material.
- These problems occur more often during manual changes than with automated systems.
The time added to a print job with manual filament changes is not linear. Each color swap introduces a fixed delay, so the total print time increases with the number of color changes.
Automated Filament Changers
Automated filament changers streamline multicolor 3D printing by switching filaments automatically. Devices like the Bambu Lab P1S with AMS or the Box Turtle Automated Filament Changer allow the printer to change colors without user intervention.
How It Works:
- The printer uses a feeder system to load and unload filaments as needed.
- The process is controlled by the printer’s software, enabling unattended operation.
Requirements:
- Compatible 3D printer with an automated filament changer.
- Multiple filament spools.
- Slicer software that supports color assignment.
When Most Practical:
- Complex models with frequent color changes.
- Long print jobs or production environments.
Pros and Cons:
|
Pros |
Cons |
|---|---|
|
Enables unattended, continuous printing |
Higher filament waste due to purging between colors |
|
High reliability with genuine parts |
Increased initial investment |
|
Suitable for high-quality prints |
Some systems require regular maintenance |
- The Box Turtle Automated Filament Changer costs $299.99, making it accessible for many users.
- The Bambu Lab P1S with AMS can run for extended periods without major issues, especially when using genuine parts.
Pre-Colored Filaments and Resins
Pre-colored filaments and resins offer another way to achieve multicolor 3D printing. These materials come in a variety of colors, effects, and finishes, allowing users to create colorful prints without changing filaments during the process.
How It Works:
- The user loads a filament or resin with built-in color effects.
- The printer creates objects with gradients, patterns, or specialty finishes.
Requirements:
- Compatible 3D printer (FDM or resin).
- Pre-colored filament or resin.
When Most Practical:
- Artistic designs or models requiring smooth color transitions.
- Projects where post-processing is not desired.
Types of Pre-Colored Filaments and Resins:
|
Filament Type |
Description |
|---|---|
|
Print with several colors at once, ideal for detailed designs |
|
|
Gradient filaments |
Create smooth transitions between colors |
|
Specialty filaments |
Add effects and textures for unique prints |
|
Wood filaments |
Mimic real wood, suitable for carving and staining |
|
Metal filaments |
Provide metallic finishes |
|
Conductive filaments |
Enable printing of electronic components |
|
Composite filaments |
Combine materials for strength or special effects |
Limitations:
|
Limitation |
Description |
|---|---|
|
Multi-color resins cost more than standard filaments |
|
|
Limited material options |
Fewer choices compared to FDM printers |
|
Extra time for cleaning and curing |
Resin prints require more post-processing |
|
Complex setup and maintenance |
Resin printers need careful setup and regular maintenance |
|
Harmful post-processing chemicals |
Cleaning chemicals can pose health risks |
Comparison of Multicolor 3D Printing Methods
|
Method |
Key Feature |
Primary Advantage |
Main Drawback |
Colors Supported |
|---|---|---|---|---|
|
Single Extruder |
Manual swaps or automated feeder |
Accessible or automated |
Labor-intensive or filament waste |
1 (at a time) |
|
Fixed Dual Nozzle |
Two nozzles, shared print head |
Two-color & soluble supports |
Oozing, prime towers required |
2 |
|
IDEX |
Independent print heads |
No oozing, special modes |
Mechanically complex |
2 |
|
Tool Changer |
Multiple tool heads |
Low waste, high speed, multi-material |
High initial investment |
4+ |
Multicolor 3D printing continues to evolve, offering users more choices for color, material, and print quality. Whether using manual filament changes, automated changers, or pre-colored filaments, each method brings unique benefits and challenges. Selecting the right approach depends on the desired outcome, available equipment, and budget.
Essential Software and Setup
Slicer Tools for Color Assignment
Selecting the right software is essential for successful multicolor 3d printing. Slicer software allows users to assign colors to different sections of a 3d model and control how the printer switches between filaments. Popular slicer options include PrusaSlicer, Bambu Studio, and Cura. Each slicer offers unique features for color management and model preparation. The table below compares slicing techniques and their impact on color assignment and print quality:
|
Slicing Technique |
Pros |
Cons |
|---|---|---|
|
IDEX 3D Printers |
Dual printing capability, no purging needed |
Complex calibration, limited to two materials |
|
Dual-Nozzle Single-Head |
Affordable, simple to manage |
Ooze risk, potential print quality issues |
|
Tool Heads (Prusa XL, ZR Ultra) |
Minimal waste, high flexibility |
Higher cost, increased complexity |
|
BambuLab AMS |
User-friendly, easy filament management |
Wasteful purging, slower switching |
Modern slicer software simplifies the learning curve for beginners. Features like automatic bed leveling and intuitive interfaces help users achieve successful multicolor printing within hours.
Model Preparation Tips
Proper model preparation ensures sharp color boundaries and reduces color bleeding. Users should split the 3d model into sections to isolate colors. Assigning colors to specific layers gives precise control over transitions. Fine-tuning printer settings such as pressure advance and outer wall line width sharpens color edges. Modifying CAD designs to thicken regions at color boundaries also improves transitions.
Tip: Adjust flush rates and use wipe or purge towers in the slicer to minimize color contamination during filament changes. Regular nozzle cleaning prevents unwanted mixing.
Best practices for preparing models include:
- Split the model into sections for each color.
- Assign colors to layers for accurate transitions.
- Fine-tune printer settings for sharper boundaries.
- Modify designs to thicken color regions.
Calibration and Maintenance
Routine calibration and maintenance keep multicolor 3d printing consistent. Users should clean the nozzle regularly to prevent clogs and color mixing. Lubricating moving parts every 1,000 hours of printing extends machine life. Monitoring cables and replacing worn parts prevents unexpected failures. Cleaning electronics and ventilation areas with compressed air or a soft brush removes dust. Inspecting spool holders and couplers for damage ensures smooth filament feeding. Clearing scratches from the build surface maintains good adhesion.
Minimizing waste in multicolor printing involves careful color palette planning and layer optimization. Users can reuse leftover filament for small projects or share it with others. Adjusting flushing volumes and using the 'Flush into Object Infill' option in the slicer reduces filament waste during color changes.
The single-nozzle multi-feed system stands out as the most cost-effective way for beginners to start color printing. This approach allows smooth color transitions in 3d printing without high expenses or complex setups. Beginners should try manual filament changes first and upgrade to automated systems as their skills grow. Understanding each color printing method helps users avoid common frustrations, such as skipping calibration, ignoring firmware updates, or printing too fast.
Exploring resources like A Beginner’s Guide to 3D Printing in Multiple Colors and advanced software tutorials can help users master color printing techniques.
- Skipping exposure calibration
- Not updating firmware
- Printing too fast
- Insufficient resin
- Skipping bed leveling
- Incorrect Z-offset setup
- Ignoring nozzle temperature calibration
FAQ
What is the easiest way to start multi-color 3D printing?
Beginners often use manual filament changes on a single extruder printer. This method requires pausing the print and swapping filaments. It costs less and helps users learn the basics of color printing.
Can any 3D printer print in multiple colors?
Most standard 3D printers need upgrades or special attachments for multi-color printing. Printers with dual nozzles, IDEX systems, or filament changers support multiple colors. Users should check compatibility before buying new equipment.
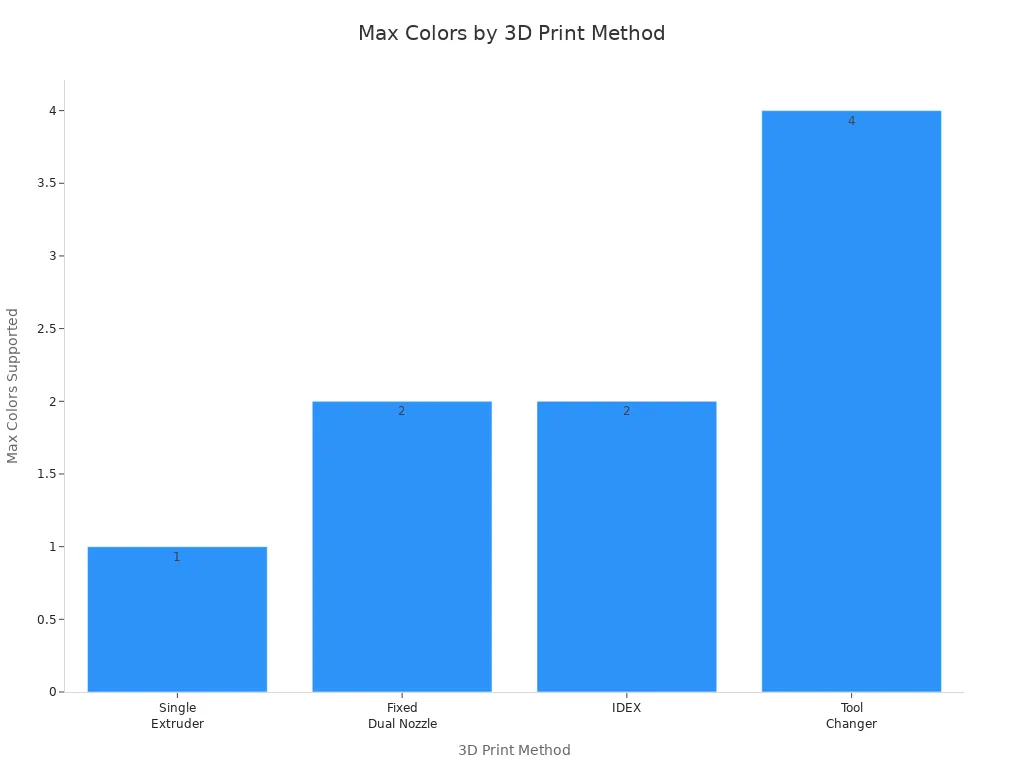
How many colors can a multi-color 3D printer use at once?
|
Printer Type |
Max Colors Supported |
|---|---|
|
Single Extruder |
1 (manual swap) |
|
Dual Nozzle |
2 |
|
Tool Changer |
4+ |
|
Automated Changer |
4+ |
Does multi-color printing waste more filament?
Multi-color printing often produces extra waste, especially with automated changers. Purge towers and filament flushing remove old colors, which increases material use. Careful planning and slicer settings help reduce waste.