


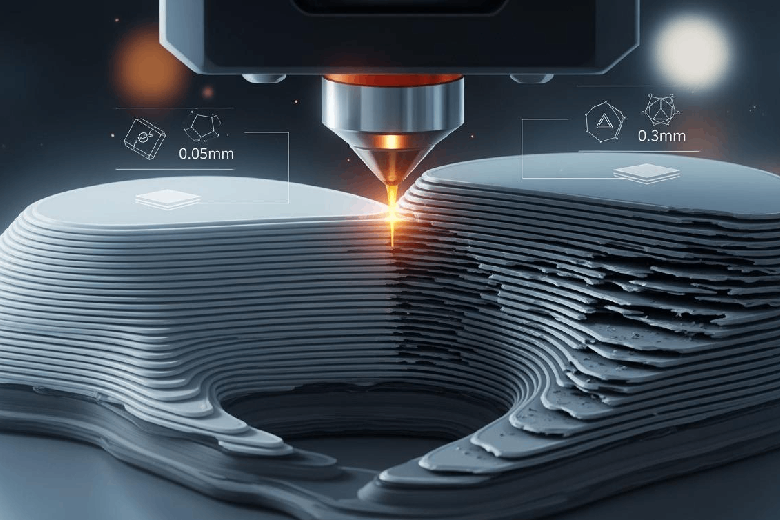
Layer height plays a big role in 3d printing quality. You see the difference in surface finish and mechanical strength every time you adjust this setting for your 3d prints. Thinner layers can create smoother surfaces and stronger bonds.
Printing speed is not only one-sidedly positive when it allows us to prototype faster. It is one of the most critical parameters affecting the manufactured part’s final properties.
Layer height influence affects how quickly you finish a print and how durable your 3d parts become. The right choice can make your printing process more reliable.
Key Takeaways
- Choose a smaller layer height (0.1 mm to 0.15 mm) for detailed models to achieve smoother surfaces and higher quality.
- Larger layer heights (0.2 mm to 0.3 mm) speed up printing but may result in visible lines and reduced detail.
- Balancing layer height with your project's needs is crucial; thinner layers improve strength and adhesion, while thicker layers enhance speed.
Layer height in 3d printing
What is layer height?
When you print a 3d object, the printer builds it up one thin layer at a time. Layer height is the thickness of each of these layers along the Z-axis. You set this value before you start your print. It controls how smooth or rough your final part will look and feel. If you choose a smaller layer height, you get more detail and a smoother surface. If you pick a larger layer height, you finish your print faster, but you may see more visible lines.
Different 3d printing technologies use different layer heights. Here is a table that shows the most common ranges:
|
Technology |
Common Layer Height Range |
|---|---|
|
Fused Filament Fabrication (FFF) |
|
|
Stereolithography (SLA) |
0.025 mm to 0.1 mm |
|
Selective Laser Sintering (SLS) |
0.1 mm to 0.15 mm |
|
Digital Light Processing (DLP) |
0.025 mm to 0.1 mm |
|
Multi Jet Fusion (MJF) |
0.08 mm to 0.1 mm |
Measuring layer height
You measure layer height in millimeters. Most 3d printers let you set this value in your slicing software. Smaller values, like 0.05–0.15 mm, give you better detail and smoother surfaces. Larger values, such as 0.2 mm or more, help you print faster but can make the layers more visible.
- Smaller layer heights improve surface finish and detail.
- Larger layer heights reduce print time but may leave visible lines.
- FDM printers usually use 0.1–0.3 mm, while SLA printers use 0.025–0.1 mm.
Choosing the right layer height helps you balance speed, quality, and the look of your 3d prints.
Layer height and print quality
Surface finish and resolution
You control the surface finish and resolution of your 3d prints by adjusting the layer height. Think of layer height in 3d printing like pixels in a digital photo. When you use thinner layers, you increase the resolution. This means your 3d model will show more detail and look smoother to the touch. Thicker layers lower the resolution, so you see less detail and the surface feels rougher.
You should aim for a layer height between 25% and 75% of your nozzle diameter. For example, if your printer uses a 0.4 mm nozzle, set the layer height between 0.1 mm and 0.3 mm. This range gives you a good balance between speed and resolution. If you want the highest resolution, choose the lower end of this range.
Studies show that thinner layers do more than just improve the look of your prints. They also increase the flexural strength of your parts. When you use a layer height of 0.10 mm, you get stronger and smoother prints. This happens because thinner layers create more deposition lines and better adhesion between each layer. The result is a part with higher resolution and improved mechanical integrity.
You also need to think about the orientation of your part in the printer. If you print a part vertically, you may see more errors and roughness in the Z-direction. Thicker layers can cause a stair-stepping effect, especially on curved or angled surfaces. Lowering the layer height reduces this effect and boosts the resolution, making your 3d prints more accurate.
Note: Not every model needs the highest resolution. If you plan to sand, dye, or smooth your print after, you can use a higher layer height to save time.
Visible layer lines
Layer lines are the small ridges you see on the surface of a 3d print. These lines become more obvious when you use a higher layer height. If you want to minimize visible layer lines, you should reduce the layer height. Thinner layers make the lines less noticeable and give your print a cleaner look.
Sometimes, you might try using variable layer heights to speed up the process or add detail only where needed. If you do not manage these changes carefully, you can end up with uneven surfaces. Large differences in layer height from one layer to the next can make the surface look bumpy.
The relationship between layer height and visible lines is clear. Lowering the layer height is the best way to hide these lines, even though it may take longer to print. You should also remember that the technology you use affects the result. For example, FDM printers with a layer height of 0.05–0.3 mm can show stair-stepping on curves, while SLA printers with 0.02 mm layers offer better resolution but may need supports to prevent warping.
If you want to improve print quality and resolution, focus on using thinner layers. This approach gives you smoother surfaces, hides layer lines, and increases the overall quality of your 3d prints.
Layer height and strength of 3d prints
Layer adhesion
You control the strength of your 3d prints by adjusting layer height. Layer adhesion describes how well each layer bonds to the next. Strong layer adhesion means your part can handle more stress and lasts longer. When you use thinner layers, you increase the contact area between layers. This helps the material fuse better and improves layer adhesion. Thicker layers reduce the bonding area, which can weaken layer adhesion.
You can see the effect of layer height influence in the table below. It shows how layer adhesion changes with different materials and layer heights:
|
Layer Height (mm) |
PLA Tensile Strength (MPa) |
PETG Tensile Strength (MPa) |
PETGCF Tensile Strength (MPa) |
|---|---|---|---|
|
0.1 |
32 |
33.52 |
28.46 |
|
0.2 |
30.19 |
30.37 |
24.396 |
|
0.3 |
28.75 |
29.45 |
22.52 |
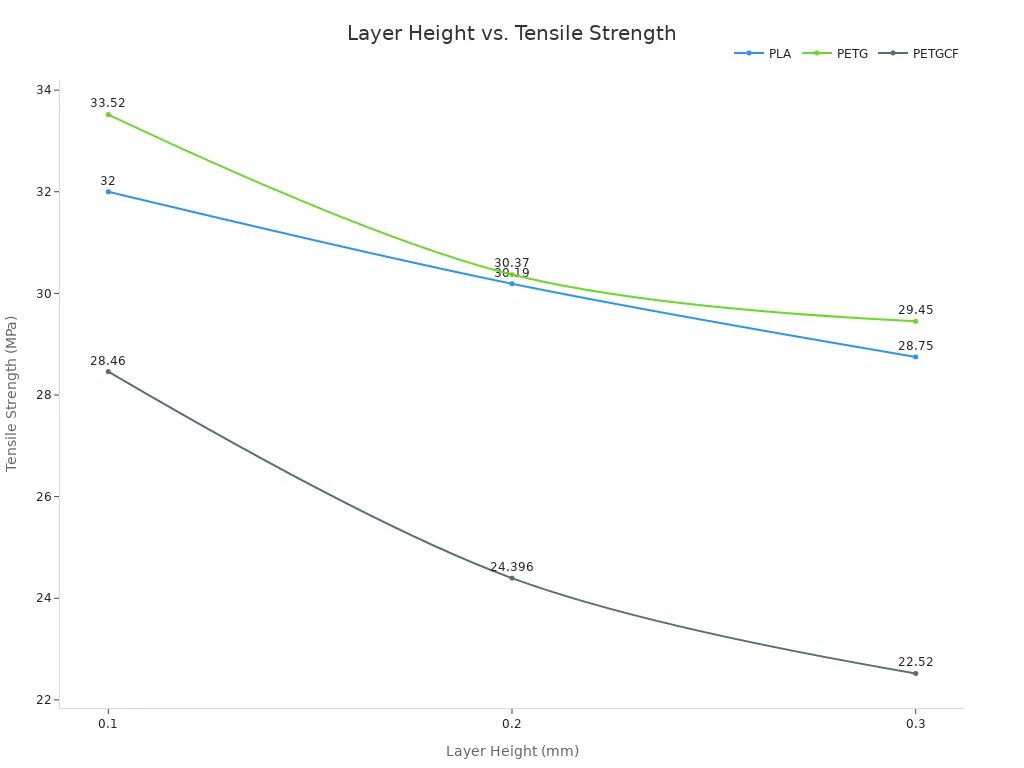
You notice that thinner layers give you higher tensile strength. This means better layer adhesion and stronger 3d parts. Thicker layers lower the strength, so you need to choose the right layer height for your project.
Durability factors
Layer adhesion affects the durability of your 3d prints. If you want parts that last, you need to focus on how well the layers stick together. Thicker layers can make prints finish faster, but they often reduce layer adhesion. You may see more cracks or breaks if the layers do not bond well.
Recent studies show that reducing layer height increases ultimate tensile strength and stiffness. You get better quality and tougher 3d prints. However, using very thin layers can cause thermal stress, which may lower durability. Thicker layers sometimes absorb more impact energy, but they sacrifice layer adhesion.
Here is a summary of findings from different studies:
|
Study |
Findings |
|---|---|
|
Optimization of FDM parameters for enhanced mechanical properties of chopped carbon fiber-reinforced polymer composites |
Reducing layer height increases ultimate tensile strength (UTS) and Young’s Modulus due to improved interlayer bonding. |
|
Another Pulipaka et al. |
Reduced layer height promotes stronger layer adhesion, resulting in stiffer structures. |
|
Kuznetsov et al. |
Excessively low layer height does not linearly increase strength due to increased thermal stress. |
|
Influence of layer orientation on the mechanical properties of fused deposition modelling using PLA and PETG |
Higher layer heights increase hardness but reduce tensile strength. |
|
Impact energy absorption |
Samples with higher layer heights absorbed more impact energy and showed fewer visible cracks, indicating improved mechanical performance. |
You need to balance layer height, layer adhesion, and durability for the best results in 3d printing. Thicker layers help with speed, but you should not ignore the importance of layer adhesion for quality and long-lasting parts.
Layer height and printing speed
Print time impact
You can change how long your 3d print takes by adjusting the layer height. When you increase the layer height, you reduce the number of layers needed to build your model. This change can cut your print time by 40-50% if you double the layer height. For example, printing with a 0.3 mm layer height instead of 0.1 mm means your project finishes much faster.
Here is a table showing how layer height affects print time and costs:
|
Layer Height (mm) |
Print Time (hours) |
Electricity Cost (yuan) |
Labor Cost (yuan) |
|---|---|---|---|
|
0.2 |
4 |
1.28 |
200 |
|
0.1 |
8 |
2.56 |
400 |
Smaller layer heights increase print time and cost. Thicker layers help you finish faster, but you may notice changes in surface detail.
Balancing speed and quality
You need to find the right balance between speed and quality in 3d printing. Thinner layers give you smoother surfaces and better detail, but they slow down the process. Thicker layers speed things up, but you might see rougher surfaces.
Reducing the layer height decreases the volumetric speed, which lowers the strain on your printer’s hotend. Smaller layer heights also improve resolution and surface quality, capturing finer details and producing smoother curves.
Most users choose a layer height between 0.1-0.2 mm to keep accuracy high while maintaining reasonable speed. If you want rapid prototyping, you can use higher layer heights because aesthetic quality is less important. For final products, lower layer heights help you achieve better results.
|
Layer Height |
Print Speed |
Print Quality |
|---|---|---|
|
Higher |
Faster |
Lower |
|
Lower |
Slower |
Higher |
Layer height influence affects both your workflow and the final look of your 3d models. You should consider your project’s needs before making changes.
Choosing the best layer height for 3d printing
Factors to consider
When you select layer height settings for your 3d prints, you need to think about several important factors. Each project has unique requirements, so you must match your choices to your goals. You should look at the type of model, the desired surface finish, and the capabilities of your printer. Layer height tolerance plays a big role in how well your printer can handle fine details or thicker layers.
Here is a table that shows the [main factors you should consider](https://www.trideo3d.com/en/blog-posts/complete guide on layer height in 3D printing) when making layer height adjustments:
|
Factor |
Description |
|---|---|
|
Printing Time |
Lower layer heights require more passes, which increases print time. |
|
Structural Strength |
Thicker layers often provide better fusion between layers, but the design of your part matters too. |
|
Cost |
Thinner layers increase costs because prints take longer, while thicker layers can reduce costs but may affect quality. |
|
Printer Type |
Different printers have different layer height tolerance. FDM printers usually use 0.1 mm to 0.6 mm. SLA printers can go as fine as 0.025 mm. |
|
Purpose of Object |
The intended use of your print, such as prototyping, decorative, or functional, influences your choice. |
|
Material Used |
Some materials allow for thinner layers, while others need thicker layers to avoid problems. |
You also need to think about the complexity of your model and the finish you want. If your design has intricate details, you should use a smaller layer thickness. This gives you smoother surfaces and better detail. If you want a strong part, smaller layer heights improve adhesion between layers. Thicker layers reduce print time, which helps when you need a quick result.
Tip: Always check your printer’s specifications before you change layer height settings. Some printers have strict layer height tolerance, so you must stay within their limits.
Recommended ranges
You can find the optimal layer height for 3d printing by looking at your nozzle diameter and the type of print you want. Nozzle size sets the minimum and maximum layer thickness you can use. Most printers work best when you set the layer height between 25% and 80% of the nozzle diameter. A good starting point is 50%.
Here is a table that shows recommended ranges for layer height settings based on nozzle diameter:
|
Nozzle Diameter |
Recommended Layer Height Range |
|---|---|
|
0.4 mm |
0.1 mm – 0.3 mm |
You should remember these guidelines when you make layer height adjustments:
- The minimum layer height is about 25% of your nozzle diameter, but it should not go below the smallest Z-axis movement, usually around 0.04 mm.
- The maximum layer height can reach up to 80% of the nozzle diameter.
- Setting the layer height at 50% of the nozzle diameter gives you a good balance between speed and quality.
Layer height influence affects both the look and strength of your 3d prints. If you want a smooth surface, use thinner layers. If you need a fast print, choose thicker layers. You must also consider layer height tolerance to avoid printing errors.
Here is a quick list to help you choose the right layer thickness:
- For high-quality models with fine details, use 0.1 mm to 0.15 mm.
- For balanced speed and quality, use 0.15 mm to 0.25 mm.
- For fast prints or strong parts, use 0.25 mm to 0.3 mm.
Mistakes happen when you ignore layer height tolerance or choose settings outside your printer’s range. If you use a layer height that is too small, you get smooth surfaces but slow prints. If you use a layer height that is too large, you finish quickly but lose detail.
|
Surface Quality |
Print Speed |
|
|---|---|---|
|
50 |
Smooth |
Slow |
|
100 |
Rough |
Fast |
You need to balance layer height for 3d printing with your project’s needs. Always test your settings before you start a big print. This helps you avoid problems and get the best results.
Note: Layer height settings affect every part of the printing process. You control the final quality, speed, and strength by making smart layer height adjustments.
Optimizing layer height for 3d prints
Printer settings
You can improve your 3d prints by adjusting printer settings for layer height. Start by matching the layer height to your nozzle size. Most users choose a layer height between 0.1mm and 0.3mm when using a 0.4mm nozzle. This range helps you balance speed and quality. If you print detailed models like figurines, set the layer height to 0.1mm or 0.15mm. For larger models without fine details, increase the layer height to 0.3mm or 0.4mm. You should always check your printer’s specifications before changing settings.
Tip: Use a layer height that is 25% to 75% of your nozzle width. This helps you get better adhesion between layers and improves the overall quality of your 3d prints.
You can follow these steps to optimize your printer settings:
- Choose the right nozzle size for your project.
- Set the layer height based on the model’s detail level.
- Test a small print to check surface finish and strength.
- Adjust the layer height if you see visible lines or weak spots.
Filament compatibility
You need to consider filament type when setting layer height for 3d printing. Different filaments interact with layer height in unique ways. PLA, ABS, and PETG each respond differently to changes in layer height. Lower layer heights create smoother surfaces and finer details. Taller layers reduce print time but may show more visible lines.
|
Filament Type |
Impact of Layer Height |
Mechanical Properties |
|---|---|---|
|
PLA |
Smoother surfaces with lower layer heights |
Stronger parts with optimized settings |
|
ABS |
Visible lines with taller layers |
Mechanical properties depend on layer height |
|
PETG |
Finer details with thin layers |
Layer height affects strength and flexibility |
You should match the filament to your project’s needs. If you want high-quality surfaces, use lower layer heights with PLA or PETG. For faster prints, choose taller layers, but expect less detail. Always test your settings with your chosen filament to find the best results for your 3d projects.
Advanced layer height strategies
Variable layer heights
You can take your 3d prints to the next level by using variable layer heights. This strategy lets you change the thickness of each layer as your model builds up. You get the best results when you use finer layers for sloped or curved surfaces and thicker layers for flat or vertical sections. This approach works especially well for complex 3d models with slopes greater than 45 degrees.
Here are some benefits you will notice when you use variable layer heights:
- Improved final print quality
- Smoother finishes on curved areas
- Better layer adhesion for stronger parts
- More precise adjustments along the Z axis
You can save time and material by using coarse layers where detail is not needed. Finer layers help you capture small features and smooth out visible lines. This method gives you more control over the look and strength of your 3d projects.
Slicer software tools
Modern slicer software gives you powerful tools to control layer height settings. You can find options for adaptive and variable layer heights in most advanced slicers. These features help you balance speed and quality in your 3d printing.
|
Feature |
Description |
|---|---|
|
Adjusts layer thickness based on model needs, using thinner layers for details and thicker layers where less detail is needed. |
|
|
Variable Layer Height |
Allows customization of layer heights for different parts of the model, enhancing print quality. |
|
Configuration Location |
Settings can be found in the 'Prepare' tab under the 'Quality' submenu. |
|
First Layer Height Setting |
Can be set between 20%-80% depending on the print requirements. |
|
General Layer Height Setting |
Users can adjust the layer height in mm according to their specific needs. |
You can use adaptive layers to reduce print time without losing detail. Finer layers (0.1 mm or less) work best for highly detailed models, while thicker layers (0.2 mm or more) suit larger, less detailed parts. Adaptive strategies let you combine both for the best results in 3d printing.
You shape the quality of your 3d prints by adjusting layer height. Smaller heights give you smoother surfaces and stronger parts, while larger heights speed up printing. The table below shows how these choices affect print time, strength, and surface finish:
|
Aspect |
Impact |
|---|---|
|
Print Time |
Smaller layer heights increase print time due to more layers; larger heights decrease it. |
|
Structural Strength |
Smaller heights improve layer adhesion; larger heights may weaken bonds, risking splits. |
|
Surface Quality |
Smaller heights yield smoother surfaces; larger heights show more pronounced layering. |
|
Dimensional Accuracy |
Smaller heights enhance accuracy for curves; larger heights may struggle with details. |
|
Efficiency |
Smaller heights use more material and time; larger heights are more efficient for prototyping. |
You should experiment with different settings for your 3d projects. Results can vary based on your model and material. The next table highlights why testing matters:
|
Shear Bond Strength (SBS) |
Flexural Strength (FS) |
Infill Pattern Effect |
|
|---|---|---|---|
|
0.1 |
Highest observed |
Significant effect |
Concentric pattern highest FS |
|
0.2 |
Moderate |
Significant effect |
N/A |
|
0.3 |
Lower |
Significant effect |
N/A |
Try these strategies to improve your 3d printing results.
FAQ
What is the best layer height for 3d models with fine details?
You should use a layer height between 0.1 mm and 0.15 mm. This range gives your 3d prints smoother surfaces and higher quality.
Does layer height affect the strength of 3d prints?
Yes. Lower layer heights improve layer bonding. You get stronger 3d parts and better durability. This matters for both functional and decorative 3d printing projects.
Can I change layer height during a 3d print?
Many slicer programs let you set variable layer heights. You can use thicker layers for fast sections and thinner layers for detailed areas in your 3d models.