


Removing layer lines from 3D prints often involves a mix of hands-on techniques and smart choices during the printing process. Many makers use sanding, chemical smoothing, or post-processing with fillers to effectively remove layer lines and achieve smooth surfaces. Adjusting print orientation, solving over-extrusion, and using high-quality filament can also help to remove layer lines before finishing even begins. 3D printing enthusiasts find that combining these methods leads to professional results. 3D printing technology continues to evolve, offering more ways to improve surface quality and remove layer lines. 3D printing projects benefit from careful preparation and attention to detail.
Key Takeaways
- Sanding with different grit levels helps achieve a smooth finish on 3D prints.
- Chemical smoothing works well for ABS prints, giving them a polished look.
- Using fillers and primers fills gaps and prepares prints for painting.
- Adjusting layer height and nozzle size reduces layer lines during printing.
- High-quality filament and proper print orientation improve surface quality.
Post-Processing to Remove Layer Lines
Sanding & Polishing
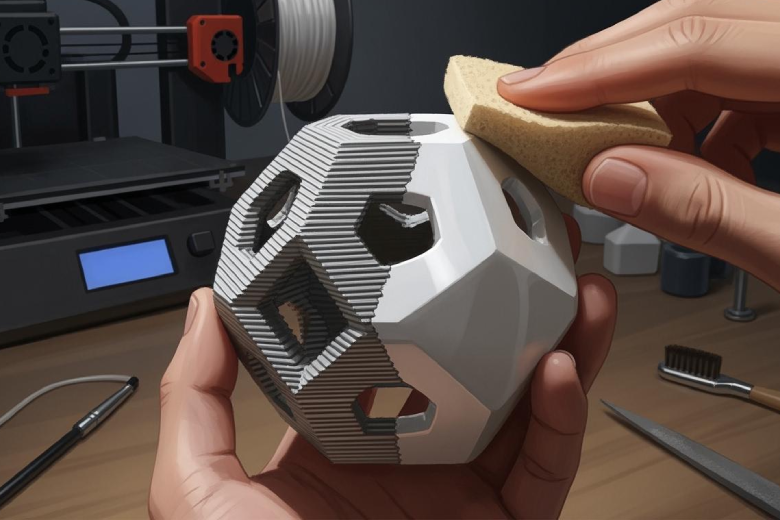
Sanding remains one of the most common post-processing steps for those who want to remove layer lines from 3D prints. Makers often start with coarse sandpaper, such as 100 or 200 grit, and gradually move to finer grits like 400, 800, or even 2000 for a polished finish. This progressive approach helps achieve a smooth surface without damaging the print. Polishing compounds or buffing wheels can further enhance the shine, especially on PLA or PETG parts.
Safety Tips for Sanding and Polishing:
- Wear a dust mask (N95 or better) during dry sanding to avoid inhaling plastic dust.
- Use a respirator with organic vapor filters if combining sanding with chemicals.
- Always wear gloves and ensure the workspace has good ventilation.
Sanding works best on flat or gently curved surfaces. Intricate details may require small files or sanding sticks. This smoothing process can take time, but it prepares the print for further finishing steps.
Chemical Smoothing Methods
Chemical smoothing techniques offer a fast way to remove layer lines, especially for ABS and PLA prints. Acetone vapor smoothing works well for ABS. This method improves surface aesthetics, mechanical performance, and chemical resistance. It seals pores, enhances water resistance, and creates a surface that is easier to clean. The process gives parts an injection-molded look, making them suitable for end-use applications. Unlike sanding, vapor smoothing does not remove material. It delivers a sealed, smooth surface with consistent results, even on complex shapes.
For PLA, smoothing PLA prints with chemicals is more challenging. Strong chemicals like tetrahydrofuran or dichloromethane can smooth PLA but pose safety risks and are hard to obtain. Ethyl acetate, found in some nail polish removers, is a safer option but less effective. Chemical smoothing of PLA requires protective equipment and a well-ventilated area. Many makers prefer epoxy resin coatings for smoothing PLA prints. These coatings undergo durability tests and advanced quality checks, making them reliable for professional use. Maintaining the bond between resin and PLA is important for long-term results.
Smoothing PLA prints with microfiber cloths and a small amount of acetone can sometimes help, but results vary. The smoothing process for PLA often combines light sanding with resin or primer coatings for the best finish.
Fillers & Primers
Fillers and primers play a key role in post-processing for 3D printing. They fill minor imperfections and layer lines, creating a uniform surface ready for painting or further finishing. Makers often use resin mixed with baby powder or fine line primers to fill gaps. Multiple coats may be needed for a smooth texture.
|
Type of Primer |
Description |
|---|---|
|
Thick-bodied, sandable primers ideal for FDM prints with visible layer lines; they build surface volume and help fill in small gaps or texture. |
|
|
Spray Primers (Automotive) |
Popular for resin prints, offering fine atomization, fast drying, and smooth coverage. Ideal for miniatures or detailed parts. |
|
Adhesion-Promoting Primers |
Useful for materials like PP, PETG, or flexible filaments that resist bonding; often clear and provide a chemical bridge for paint. |
|
Two-Part Epoxy Primers |
For industrial or high-stress applications, offering superior chemical resistance and bonding strength, especially useful on SLS parts. |
- Filler primers and spray primers improve the appearance of 3D prints.
- They increase the adhesion of paint layers and are suitable for high-quality finishes on ABS or PLA.
- The smoothing process with fillers and primers is essential for professional results.
Spray Paint & Coatings
Spray paint and coatings help reduce the visibility of layer lines on 3D printed objects. Applying a primer before painting improves paint adherence and surface quality. Makers achieve the best results by applying several thin coats of paint. This method covers layer lines without hiding fine details.
- Spray paint creates a smoother finish and enhances the look of the print.
- Priming before painting further minimizes imperfections.
- Multiple thin coats help maintain detail while covering layer lines.
Spray painting is a popular post-processing step for both functional and decorative prints. It works well with other smoothing techniques to remove layer lines and achieve a professional appearance.
Heat Gun & Surface Fusion
Using a heat gun offers another way to smooth the surface of 3D prints. The heat gun slightly melts the outer layer of plastic, which helps reduce the visibility of layer lines. This smoothing process works best on certain plastics, such as PLA and ABS. However, careful handling is necessary. Too much heat can warp or melt the part, ruining the print.
Makers often use a heat gun as a final touch after sanding or chemical smoothing. This technique can enhance the overall finish, but it requires practice to master. The heat gun method is a valuable addition to the range of post-processing options for 3D printing.
Tip: Always test the heat gun on a scrap piece before applying it to the final print.
Post-processing remains essential for anyone who wants to remove layer lines and achieve smooth, professional results in 3D printing. By combining sanding, chemical smoothing, fillers, spray paint, and heat gun techniques, makers can transform rough prints into finished products. The right smoothing process depends on the material, print geometry, and desired finish.
How to Reduce Layer Lines During Printing
Layer Height & Nozzle Size
Layer height and nozzle size play a major role in the appearance of layer lines in 3d printing. Thinner layers minimize the stairstep effect and enhance the overall finish of the print. Makers often choose lower layer heights to achieve smoother surfaces and finer details, especially on complex geometries. Thicker layers can lead to more pronounced layer lines, which become especially noticeable on curves and angles. While thinner layers provide a better surface, they also increase print time, so users must balance quality and efficiency.
The nozzle diameter determines the minimum and maximum layer heights possible. The following table shows recommended settings for different nozzle sizes:
|
Nozzle Diameter |
Min Layer Height |
Standard Layer Height |
Max Layer Height |
|---|---|---|---|
|
0.2 mm |
0.05 mm |
0.1 mm |
0.15 mm |
|
0.4 mm |
0.1 mm |
0.2 mm |
0.32 mm |
|
0.6 mm |
0.15 mm |
0.3 mm |
0.48 mm |
|
0.8 mm |
0.2 mm |
0.4 mm |
0.64 mm |
|
1.0 mm |
0.25 mm |
0.5 mm |
0.75 mm |
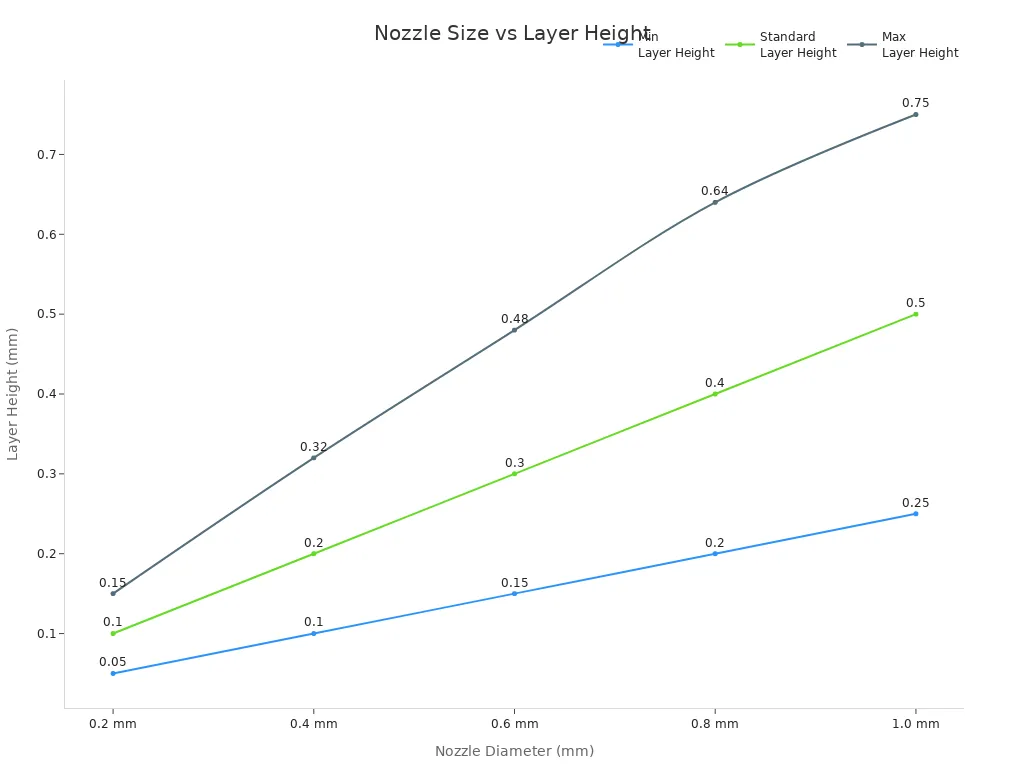
Selecting the right combination of layer height and nozzle size helps reduce layer lines and improves the smoothing process before any post-processing begins.
Print Speed & Temperature
Print speed affects the formation of layer lines in 3d printing. High print speeds can disrupt the surface profile and increase pores in the material. Fast speeds may cause under- or over-extrusion, leading to voids and other defects. When the printer moves too quickly, the filament does not have enough time to melt and bond with the previous layer. This results in visible gaps and weak prints.
|
Aspect |
Effect of High Print Speed |
|---|---|
|
Surface Profile |
Affects surface profile and increases pores in the material. |
|
Material Extrusion |
Causes under- or over-extrusion depending on path shape. |
|
Morphological Defects |
Leads to voids and other defects in the printed product. |
Temperature settings also influence the ability to reduce layer lines. For PLA, the optimal nozzle temperature ranges from 190°C to 210°C, with a bed temperature of 50°C to 60°C. ABS prints benefit from nozzle temperatures between 240°C and 250°C and bed temperatures of 100°C to 110°C. Proper temperature control ensures good layer adhesion and a smoother finish.
|
Material |
Nozzle Temperature |
Bed Temperature |
|---|---|---|
|
PLA |
180°C–220°C (best: 190°C–210°C) |
50°C–60°C |
|
ABS |
240°C–250°C |
100°C–110°C |
Filament Quality
Filament quality directly impacts the ability to remove layer lines and achieve a smooth finish. High-quality filaments produce consistent extrusion and fewer defects. Reliable brands offer materials that minimize warping and improve the smoothing process. Some of the most trusted brands include:
- 3D Solutech (PLA): Vibrant colors and smooth finishes, suitable for all skill levels.
- Gizmo Dorks (ABS): Strong and durable, ideal for functional parts.
- Taulman3D (Nylon 645): Exceptional strength and flexibility for industrial use.
- SpoolWorks (Edge PETG): Combines strength and ease of use for demanding applications.
- MatterHackers (PRO Series Raptor PLA): High mechanical performance for engineering parts.
- Overture (PLA): Cost-effective and reliable, with minimal warping.
- Sunlu (PLA): Affordable and high-quality, with a wide range of materials.
Choosing the right filament helps reduce layer lines and supports effective smoothing pla prints.
Print Orientation & Slicer Settings
Print orientation influences the appearance of layer lines, especially on complex geometries. The surface quality in additive manufacturing depends on part orientation, with layer stepping, support marks, and surface roughness varying based on build angle. Vertical surfaces show minimal stepping and excellent finish quality. Horizontal surfaces offer the best resolution with no layer lines. Shallow angles (0-30°) lead to maximum stepping and poor finish, while steep angles (60-90°) result in minimal stepping and good finish.
Slicer settings also help reduce layer lines. Makers can:
- Adjust layer height to decrease visibility of layer lines.
- Optimize nozzle size for finer layers and smoother surfaces.
- Calibrate extrusion settings to prevent over-extrusion.
- Enable smoothing features like adaptive layers in slicer software.
- Enable flow dynamics calibration for better adaptation to flow changes.
- Lower outer wall speed and acceleration to smooth speed transitions.
- Match outer wall speed to bridging speed to minimize layer lines.
Proper orientation and slicer calibration make a significant difference in the smoothing process and the final appearance of 3d printing projects.
Hardware Upgrades
Hardware upgrades offer another way to reduce layer lines and improve print quality. Upgrading to high-quality hotends, such as the E3D Volcano, SuperVolcano, or E3D V6, allows for faster filament melting and extrusion. All-metal hotends handle higher temperatures and keep filament flowing smoothly, reducing clogs and supporting faster printing. Dual-drive extruders improve grip and feeding, enabling higher speed filament pushing without slipping. The Micro Swiss and Dragon hotend provide efficient heat dissipation and easy installation.
A dual extruder setup or an extruder with a larger drive gear enhances filament grip, reducing slipping and ensuring smooth extrusion. These upgrades help maintain consistent layer properties and support the smoothing pla prints process.
Note: Interlayer bonding issues, thermal stress-induced warping, and incomplete curing contribute to many part failures in 3d printing. Managing thermal and mechanical interactions is crucial for consistent results.
By focusing on layer height, nozzle size, print speed, temperature, filament quality, orientation, slicer settings, and hardware upgrades, makers can reduce layer lines and achieve smoother prints. Combining these preventative measures with post-processing techniques helps remove layer lines and produces professional results in 3d printing.
Expert Tips & Common Mistakes
Pro Tips for Smoother Prints
Experts in 3d printing recommend several techniques to achieve the smoothest results. Makers often start by sanding prints with 100-200 grit sandpaper to remove larger imperfections. They then progress to finer grits, such as 400 or 600, for a refined surface. Wet sanding can add a polished effect and helps to reduce layer lines even further.
Applying primer and paint fills in small gaps and creates a uniform finish. This process takes time because each layer must dry before sanding and painting again. Heat gun smoothing works well for materials like PLA. By gently heating the surface, makers can melt the outer layer and reduce layer lines without damaging the print.
Resin coating is another expert method. A thin layer of epoxy or UV-curable resin covers the print, which can then be cured and sanded for a glassy finish. Some users choose solvent immersion or vapor smoothing with ethyl acetate for effective results, especially when working with specific materials. These methods help reduce layer lines and give 3d printing projects a professional look.
Tip: For persistent layer line issues, experts suggest disabling combing, increasing retraction, checking extrusion rates, lowering hot end temperature, and adjusting Z-hop settings.
Mistakes to Avoid
Many beginners make common mistakes when trying to reduce layer lines in 3d printing. Skipping grit levels during sanding often leaves deep scratches that are hard to remove later. Applying too much pressure can deform delicate prints or cause smearing due to heat buildup. Failing to clean the print between sanding stages allows coarse dust to scratch the surface during finer sanding.
Incorrect post-processing methods can also cause problems. Using the wrong technique may lead to dimensional inaccuracies or shape distortion. Over-washing prints can harm surface quality and mechanical properties by allowing solvents to absorb into the plastic. Excessive post-curing may result in brittle parts with poor durability.
|
Mistake |
Consequence |
|---|---|
|
Skipping grit levels |
Deep scratches remain visible |
|
Too much pressure |
Deformation or smearing |
|
Not cleaning between |
Scratches from leftover dust |
|
Over-washing |
Weakened surface and mechanical properties |
|
Excessive post-curing |
Brittle, less durable prints |
Establishing a careful, step-by-step post-processing routine helps maintain accuracy and quality in every 3d printing project.
Makers who want to reduce layer lines in 3d printing should use both preventative and post-processing techniques. This dual approach improves surface quality and meets functional and aesthetic goals. They can experiment with sanding, vapor polishing, and solvent baths to find the best method for each project. Popular finishing resources include trimming, sanding, and polishing, which help reduce layer lines and create smooth prints. Readers are encouraged to share their results and tips with the community.
FAQ
What causes layer lines in 3D prints?
Layer lines appear when the printer deposits each layer of filament. Factors like layer height, print speed, and filament quality affect their visibility. Uneven extrusion or poor calibration can make lines more noticeable.
Can sanding remove all layer lines?
Sanding removes most layer lines, especially on flat surfaces. Fine details or deep grooves may need extra attention. Makers often combine sanding with primers or fillers for the smoothest finish.
Is chemical smoothing safe for all filaments?
Chemical smoothing works best for ABS and sometimes PLA. Not all filaments respond well to chemicals. Makers should always check material compatibility and use proper safety gear.
How does print orientation affect layer lines?
Print orientation changes how layer lines appear on the surface. Vertical surfaces show fewer lines, while shallow angles display more. Adjusting orientation in the slicer can improve surface quality.
Do hardware upgrades help reduce layer lines?
Upgrading to a better hotend or extruder improves filament flow and temperature control. These upgrades help produce smoother prints with fewer visible layer lines.