


Mastering support structures in 3d printing means understanding how they influence both success and quality. Many users experience frustration because improper setup causes 41% of print failures. When someone chooses the right support structure, they see better dimensional accuracy and fewer errors. Good support placement keeps overhangs from sagging and prevents delamination. With practice, anyone can achieve cleaner prints and more reliable results.
Key Takeaways
- Choose the right support structure to improve print quality and reduce failures. Proper support placement prevents sagging and enhances dimensional accuracy.
- Understand the 45-degree rule to determine when supports are necessary. Overhangs greater than 45 degrees typically require support to maintain stability.
- Experiment with different support types, such as lattice, tree, and dissolvable supports, to find the best fit for your model's geometry and desired finish.
- Optimize slicer settings for easier support removal. Adjusting Z distances and interface layers can enhance print quality and simplify post-processing.
- Use the right tools for support removal. Pliers, craft knives, and sandpaper help achieve a clean finish while minimizing damage to the model.
What Are 3D Printed Support Structures
Definition and Purpose
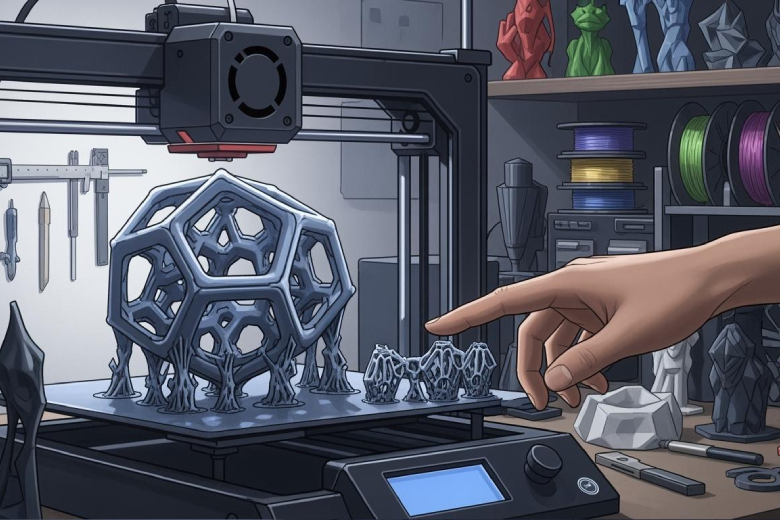
3d printed support structures play a vital role in 3d printing. These temporary structures hold up parts of a model that would otherwise hang in mid-air during the printing process. Without a support structure, gravity can cause overhanging sections to sag or collapse. The printer builds these supports alongside the main object, then removes them after the print finishes. This process allows for the creation of shapes and features that would not be possible with only the main material.
The main functions of support structures include stabilizing overhangs, preventing deformation, and enabling complex geometries. The table below summarizes these functions:
|
Function |
Description |
|---|---|
|
Stabilizing Overhangs |
Supports areas during printing to prevent them from collapsing under gravity. |
|
Preventing Deformation |
Ensures that new layers are held in place, reducing the risk of warping. |
|
Enabling Complex Geometries |
Allows for the creation of intricate designs that would otherwise be unprintable. |
Why Support Structures Matter
Support structures make it possible to print objects with bridges, arches, and other challenging shapes. They support overhanging features and ensure that each new layer has a solid foundation. Designers can choose from different support styles, such as conduit and tree structures. Conduit supports cover a large surface area and work well for FDM printing. Tree supports use less material but may not hold up heavy overhangs as effectively.
Note: While supports help achieve complex designs, they can affect the surface finish where they touch the model. Removal often requires extra labor, and single-material supports increase material waste.
A support system enables innovation in 3d printing by allowing for more creative and functional designs. However, users must consider the trade-offs, such as post-processing time and material usage, when planning their prints.
Types of Support Structures in 3D Printing
Support structures come in many forms, each designed to solve specific challenges in 3d printing. The right structure can improve print quality, reduce waste, and make post-processing easier. Users often select a support structure based on the model’s geometry, the printer’s capabilities, and the desired finish.
Lattice and Accordion Supports
Lattice supports use a grid-like pattern to hold up overhangs and bridges. This type of support provides strong stability and works well for models with flat surfaces. Accordion supports, sometimes called linear 3d print supports, use parallel lines or zigzag patterns. These supports are easy to generate and remove, making them popular for beginners.
FDM printers most often use lattice and accordion supports. These supports offer a balance between strength and ease of removal. Lattice supports can handle heavy overhangs, while accordion supports minimize material use and print time. However, both types may leave marks on the model’s surface after removal.
Tip: Choose lattice supports for large, flat overhangs and accordion supports for simple shapes that need quick cleanup.
|
Type of Support |
Description |
Advantages |
|---|---|---|
|
Lattice |
Grid or mesh pattern, covers wide areas |
Strong, reliable, good for flat overhangs |
|
Accordion |
Linear or zigzag lines, easy to peel off |
Fast to print, simple removal |
Tree and Hybrid Supports
Tree-like 3d printer supports branch out from a few main trunks, much like the limbs of a tree. These supports use less material and reduce print time. They work best for models with many non-flat overhangs or complex shapes. Tree supports are easy to remove and cause less surface damage.
Hybrid supports combine features from both tree and lattice designs. They balance material efficiency with strong support at critical points. Hybrid supports provide a stronger interface for overhangs and help maintain print quality.
|
Support Type |
Material Usage |
Print Quality |
|---|---|---|
|
Tree Supports |
Use less filament, reduce print time |
Less surface damage, easier removal |
|
Hybrid Supports |
Balance between material efficiency |
Stronger interface, better overhang support |
- Tree-like supports are ideal for models with many non-flat overhangs.
- They are easy to remove and minimize damage to visible surfaces.
Breakaway, Dissolvable, and Manual Supports
Breakaway supports are made from the same material as the model. Users can peel them off by hand after printing. These supports work well for simple models where removal does not risk damaging the surface.
Dissolvable supports, also called dissolvable support structures, use materials like PVA or HIPS. These supports dissolve in water or a chemical bath, leaving no marks on the model. Dissolvable supports are perfect for intricate designs that need careful handling. They require a dual-extruder printer and add to material costs, but they prevent scarring and reduce post-processing time.
Manual supports are custom structures created by the user. These supports allow for full control over placement and shape. Manual supports are useful for unique geometries where automatic generation does not provide enough stability.
|
Type of Support |
Description |
Use Cases |
|---|---|---|
|
Breakaway Supports |
Made from the same material as the model, designed to be easily removed by hand. |
Useful for prints where support removal is straightforward and the model is not overly complex. |
|
Soluble Supports |
Made from materials that dissolve in water or chemical solutions. |
Ideal for complex and sensitive models where traditional support removal could damage the print. |
|
Manual Supports |
Generated by the user, allowing for customized support structures. |
Best for unique geometries where automated support generation may not suffice. |
- Breakaway supports are easy to peel off after printing, suitable for less complex models.
- Soluble supports dissolve in a solution, perfect for intricate designs that require careful handling.
- Manual supports allow for customization, useful for unique shapes and structures.
Note: Dissolvable supports are typically used with dual-extruder printers. They allow for easy removal by dissolving in water.
The choice of support affects print time, material usage, and the final appearance of the model. Supports are printed layer by layer, which increases print times and reduces overall efficiency. The construction of supports uses additional materials that ultimately become waste, impacting both time and costs. Support structures can increase material usage by 20-50% of the total material for a print. Removing supports is often the most time-consuming part of post-processing, particularly for complex models.
The interaction between support materials and the main model also matters. Support materials should be easy to peel off while being sticky enough to hold the part in place during printing. The right material combinations can enhance the effectiveness of multi-material prints. However, the mechanical properties of 3D printed parts are significantly influenced by the compatibility of materials used in support structures. Issues such as differential shrinkage during cooling can lead to deformation and reduced dimensional stability. Additionally, the strength at the interfaces between different materials is often compromised due to weak chemical bonding, which can adversely affect the overall performance of the printed part.
Selecting the right support type depends on the model’s geometry, the printer’s capabilities, and the desired finish. Each support type offers unique benefits and challenges, so users should experiment to find the best fit for their project.
When to Use 3D Print Supports
The 45-Degree Rule
The 45-degree rule helps users decide when to use supports while 3d printing. This guideline states that an overhang structure with an angle less than 45 degrees from the vertical usually does not need a support structure. The layers can build upon each other without collapsing. When the angle goes beyond 45 degrees, the overhang becomes unstable and requires support for stability. The table below shows how the angle affects the need for support:
|
Angle from Vertical |
Support Requirement |
|---|---|
|
Less than 45° |
Typically no support needed |
|
Greater than 45° |
Support required for stability |
This rule gives a simple way to check if a part of a model will need extra help during printing.
Overhangs, Bridges, and Complex Geometries
In 3d printing, overhangs and bridges often challenge the printer. An overhang structure that extends out more than 45 degrees from the vertical will likely sag or deform without support. Bridges are horizontal gaps between two points. If a bridge is shorter than 5mm, the printer can usually span it without support. Longer bridges, especially those over 15mm, may droop due to gravity and need 3d printer supports.
Complex shapes, such as models with arms, wings, or thin features, often require support structures. Proper orientation of the part can reduce the need for supports and improve the surface finish. Reorienting a model can help critical features print smoothly and minimize marks left by supports.
Tip: Innovative support structures allow users to print complex parts that would be difficult to make otherwise.
Model Scenarios Requiring Supports
Some model scenarios always need supports. These include:
- Overhangs with angles over 45 degrees
- Bridges longer than 15mm
- Tricky overhanging structure shapes
- Thin or fragile details under 2mm
- Overhanging features like arms or wings
Support structures are essential in SLA, DLP, and LCD printing to prevent deformation and crumbling. Understanding when to use supports while 3d printing helps users avoid failed prints and wasted material. Each structure and model presents unique challenges, so careful planning ensures the best results.
Setting Up Support Structures in Slicers
Auto vs. Manual Support Generation
Slicer software gives users two main ways to create supports: automatic generation and manual placement. Auto-generated supports use algorithms to analyze the model’s geometry. The software decides where to add supports based on overhangs and bridges. This method works well for complex shapes and saves time for beginners. Manual support placement lets users choose exactly where to add or remove supports. This approach gives full control and helps target only the areas that need extra stability.
The table below compares these two methods:
|
Feature |
Auto-Generated Supports |
Manually Placed Supports |
|---|---|---|
|
Creation Method |
Created automatically based on model geometry |
Customized by the user according to needs |
|
Customization |
Limited customization options |
Full control over placement |
|
Use Case |
Best for complex geometries needing support |
Ideal for specific areas requiring support |
Many users start with auto-generated supports for convenience. Advanced users often switch to manual placement to save material and reduce post-processing time. Manual supports also help avoid unnecessary marks on the model’s surface.
Key Support Settings to Adjust
Slicer settings play a big role in how easy it is to remove supports and how clean the final print looks. Adjusting these settings can improve both print quality and the removal process. The most important settings include Z distances and interface layers.
|
Setting |
Description |
Suggested Adjustment |
|---|---|---|
|
Top Z Distance |
Gap between support and model; increasing eases removal but may reduce quality. |
Increase from 0.2 mm to 0.3 mm. |
|
Bottom Z Distance |
Gap between build plate and support; usually stable but can be adjusted slightly. |
Keep at 0.2 mm. |
|
Top Interface Layers |
Layers between support and model; fewer layers ease removal but may affect quality. |
Reduce from 2 layers to 1 layer. |
|
Bottom Interface Layers |
Layers between build plate and support; fewer layers can help with removal. |
Reduce from 2 layers to 1 layer. |
A higher top Z distance makes it easier to remove supports but can leave rougher surfaces. Fewer interface layers also help with removal but may affect the finish. Users should test these settings to find the right balance for their printer and material. For dissolvable supports, these adjustments can make the cleaning process even smoother.
Optimizing Support Placement
Optimizing support placement helps reduce material use and improves print quality. Users can follow several strategies to get the best results:
- Manually placing supports saves material and reduces post-processing time.
- Some slicers let users add or remove supports in specific areas.
- Supports act as scaffolding for suspended parts of the model during printing.
- The design and placement of supports must ensure they are strong enough to hold the model but easy to remove without damaging the final print.
Slicer algorithms look for overhanging or complex features that need extra help. They offer different support types, such as tree, linear/grid, and conical supports. Tree supports minimize contact with the model, making removal easier. Linear or grid supports provide strong support for large flat areas but can be harder to remove. Conical supports use a tapered design to reduce contact points. Custom manual supports allow for precise placement where needed.
Choosing the best support pattern in 3d printing depends on the model’s shape and the desired finish. Users should experiment with different patterns and settings to find what works best for each project. Good support structure setup leads to cleaner prints and less wasted material.
Removing and Troubleshooting Support Structures
Clean Removal Techniques
Removing support structures from a 3d printed object requires patience and the right approach. The process starts with removing easy-to-reach supports using needle-nose pliers or flush cutters. Internal supports often need a combination of tools for precision. A gentle touch prevents damage to the model. Many users rely on a craft knife to trim small remnants left behind. After rough removal, sanding the surface helps achieve a smooth finish. For complex prints, water-soluble supports can simplify the process. Adjusting support settings in slicer software for future prints can also improve removal.
Tip: Always let the print cool or cure fully before starting removal. Warm parts are more likely to deform or break.
Tools for Support Removal
Several tools help users remove supports efficiently and safely:
- Flush cutters and needle-nose pliers work well for breaking away large support pieces.
- X-Acto or craft knives provide precision for cutting small connections.
- Tweezers and dental tools reach tight spaces and remove fine debris.
- Files and sandpaper smooth rough areas after removal.
- A heat gun or hair dryer can soften stubborn supports for easier removal.
- Solvents like water or limonene dissolve soluble supports.
- An ultrasonic cleaner helps clean complex models after manual removal.
Common Support Issues and Fixes
Support removal can present several challenges. The table below outlines common issues and solutions:
|
Support Type |
Removal Method |
Tools Recommended |
Fixes and Tips |
|---|---|---|---|
|
Breakaway |
Snap or clip off manually |
Pliers, flush cutters, deburring tool |
Use support interface layers for cleaner detachment. |
|
Soluble |
Dissolve in water or limonene |
Water bath, ultrasonic cleaner, brush |
Allow enough time for full dissolution. |
|
Resin |
Clip close to contact point, sand |
Flush cutters, sandpaper, tweezers |
Work slowly around delicate features. |
|
Powder |
Remove loose powder manually |
Soft brush, air compressor, media blaster |
Let the print cool before handling. |
Fewer supports reduce post-processing time. Orienting the model to minimize the number of supports can speed up removal and improve results. Working slowly and using the right tools helps avoid damaging the final structure.
Mastering support structure in 3d printing involves several key steps. Users should choose the best part orientation, optimize supports, and adjust slicer settings for each structure. Selecting the right support type improves print quality and reduces failed prints. Experimenting with different techniques helps users find what works best for their models. Many tutorials and practical tests, such as the Massive Overhang Test, offer guidance for advanced learning.
FAQ
What is the main purpose of support structures in 3D printing?
Support structures hold up overhanging parts during printing. They prevent sagging and ensure the model keeps its shape. Removing supports after printing helps achieve clean results.
Can users print without supports?
Users can print without supports if the model has no steep overhangs or long bridges. Careful model orientation and design adjustments reduce the need for extra structures.
How do dissolvable supports work?
Dissolvable supports use special materials that break down in water or a chemical bath. This method leaves the model’s surface smooth and reduces manual cleanup.
What tools help with support removal?
Pliers, flush cutters, and craft knives help remove supports. Tweezers and sandpaper finish the process. These tools make post-processing easier and safer.
Does support material increase 3D printing costs?
Support material adds to the total cost. It uses extra filament and increases print time. Efficient support placement can help reduce waste and save money.