


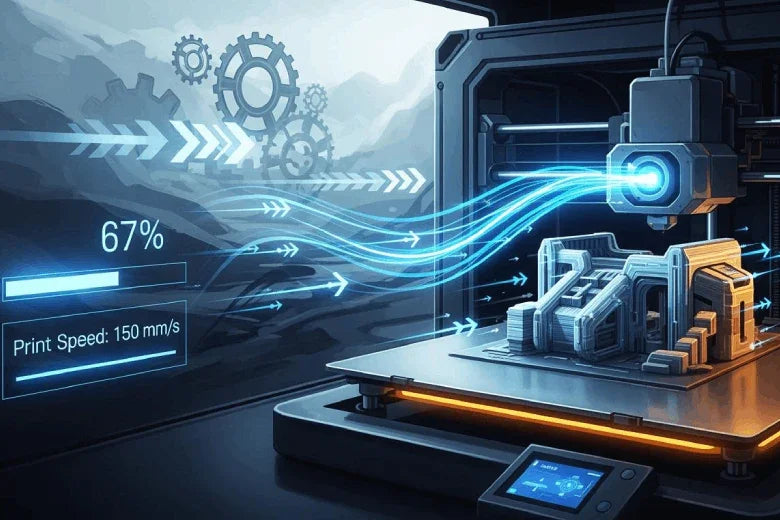
You can increase printing speed in 3D printing by fine-tuning printer settings, upgrading hardware, selecting fast-printing materials, and preparing your models for efficiency. Always balance speed with print quality and reliability. Try new approaches and test different settings to discover what works best for your projects.
Key Takeaways
- Fine-tune printer settings like layer height and infill to reduce print times while maintaining quality.
- Upgrade hardware components such as the hot end and extruder to enhance printing speed and reliability.
- Select high-flow materials like PLA for faster printing without sacrificing quality.
Optimize Printer Settings
Fine-tuning your printer settings is one of the most effective ways to increase printing speed in 3D printing. By making smart adjustments in your slicer software, you can reduce print times while maintaining acceptable quality. Let’s break down the key settings you should focus on:
Adjust Layer Height
Layer height determines how thick each printed layer will be. Thicker layers mean fewer layers to print, which directly reduces print time. However, you must balance speed with surface finish and part strength.
|
Aspect |
Explanation |
|---|---|
|
Surface Finish |
Thinner layers make smoother surfaces and better curves. |
|
Strength |
Smaller layer heights help layers stick better, making parts stronger. |
|
Print Time |
Larger layer heights print faster because there are fewer layers. |
- Use a 0.15mm layer height for most prints.
- For faster prints, increase to 0.3mm, but avoid exceeding 0.4mm.
- Always test your settings on a small model before committing to a large print.
Use Larger Nozzle Size
Nozzle size affects how much material your printer can lay down in each pass. Larger nozzles extrude more filament, which speeds up the process.
- Larger nozzles extrude more material per pass, leading to faster print times.
- They work best for large-scale projects where fine detail is less important.
- Smaller nozzles provide better detail and layer adhesion but slow down the process.
- A medium-sized nozzle (like 0.4 mm) often balances speed and quality well.
Switching to a larger nozzle is a simple way to increase printing speed, especially for prototypes or functional parts where surface detail is not critical.
Set Infill and Shell Layers for Speed
Infill and shell settings have a big impact on print duration. Increasing infill percentage means more material and longer print times. Simpler infill patterns, such as Linear or Diagonal, print faster than complex ones like Hexagonal. Lowering the number of shell layers also reduces print time, but you should ensure your part remains strong enough for its intended use.
Note: For most projects, use the lowest infill percentage and shell count that still meets your strength requirements. This approach helps you increase printing speed without sacrificing too much durability.
Increase Print and Travel Speeds
Print speed controls how fast your printer moves while extruding filament, while travel speed sets the pace for non-printing moves. Adjusting these speeds can significantly reduce print times, but you must avoid going too fast, which can cause quality issues.
|
Setting Type |
Recommendation |
Impact on Quality and Speed |
|---|---|---|
|
Travel Speed |
Increase for faster movement without extruding material. |
Reduces print time but may cause imprecise prints if too high. |
|
Initial Layer Speed |
Keep slower for better adhesion. |
Ensures solid foundation, improving overall print quality. |
|
Printer Calibration |
Calibrate regularly for speed and precision. |
Poor calibration leads to quality issues and longer prints. |
|
Slicing Software |
Adjust print speed and layer thickness for optimization. |
Balances speed and detail, affecting overall print time. |
|
Material Type |
Use PLA for faster printing; ABS may require slower speeds. |
Material properties influence optimal speed settings. |
Maximize Volumetric Flow Rate
Volumetric flow rate measures how much plastic your hotend and extruder can push through per second. This value sets the upper limit for how fast you can print without under-extrusion.
|
Parameter |
Description |
|---|---|
|
Volumetric Flow Rate |
The amount of material extruded per second (mm³/s). |
|
Layer Height |
The thickness of each printed layer (mm). |
|
Line Width |
The width of the extruded filament line (mm). |
|
Print Speed |
Calculated speed based on volumetric flow rate, layer height, and line width (mm/s). |
|
Formula |
Print Speed (mm/s) = Volumetric Flow Rate (mm³/s) / (Layer Height (mm) × Line Width (mm)) |
For example, if your hotend can extrude 24 mm³/s and you use a 0.4 mm line width with a 0.2 mm layer height, your maximum print speed is 300 mm/s.
- Always check your printer’s maximum volumetric flow rate.
- Avoid exceeding this limit to prevent under-extrusion and poor layer adhesion.
By optimizing these settings, you can increase printing speed while still producing reliable, high-quality prints. Experiment with each parameter to find the best combination for your printer and project needs.
Upgrade Hardware to Increase Printing Speed
Upgrading your 3D printer’s hardware can dramatically improve how quickly you complete projects. When you invest in better components, you unlock higher speeds and more reliable performance. Let’s explore the most impactful upgrades.
Install Powerful Hot End
A powerful hot end allows you to melt and extrude filament much faster. Standard hot ends, like the E3D V6, reach a volumetric flow rate of about 15 mm³/s. If you switch to a high-flow model, such as the E3D Volcano, you can achieve rates up to 25 mm³/s. This boost lets you print with larger nozzle diameters and tackle bigger models without slowing down.
Experiments show that standard hot ends often struggle to keep up during fast prints. You may notice under-extrusion, which leads to weak parts and poor surface quality. Upgrading to a high-flow hot end solves these problems and helps you increase printing speed for demanding projects.
Tip: When you install a new hot end, recalibrate your printer’s temperature and flow settings. This ensures consistent extrusion and prevents clogs.
Upgrade Extruder
Your extruder controls how much filament reaches the hot end. A robust extruder pushes filament smoothly, even at higher speeds. If you upgrade to a direct drive or high-torque extruder, you can print faster and handle flexible or abrasive materials with ease.
- A 4.3mm wide extrusion produces a fine appearance and smooth surface finish.
- A 3mm wide extrusion often looks rougher, showing that wider extrusions can improve print quality.
- Both extrusions use a layer height of 0.6mm, so you can optimize speed without sacrificing quality.
When you pair a powerful extruder with a high-flow hot end, you maximize your printer’s output. This combination lets you print larger layers and wider lines, which shortens print times and maintains strong, attractive parts.
Update Firmware
Firmware upgrades unlock new features and improve your printer’s speed and stability. Modern firmware, like Klipper, supports advanced motion control and real-time processing. Klipper’s architecture offloads calculations to a host computer, so your printer handles complex commands without lag. This setup boosts performance during high-speed printing.
|
Firmware |
|
|---|---|
|
8-bit RAM board |
> 100,000 |
|
32-bit systems |
> 600,000 |
New firmware features help you print faster and cleaner:
- Smooth Pressure Advance reduces oozing during extrusion.
- Input Shaping minimizes vibrations for sharper prints.
- Modular design supports multiple microcontrollers for customization.
When you update your firmware, you enable your printer to process more steps per second. This upgrade lets you run faster print jobs without losing accuracy or stability.
Note: Always back up your printer’s settings before updating firmware. Test your printer after the update to confirm everything works as expected.
By upgrading your hot end, extruder, and firmware, you can increase printing speed and achieve better results. These hardware improvements give you more control and flexibility, making your 3D printing experience faster and more reliable.
Choose Fast-Printing Materials
Selecting the right filament plays a crucial role when you want to increase printing speed. Some materials allow you to print faster without sacrificing quality. You should always consider the properties of each filament before starting a new project.
Select High-Flow Filaments
High-flow filaments are engineered for rapid extrusion and consistent performance. These materials feature optimized flow properties, enhanced temperature control, and improved cooling systems. You can find high-flow versions of common materials such as PLA, ABS, and ASA. Each offers unique benefits for fast printing.
|
Characteristic |
Description |
|---|---|
|
Optimized Flow Properties |
Prevent clogging and uneven extrusion during high-speed printing. |
|
Temperature Control |
Maintains correct temperature for smooth, rapid extrusion. |
|
Cooling Systems |
Enables quick solidification, preserving print quality at high speeds. |
|
Layer Adhesion |
Ensures strong bonds between layers, even at increased speeds. |
|
Durability |
Provides strength and heat resistance for demanding applications. |
|
UV Resistance |
ASA filaments resist sunlight, ideal for outdoor use. |
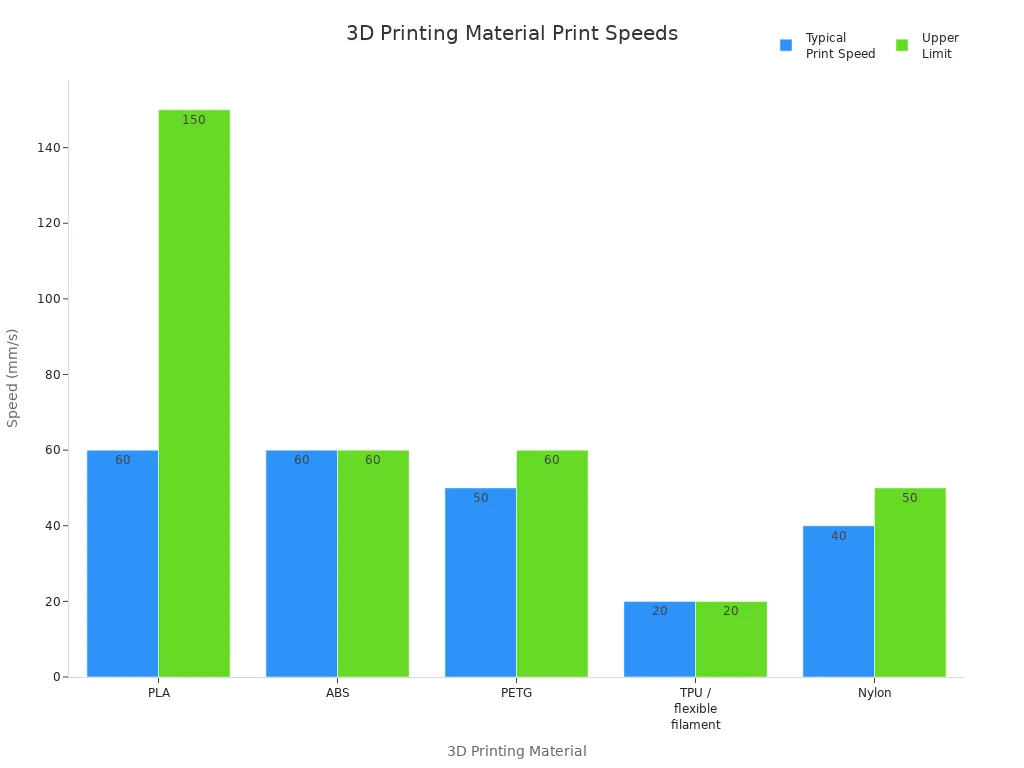
You can compare typical print speeds for popular materials in the table below:
|
3D printing material |
Typical print speed |
Upper limit |
Explanation |
|---|---|---|---|
|
PLA |
60 mm/s |
150 mm/s |
Low extrusion temperature allows for rapid printing without warping. |
|
ABS |
60 mm/s |
60 mm/s |
Higher extrusion temperature limits speed due to warping. |
|
PETG |
50 mm/s |
60 mm/s |
Requires fast travel speeds but generally prints at 50 mm/s. |
|
TPU / flexible filament |
20 mm/s |
20 mm/s |
Needs slow speeds to avoid clogs and jams. |
|
Nylon |
40 mm/s |
50 mm/s |
Faster than TPU but slower than PLA, ABS, and PETG. |
Optimize Material Temperature
You must set the correct temperature for your chosen filament to achieve fast and high-quality prints. Higher temperatures keep the filament molten, allowing for smooth flow at increased speeds. Lower temperatures work better for slow prints and help prevent issues like stringing or over-extrusion.
- Adjust the hotend temperature to match the filament’s recommended range.
- Monitor layer adhesion and surface finish during test prints.
- Increase temperature slightly if you notice under-extrusion at higher speeds.
Proper temperature management ensures strong layer bonding and a smooth surface. You can experiment with small changes to find the best settings for your printer and material.
Prepare Models for Speed

When you want to increase printing speed, you should start by preparing your 3D models for efficiency. Careful model preparation can save hours on large projects and improve your overall results.
Simplify Geometry
Simple models print faster and use less material. You can streamline your designs by removing unnecessary features and using basic shapes. Hollowing out models, when possible, also reduces print time and filament use. The table below outlines effective techniques for model simplification:
|
Technique |
Description |
|---|---|
|
Optimize Wall Thickness |
Keep wall thickness consistent. Use slightly thicker walls with lower infill for strength and speed. |
|
Control Infill Density and Pattern |
Choose fast infill patterns like Lines or Grid. Lower infill density for non-structural parts. |
|
Choose the Right Printing Orientation |
Place visible surfaces upward and minimize model height to reduce layer count and print time. |
|
Simplify Model Geometry |
Remove small details and use simple shapes. Hollow models if strength is not compromised. |
Minimize Overhangs and Details
Complex designs with many overhangs or fine details require extra support structures. These supports increase both print time and material usage. By reducing overhangs and simplifying intricate features, you streamline the printing process and make post-processing easier.
- Fewer supports mean faster prints.
- Simple shapes reduce the risk of print failure.
- Less detail leads to smoother surfaces and easier finishing.
Orient for Fewer Supports
Proper orientation of your model can further reduce the need for supports and speed up printing. Consider these best practices:
- Align layers so that critical forces act parallel to the X-Y plane.
- Analyze stress points to ensure strong filament paths.
- Rotate parts to minimize steep overhangs.
- Place intricate features horizontally to protect them and reduce support requirements.
By preparing your models with these strategies, you can achieve faster, more reliable prints without sacrificing essential strength or appearance.
Balance Speed and Quality
Identify Trade-Offs
When you try to increase printing speed, you often face a trade-off between speed and print quality. Faster settings can reduce detail, strength, or accuracy. You need to find the right balance for your project. The table below shows how orientation, retraction speed, and wall thickness affect quality:
|
Parameter |
Best Retraction Speed |
Wall Thickness |
Quality Score (out of 10) |
|---|---|---|---|
|
0° Orientation |
75 mm/s |
1 |
Highest |
|
45° Orientation |
75 mm/s |
N/A |
Highest |
|
90° Orientation |
30 mm/s, 75 mm/s |
2 |
Highest |
|
Dimensional Accuracy |
90° Orientation |
N/A |
Lowest Error |
You can see that orientation and wall thickness play a big role in both speed and quality. Adjust these parameters based on your needs.
Avoid Common Pitfalls
Printing at higher speeds introduces new challenges. Watch out for these common issues:
- Nozzle clogging and jams can stop your print.
- Prints may detach from the build plate, wasting time and material.
- Layer shifting causes misaligned prints.
- Print quality can drop, with weak layers or poor resolution.
- Energy use increases, raising costs.
- Failed prints create more waste.
- Printer parts may wear out faster.
You should monitor your printer and make adjustments to avoid these problems.
Tips for Reliable Fast Printing
To print faster without losing reliability, follow these proven tips:
- Select a higher speed setting in your slicer.
- Switch to a faster material when possible.
- Lower infill density for non-structural parts.
- Choose a simple infill pattern to reduce print head movement.
- Print thinner walls if strength is not critical.
- Use a larger nozzle to boost material flow.
By following these tips, you can increase printing speed while keeping your prints strong and accurate.
Test and Fine-Tune Printing Speed
Step-by-Step Speed Testing
You can achieve the best results by following a structured approach to speed testing. Start with a retraction test model in your slicer. Set your initial retraction settings based on the filament type, such as 1.5 mm for PLA. Print the test model and check for stringing. Adjust the retraction settings until you see minimal stringing. Next, determine the maximum volumetric speed your printer can handle. Adjust acceleration and jerk settings to balance speed and print quality. Understanding volumetric speed helps you maintain consistent extrusion and avoid under-extrusion as you increase printing speed.
Monitor Print Quality
You should monitor print quality closely during high-speed printing. Use these best practices:
- Maintain humidity between 30-50% to prevent filament moisture issues.
- Place your printer on a stable surface or use vibration-dampening pads to reduce movement.
- Check part dimensions with precision tools to ensure accuracy.
- Use high-resolution cameras or sensors for real-time monitoring and quick adjustments.
These steps help you catch problems early and keep your prints looking sharp.
Adjust for Your Printer
Every 3D printer model responds differently to speed changes. Use the table below to guide your adjustments:
|
Setting Type |
Description |
Common Adjustment Practice |
|---|---|---|
|
Print Speed |
Controls X, Y, and extruder movement speed |
Test with increasing speeds |
|
Outer Wall/Shell Speed |
Affects outer surface quality |
Decrease slightly for better finish |
|
Infill Speed |
Internal structure speed |
Match overall print speed |
|
Top/Bottom Speed |
Surface layer speed |
Decrease slightly for smoother layers |
|
Travel Speed |
Non-extruding movement speed |
Start at 100 mm/s and adjust as needed |
|
Retraction Speed |
Filament pull-back speed |
Test various speeds to reduce stringing |
|
Layer Height |
Thickness of each layer |
Increase for faster prints |
Fine-tuning these settings ensures your printer operates at its best, giving you reliable results every time.
You can increase printing speed by using larger nozzles, batch production, and high-flow hotends. Regular calibration and maintenance help prevent breakdowns. Choose the right technology and software to balance speed and quality. Experiment with settings and designs to find what works best for your setup. 🚀
FAQ
What is the safest way to increase 3D printing speed?
You should start by adjusting layer height and infill settings in your slicer. Test changes on small models to avoid quality issues.
Will faster printing always reduce print quality?
|
Speed Increase |
Print Quality Impact |
|---|---|
|
Moderate |
Slightly lower |
|
High |
Noticeable drop |
You may see rough surfaces or weak layers at higher speeds.
Can you use any filament for high-speed printing?
- You should choose PLA or high-flow filaments for best results.
- Flexible or specialty filaments often require slower speeds to prevent jams.