


To achieve the best results with any 3d printer, users should clean the nozzle regularly. The most effective ways to clean the nozzle include using a needle, performing a cold pull, soaking in solvent, applying a heat gun, scrubbing with a brass brush, or wiping with alcohol. Regular nozzle cleaning routine helps enhance layer adhesion, reduces stringing, and ensures consistent filament flow. After users unclog 3d printer nozzle, print quality often returns to near-factory precision. Nozzle maintenance remains manageable for all skill levels. Anyone can clean their 3d printer nozzle and improve results by following simple steps.
Key Takeaways
- Regularly clean your 3D printer nozzle to prevent clogs and ensure high-quality prints. Aim to clean it every 10 to 20 prints.
- Use the cold pull method for soft clogs. This gentle technique effectively removes residue without damaging the nozzle.
- Inspect filament quality and moisture levels. Store filament in airtight containers to avoid clogs caused by moisture absorption.
- Adjust printer settings according to filament type. Proper temperature and retraction settings help maintain smooth extrusion and reduce clogs.
- Gather all cleaning tools before starting. A well-prepared cleaning kit makes the process smoother and more efficient.
Quick Ways to Clean the Nozzle
Best Cleaning Methods
A 3d printer nozzle can clog for many reasons, but several quick cleaning methods help restore smooth operation. Users often rely on a cleaning needle, cold pull, soaking, heat gun, brass brush, or alcohol wipe. Each method targets different types of blockages and residue. The table below summarizes the most effective cleaning methods and their descriptions:
|
Cleaning Method |
Description |
|---|---|
|
Use high-quality filament |
Cheap filament can contain dust or inconsistent thickness that gums up nozzles fast. |
|
Keep filament dry |
Moist filament prints poorly and leaves behind moisture-induced bubbles that clog your nozzle. |
|
Regularly perform cold pulls |
These simple maintenance pulls are surprisingly effective at keeping residue build-up in check. |
|
Print at the right temperature |
Too hot or too cold harms extrusion and encourages clogs. |
|
Clean your nozzle after every few prints |
A quick wipe, heat up, or cold pull routine can prevent nasty blockages from settling in. |
For a fast fix, many users pause the 3d printer and heat the nozzle slightly above normal temperature. This loosens stuck filament. A cleaning needle can gently poke through the nozzle tip to clear a partial clog. Running a short filament purge also helps push out soft blockages. Cold pulls grab residue inside the nozzle and remove it with the filament.
When to Use Each Method
Choosing the right cleaning method depends on the type of clog and the material inside the nozzle. The table below compares two popular methods:
|
Method |
Best Use |
Pros |
Cons |
|---|---|---|---|
|
Cold Pull |
Soft clogs and filament residues |
Gentle, inexpensive, reusable |
May require multiple attempts |
|
Cleaning Needle / Wire |
Partial or hard clogs |
Precise, fast action |
Risk of nozzle damage if careless |
A cold pull works best for soft filament residue or minor buildup. This method is gentle and does not require extra tools. For hard or partial clogs, a cleaning needle provides precise action. Users should insert the needle carefully to avoid damaging the nozzle. When removing PLA clogs, experts recommend heating the nozzle to 250°C, lowering the heatbed, and using a pin or needle. After confirming flow, a cold pull ensures the nozzle is fully clean.
Tip: Clean the nozzle after every few prints to prevent stubborn clogs and keep the 3d printer running smoothly.
Identify 3D Printer Nozzle Clogs
Signs of a Clogged Nozzle
A 3D printer often shows clear signs when the nozzle becomes clogged. Users may notice uneven extrusion or gaps in printed layers. Sometimes, filament stops coming out entirely, even though the extruder motor keeps moving. A clogged nozzle can also cause clicking sounds from the extruder or sudden pauses during printing. These symptoms signal that the nozzle needs attention.
A clogged nozzle often leads to rough surfaces and uneven textures on printed objects. Misaligned walls and ringing may appear, showing that the nozzle cannot maintain a steady flow. The table below highlights common symptoms and their impact:
|
Symptoms of Clogged Nozzle |
Impact on Dimensional Accuracy |
|---|---|
|
Rough surfaces and uneven textures |
These issues can compromise the overall dimensional accuracy of the print. |
|
Misaligned walls and ringing |
These geometric defects reflect inconsistencies in the nozzle, affecting precision. |
Print Quality Problems
A clogged nozzle affects print quality in several ways. Inconsistent extrusion causes under-extrusion, which leads to visible defects and rough surfaces. These problems can result in misaligned walls and geometric inaccuracies, especially in fine features. The following table explains how a clogged nozzle impacts dimensional accuracy:
|
Evidence |
Explanation |
|---|---|
|
A clogged nozzle can lead to inconsistent extrusion. |
This inconsistency directly affects the dimensional accuracy of 3D printed objects. |
|
Under-extrusion can lead to rough surfaces and visible defects. |
These defects can result in misaligned walls and geometric inaccuracies, particularly in fine features. |
Seam lines and thin features may show localized buildups or offsets. Poor printer tuning or aggressive slicer settings can make these problems worse. When the nozzle remains clogged, print quality drops, and objects lose their intended shape.
Note: Regular inspection of the nozzle helps prevent clogs and keeps print quality high.
Why Nozzles Get Clogged
Common Causes
Nozzles in 3D printers face clogs for several reasons. Most clogs start with material problems or improper printer operation. Manufacturers report that moisture in the material often leads to bubbles during extrusion. These bubbles disrupt the flow and cause blockages inside the nozzle. Low-quality or contaminated material can introduce impurities that build up over time. This buildup restricts the nozzle opening and increases the risk of clogs. Improper retraction settings also play a role. When the printer pulls material back too far, it can cool and solidify inside the nozzle, creating stubborn clogs. Incorrect temperature settings make the situation worse. If the material does not melt evenly, it can leave behind filament residue that blocks the nozzle.
Tip: Regular inspection and cleaning of nozzles help prevent unexpected clogs and keep material flowing smoothly.
The following list highlights the most common causes of nozzle clogs:
- Filament degradation from moisture absorption
- Excessive or improper retraction settings
- Low-quality or contaminated material
- Incorrect temperature settings during printing
Filament and Settings Issues
Material selection and printer settings have a direct impact on nozzle performance. Many types of material absorb moisture from the air. Even factory-sealed spools can contain water. When heated, this moisture creates bubbles and weakens the material, leading to clogs. Some materials, such as PLA or PETG, require specific temperature ranges to melt properly. Printing outside these ranges can cause incomplete melting or carbonized material, which blocks the nozzle.
A table below summarizes how different material properties and settings affect nozzle clogs:
|
Evidence Type |
Description |
|---|---|
|
Hygroscopic Nature |
Many plastics absorb moisture, so drying before use is important. |
|
Impact of Moisture |
Moisture causes bubbles or degradation in the material, leading to clogs. |
|
Nozzle Clogs |
Clogs result from contaminants, carbonized material, or incomplete melting. |
Filament impurities also contribute to clogs. Inconsistent diameter or foreign particles in the material can collect inside nozzles and cause blockages. Calibration ensures the printer operates within ideal parameters for each material. Retraction settings must match the material type. Aggressive retraction can pull material into cooler parts of the hotend, where it solidifies and forms clogs. Proper temperature settings help the material flow smoothly and prevent filament residue from sticking inside nozzles.
Note: Testing different material profiles and drying spools before printing can reduce the risk of clogs and extend nozzle life.
Step-by-Step: Clean the Nozzle
Tools and Supplies
To clean the nozzle and achieve the best results, users need the right tools and supplies. A well-prepared cleaning kit makes the process easier and safer. The following items help users clean their 3d printer nozzle effectively:
- 40Pcs 3D Printer Nozzle Cleaning Kit: Stainless steel cleaning needles for unclogging nozzles.
- Clog Poke Tool: Long tool for reaching deep blockages in the hotend.
- Brass Mini Brushes: Soft brushes for removing burnt filament and residue.
- Small blade or hobby knife: For scraping off stubborn debris.
- Isopropyl alcohol, acetone, or ethyl acetate: For soaking and chemical cleaning.
- Heat gun or hair dryer: For hot cleaning.
- Clean cloth or paper towel: For wiping the nozzle.
- Safety gloves and eye protection: For personal safety.
The 40Pcs Nozzle Cleaning Kit allows users to clean the nozzle quickly, especially when it is warm. The Clog Poke Tool reaches deep blockages without needing to disassemble the printer. Brass Mini Brushes help clean the nozzle after long printing sessions.
Tip: Always gather all supplies before starting to clean your 3d printer. This helps prevent interruptions and ensures smooth results.
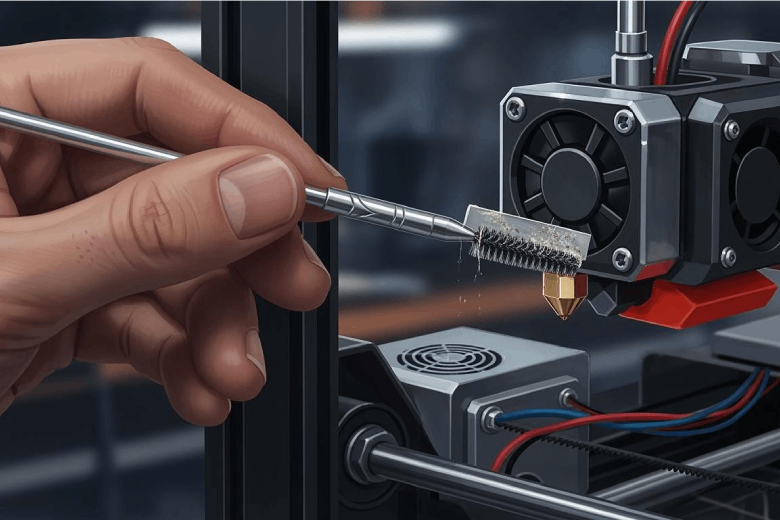
Manual Cleaning (Needle, Brush, Blade)
Manual cleaning works well for most nozzle clogs. Users should turn off the power to the printer before starting. They can use a cleaning needle to gently poke through the nozzle tip and remove blockages. Brass brushes help clean burnt filament from the outside of the nozzle. A small blade or hobby knife scrapes off stubborn residue.
|
Description |
|
|---|---|
|
Turn off power |
Always turn off the printer before cleaning to avoid electrical hazards. |
|
Be cautious around wiring |
Take care not to damage the wiring around the print head while cleaning. |
|
Use a wire brush carefully |
Avoid the thermistor and heater cables, or turn off power after heating. |
|
Consider a silicon cover |
Using a silicon cover for the heat block can provide additional safety. |
|
Avoid flammable substances |
Do not use flammable alcohol on a hot nozzle to prevent fire hazards. |
Users should insert the needle gently to avoid damaging the nozzle. They can use the brass brush to clean the nozzle surface, but must avoid touching wires or sensors. A silicon cover protects the heat block and makes cleaning safer.
Note: Manual cleaning is quick and effective for minor clogs. Users should clean the nozzle after every few prints to maintain print quality.
Cold Pull Method
The cold pull method helps clean the nozzle by removing soft filament residue inside. Users heat the nozzle to the melting temperature of the last filament used. They then insert a filament, such as PLA, PETG, or nylon, and push it through. After cooling the nozzle slightly, they pull the filament out, which grabs and removes debris.
- PLA works in a pinch for cold pulls.
- Nylon is the gold standard for cleaning.
- Dedicated cleaning filament also works well.
|
Recommended Filament |
|
|---|---|
|
SF Nozzle |
PLA or PETG |
|
HF Nozzle |
PETG |
Users should repeat the cold pull until the filament comes out clean. This method does not require extra tools and is gentle on the nozzle.
Soaking and Chemical Cleaning
Soaking and chemical cleaning help remove stubborn clogs from the nozzle. Users should remove the nozzle from the printer and place it in a safe container. They can choose a chemical based on the filament type:
- Acetone dissolves ABS clogs quickly; soak for 10-20 minutes.
- Ethyl acetate works well for PLA; soak for 15-25 minutes.
- Isopropyl alcohol is slower but safer; soak for 30 minutes to an hour.
|
Chemical |
Effective For |
Soaking Time |
|---|---|---|
|
Acetone |
ABS |
10-20 minutes |
|
Ethyl Acetate |
PLA |
15-25 minutes |
|
Isopropyl Alcohol |
General use |
30 minutes to 1 hour |
After soaking, users should rinse the nozzle with water and dry it completely. They can use a cleaning needle or brush to remove any remaining debris.
Note: Users must avoid flammable substances on a hot nozzle. Always clean the nozzle in a well-ventilated area and wear gloves for safety.
Hot Cleaning (Cloth, Alcohol, Heat Gun)
Hot cleaning uses heat to soften and remove hardened filament inside the nozzle. Users should heat the printer’s hot end to the melting temperature of the last filament used, such as 200°C for PLA or 240°C for ABS. This process softens any hardened filament and makes it easier to clean.
- Heat the nozzle to the correct temperature.
- Use a clean cloth or paper towel to wipe away softened residue.
- Apply isopropyl alcohol to the cloth for extra cleaning power, but only when the nozzle is cool.
- Use a heat gun or hair dryer to heat the nozzle if needed.
Users must avoid using flammable alcohol on a hot nozzle to prevent fire hazards. They should clean the nozzle gently to avoid damaging the tip.
Tip: Hot cleaning works well for removing tough clogs and burnt filament. Users should clean their 3d printer nozzle with this method after printing with high-temperature materials.
Reassembly and Testing
After cleaning, users should reassemble the nozzle and test the printer. They must ensure all parts are secure and wires are undamaged. Users should heat the nozzle and extrude a small amount of filament to check flow. If the filament flows smoothly, the nozzle is clean and ready for use.
Users should run a test print to confirm results. Clean the nozzle after every few prints to maintain high print quality and prevent future clogs.
Note: Regular cleaning and testing help users achieve the best results with their 3d printer. Clean your 3d printer nozzle often for consistent performance.
Prevent Nozzle Clogs on Your 3D Printer
Maintenance Tips
Regular maintenance keeps a 3d printer running smoothly and helps prevent clogs in the nozzle. Users should follow a schedule to keep the printer in top condition. The table below shows how often to perform each task:
|
Frequency |
Task |
|---|---|
|
Daily |
Inspect nozzle and print bed for debris |
|
Weekly |
Clean print bed and check belt tension |
|
Bi-weekly |
Thorough nozzle cleaning and lubrication |
|
Quarterly |
Disassemble and clean the hot end thoroughly |
A daily inspection of the nozzle helps catch problems early. Cleaning the nozzle every two weeks removes buildup before it becomes a clog. Full hot-end disassembly every few months ensures deep cleaning and long-term prevention.
Tip: Consistent maintenance routines extend the life of a 3d printer and improve print quality.
Filament Care
Proper filament care plays a big role in nozzle health. High-quality filament from reputable brands reduces the risk of impurities that can block the nozzle. Users should store filament in airtight containers with desiccants to keep moisture away. Moisture in filament causes bubbles during printing, which can lead to clogs.
A good storage setup includes:
- Airtight containers or vacuum-sealed bags
- Silica gel packets to absorb moisture
- Hygrometers to monitor humidity below 20%
- Storage in a cool, dark place
- Filament dryers for sensitive materials like nylon
These steps help keep filament dry and ready for use, supporting prevention of nozzle blockages.
Printer Settings
Printer settings affect how well a 3d printer avoids nozzle clogs. Users should match temperature settings to the filament manufacturer's recommendations. Retraction settings also matter. Excessive retraction can cause heat buildup and filament sticking inside the nozzle. Keeping retraction close to default values helps prevent clogs.
Key steps for optimal settings:
- Adjust temperature for each filament type
- Fine-tune retraction to minimize buildup
- Avoid unnecessary changes to default settings
Careful adjustment of these settings supports smooth extrusion and reduces the risk of nozzle problems.
Cleaning the nozzle of a 3d printer leads to high-quality prints and fewer failures. Regular nozzle maintenance prevents clogs and keeps material flowing smoothly. Users who clean the nozzle often see longer nozzle lifespan and less wear on printer parts. Adopting daily cleaning habits reduces jams and wasted materials.
- Regular cleaning prevents clogs and failed prints.
- Consistent nozzle care ensures accurate results.
- Brass nozzles last about six months, while ruby-tipped nozzles last several years.
Take action now for hassle-free printing and reliable results.
FAQ
How often should someone clean a 3D printer nozzle?
Most users clean the nozzle every 10 to 20 prints. Heavy use or frequent material changes may require more frequent cleaning. Regular inspection helps prevent clogs and keeps print quality high.
Can a clogged nozzle damage the printer?
A clogged nozzle can strain the extruder motor and cause skipped steps. Over time, this stress may damage the hotend or other components. Early cleaning prevents costly repairs.
What is the safest way to remove a stubborn clog?
The cold pull method offers a safe and effective way to remove most clogs. This technique avoids harsh chemicals and reduces the risk of damaging the nozzle.
Which filaments cause the most nozzle clogs?
|
Filament Type |
Clog Risk Level |
|---|---|
|
ABS |
Medium |
|
PLA |
Low |
|
PETG |
Medium |
|
Nylon |
High |
Nylon absorbs moisture quickly and clogs more often than PLA or ABS.
Is it necessary to replace the nozzle after cleaning?
Most nozzles work well after cleaning. Replace the nozzle if it shows wear, damage, or persistent clogs. Brass nozzles wear faster than hardened steel or ruby-tipped versions.